Auto Fib Retracements – Confirmed PivotsDraws up to 24 Fibonacci retracement and extension levels from the most recent confirmed swing high/low.
Uses pivot detection with user-set left/right bar counts to identify swings and auto-determine direction, with manual overrides for Up or Down moves.
Features:
• Toggle visibility of each individual Fib level
• Per-level custom colors or pre-set palettes (Classic, Monochrome, Heatmap, Pastel)
• Optional log-scale Fib calculation
• Label options: show Fib level, price, or both; set horizontal & vertical placement; ATR-based offsets; background transparency
• Zoom-friendly — lines and labels stay anchored and scale with chart zoom
• Extend levels to the right or limit them to the swing only
Tips:
• Pivot Left / Pivot Right = bars to left/right used to confirm a swing
• In “Auto” direction mode, script chooses Low→High or High→Low based on most recent swings
• Turn on/off each Fib level under “Levels (toggle each)” group
• For sharp charts, keep only the most useful levels visible to avoid clutter
Göstergeler ve stratejiler

Seasonality Monte Carlo Forecaster [BackQuant]Seasonality Monte Carlo Forecaster
Plain-English overview
This tool projects a cone of plausible future prices by combining two ideas that traders already use intuitively: seasonality and uncertainty. It watches how your market typically behaves around this calendar date, turns that seasonal tendency into a small daily “drift,” then runs many randomized price paths forward to estimate where price could land tomorrow, next week, or a month from now. The result is a probability cone with a clear expected path, plus optional overlays that show how past years tended to move from this point on the calendar. It is a planning tool, not a crystal ball: the goal is to quantify ranges and odds so you can size, place stops, set targets, and time entries with more realism.
What Monte Carlo is and why quants rely on it
• Definition . Monte Carlo simulation is a way to answer “what might happen next?” when there is randomness in the system. Instead of producing a single forecast, it generates thousands of alternate futures by repeatedly sampling random shocks and adding them to a model of how prices evolve.
• Why it is used . Markets are noisy. A single point forecast hides risk. Monte Carlo gives a distribution of outcomes so you can reason in probabilities: the median path, the 68% band, the 95% band, tail risks, and the chance of hitting a specific level within a horizon.
• Core strengths in quant finance .
– Path-dependent questions : “What is the probability we touch a stop before a target?” “What is the expected drawdown on the way to my objective?”
– Pricing and risk : Useful for path-dependent options, Value-at-Risk (VaR), expected shortfall (CVaR), stress paths, and scenario analysis when closed-form formulas are unrealistic.
– Planning under uncertainty : Portfolio construction and rebalancing rules can be tested against a cloud of plausible futures rather than a single guess.
• Why it fits trading workflows . It turns gut feel like “seasonality is supportive here” into quantitative ranges: “median path suggests +X% with a 68% band of ±Y%; stop at Z has only ~16% odds of being tagged in N days.”
How this indicator builds its probability cone
1) Seasonal pattern discovery
The script builds two day-of-year maps as new data arrives:
• A return map where each calendar day stores an exponentially smoothed average of that day’s log return (yesterday→today). The smoothing (90% old, 10% new) behaves like an EWMA, letting older seasons matter while adapting to new information.
• A volatility map that tracks the typical absolute return for the same calendar day.
It calculates the day-of-year carefully (with leap-year adjustment) and indexes into a 365-slot seasonal array so “March 18” is compared with past March 18ths. This becomes the seasonal bias that gently nudges simulations up or down on each forecast day.
2) Choice of randomness engine
You can pick how the future shocks are generated:
• Daily mode uses a Gaussian draw with the seasonal bias as the mean and a volatility that comes from realized returns, scaled down to avoid over-fitting. It relies on the Box–Muller transform internally to turn two uniform random numbers into one normal shock.
• Weekly mode uses bootstrap sampling from the seasonal return history (resampling actual historical daily drifts and then blending in a fraction of the seasonal bias). Bootstrapping is robust when the empirical distribution has asymmetry or fatter tails than a normal distribution.
Both modes seed their random draws deterministically per path and day, which makes plots reproducible bar-to-bar and avoids flickering bands.
3) Volatility scaling to current conditions
Markets do not always live in average volatility. The engine computes a simple volatility factor from ATR(20)/price and scales the simulated shocks up or down within sensible bounds (clamped between 0.5× and 2.0×). When the current regime is quiet, the cone narrows; when ranges expand, the cone widens. This prevents the classic mistake of projecting calm markets into a storm or vice versa.
4) Many futures, summarized by percentiles
The model generates a matrix of price paths (capped at 100 runs for performance inside TradingView), each path stepping forward for your selected horizon. For each forecast day it sorts the simulated prices and pulls key percentiles:
• 5th and 95th → approximate 95% band (outer cone).
• 16th and 84th → approximate 68% band (inner cone).
• 50th → the median or “expected path.”
These are drawn as polylines so you can immediately see central tendency and dispersion.
5) A historical overlay (optional)
Turn on the overlay to sketch a dotted path of what a purely seasonal projection would look like for the next ~30 days using only the return map, no randomness. This is not a forecast; it is a visual reminder of the seasonal drift you are biasing toward.
Inputs you control and how to think about them
Monte Carlo Simulation
• Price Series for Calculation . The source series, typically close.
• Enable Probability Forecasts . Master switch for simulation and drawing.
• Simulation Iterations . Requested number of paths to run. Internally capped at 100 to protect performance, which is generally enough to estimate the percentiles for a trading chart. If you need ultra-smooth bands, shorten the horizon.
• Forecast Days Ahead . The length of the cone. Longer horizons dilute seasonal signal and widen uncertainty.
• Probability Bands . Draw all bands, just 95%, just 68%, or a custom level (display logic remains 68/95 internally; the custom number is for labeling and color choice).
• Pattern Resolution . Daily leans on day-of-year effects like “turn-of-month” or holiday patterns. Weekly biases toward day-of-week tendencies and bootstraps from history.
• Volatility Scaling . On by default so the cone respects today’s range context.
Plotting & UI
• Probability Cone . Plots the outer and inner percentile envelopes.
• Expected Path . Plots the median line through the cone.
• Historical Overlay . Dotted seasonal-only projection for context.
• Band Transparency/Colors . Customize primary (outer) and secondary (inner) band colors and the mean path color. Use higher transparency for cleaner charts.
What appears on your chart
• A cone starting at the most recent bar, fanning outward. The outer lines are the ~95% band; the inner lines are the ~68% band.
• A median path (default blue) running through the center of the cone.
• An info panel on the final historical bar that summarizes simulation count, forecast days, number of seasonal patterns learned, the current day-of-year, expected percentage return to the median, and the approximate 95% half-range in percent.
• Optional historical seasonal path drawn as dotted segments for the next 30 bars.
How to use it in trading
1) Position sizing and stop logic
The cone translates “volatility plus seasonality” into distances.
• Put stops outside the inner band if you want only ~16% odds of a stop-out due to noise before your thesis can play.
• Size positions so that a test of the inner band is survivable and a test of the outer band is rare but acceptable.
• If your target sits inside the 68% band at your horizon, the payoff is likely modest; outside the 68% but inside the 95% can justify “one-good-push” trades; beyond the 95% band is a low-probability flyer—consider scaling plans or optionality.
2) Entry timing with seasonal bias
When the median path slopes up from this calendar date and the cone is relatively narrow, a pullback toward the lower inner band can be a high-quality entry with a tight invalidation. If the median slopes down, fade rallies toward the upper band or step aside if it clashes with your system.
3) Target selection
Project your time horizon to N bars ahead, then pick targets around the median or the opposite inner band depending on your style. You can also anchor dynamic take-profits to the moving median as new bars arrive.
4) Scenario planning & “what-ifs”
Before events, glance at the cone: if the 95% band already spans a huge range, trade smaller, expect whips, and avoid placing stops at obvious band edges. If the cone is unusually tight, consider breakout tactics and be ready to add if volatility expands beyond the inner band with follow-through.
5) Options and vol tactics
• When the cone is tight : Prefer long gamma structures (debit spreads) only if you expect a regime shift; otherwise premium selling may dominate.
• When the cone is wide : Debit structures benefit from range; credit spreads need wider wings or smaller size. Align with your separate IV metrics.
Reading the probability cone like a pro
• Cone slope = seasonal drift. Upward slope means the calendar has historically favored positive drift from this date, downward slope the opposite.
• Cone width = regime volatility. A widening fan tells you that uncertainty grows fast; a narrow cone says the market typically stays contained.
• Mean vs. price gap . If spot trades well above the median path and the upper band, mean-reversion risk is high. If spot presses the lower inner band in an up-sloping cone, you are in the “buy fear” zone.
• Touches and pierces . Touching the inner band is common noise; piercing it with momentum signals potential regime change; the outer band should be rare and often brings snap-backs unless there is a structural catalyst.
Methodological notes (what the code actually does)
• Log returns are used for additivity and better statistical behavior: sim_ret is applied via exp(sim_ret) to evolve price.
• Seasonal arrays are updated online with EWMA (90/10) so the model keeps learning as each bar arrives.
• Leap years are handled; indexing still normalizes into a 365-slot map so the seasonal pattern remains stable.
• Gaussian engine (Daily mode) centers shocks on the seasonal bias with a conservative standard deviation.
• Bootstrap engine (Weekly mode) resamples from observed seasonal returns and adds a fraction of the bias, which captures skew and fat tails better.
• Volatility adjustment multiplies each daily shock by a factor derived from ATR(20)/price, clamped between 0.5 and 2.0 to avoid extreme cones.
• Performance guardrails : simulations are capped at 100 paths; the probability cone uses polylines (no heavy fills) and only draws on the last confirmed bar to keep charts responsive.
• Prerequisite data : at least ~30 seasonal entries are required before the model will draw a cone; otherwise it waits for more history.
Strengths and limitations
• Strengths :
– Probabilistic thinking replaces single-point guessing.
– Seasonality adds a small but meaningful directional bias that many markets exhibit.
– Volatility scaling adapts to the current regime so the cone stays realistic.
• Limitations :
– Seasonality can break around structural changes, policy shifts, or one-off events.
– The number of paths is performance-limited; percentile estimates are good for trading, not for academic precision.
– The model assumes tomorrow’s randomness resembles recent randomness; if regime shifts violently, the cone will lag until the EWMA adapts.
– Holidays and missing sessions can thin the seasonal sample for some assets; be cautious with very short histories.
Tuning guide
• Horizon : 10–20 bars for tactical trades; 30+ for swing planning when you care more about broad ranges than precise targets.
• Iterations : The default 100 is enough for stable 5/16/50/84/95 percentiles. If you crave smoother lines, shorten the horizon or run on higher timeframes.
• Daily vs. Weekly : Daily for equities and crypto where month-end and turn-of-month effects matter; Weekly for futures and FX where day-of-week behavior is strong.
• Volatility scaling : Keep it on. Turn off only when you intentionally want a “pure seasonality” cone unaffected by current turbulence.
Workflow examples
• Swing continuation : Cone slopes up, price pulls into the lower inner band, your system fires. Enter near the band, stop just outside the outer line for the next 3–5 bars, target near the median or the opposite inner band.
• Fade extremes : Cone is flat or down, price gaps to the upper outer band on news, then stalls. Favor mean-reversion toward the median, size small if volatility scaling is elevated.
• Event play : Before CPI or earnings on a proxy index, check cone width. If the inner band is already wide, cut size or prefer options structures that benefit from range.
Good habits
• Pair the cone with your entry engine (breakout, pullback, order flow). Let Monte Carlo do range math; let your system do signal quality.
• Do not anchor blindly to the median; recalc after each bar. When the cone’s slope flips or width jumps, the plan should adapt.
• Validate seasonality for your symbol and timeframe; not every market has strong calendar effects.
Summary
The Seasonality Monte Carlo Forecaster wraps institutional risk planning into a single overlay: a data-driven seasonal drift, realistic volatility scaling, and a probabilistic cone that answers “where could we be, with what odds?” within your trading horizon. Use it to place stops where randomness is less likely to take you out, to set targets aligned with realistic travel, and to size positions with confidence born from distributions rather than hunches. It will not predict the future, but it will keep your decisions anchored to probabilities—the language markets actually speak.

Becak I-Series : Envelope Trading v.7.0Inspired by "Andean Oscillator: A New Technical Indicator Based on an Online Algorithm for Trend Analysis" (Alpaca Markets Research)
Core Concept
Inspired by the Andean Oscillator's online trend-detection algorithm, this indicator enhances traditional envelope strategies with real-time adaptive trend analysis and automated trade management.
📊 Key Innovations:
✅ Andean-Inspired Trend Detection – Dynamic envelope bands that adjust like the Andean Oscillator's real-time smoothing
✅ Self-Adjusting Targets – ATR-based profit-taking system with 3 customizable targets
✅ 5 Adaptive Modes – Switch between trend, reversal, pullback, squeeze, or hybrid strategies
✅ Smart Confirmation Filters – Volume (MFI), ADX strength, and RSI momentum
✅ Visual Trade Assistant – Auto-plots entry/exit zones with hit detection
🎯 How It Improves on Traditional Envelopes:
Real-Time Band Adjustment (like Andean's online algorithm)
Adaptive Target Zones (not static multiples)
Multiple Signal Philosophies in one tool
⚙️ Best For:
Traders who want Andean-like trend detection with clear rules
Systematic traders needing structured profit-taking
Swing traders looking for confirmed envelope breaks
How to Use the Becak I-Series Envelope Trading Indicator
This advanced indicator provides 5 trading modes with dynamic trend analysis and automated profit targets. Here’s how to use it effectively:
🔹 Step 1: Select Your Trading Mode
Choose from 5 signal types in the settings:
Momentum – Follows strong trends (best for trending markets)
Mean Reversion – Fades overextended moves (best for ranging markets)
Pullback – Enters retracements within trends (best for swing trading)
Squeeze – Trades volatility breakouts (best for consolidations)
Adaptive – Automatically blends strategies (recommended for all markets)
👉 Tip: Start with Adaptive mode if unsure.
🔹 Step 2: Understand the Signals
🔵 Blue Envelope (Upper Band) – Resistance in uptrends
🔴 Red Envelope (Lower Band) – Support in downtrends
⚪ Midline – Trend filter (price above = bullish, below = bearish)
Entry Signals
🟢 Buy Signal (⦿) – Price confirms bullish setup (depends on selected mode)
🟡 Sell Signal (⦿) – Price confirms bearish setup
Target Trend System (Auto Profit-Taking)
🎯 T1, T2, T3 – Profit targets (adjustable in settings)
🛑 SL – Dynamic stop-loss (trails with trend)
✔️ "HIT" Labels – Confirms when a target is reached
🔹 Step 3: Trade Execution Rules
For Trend-Following (Momentum/Pullback Modes)
✅ Long Entry:
Price breaks above midline
Buy signal appears (green dot)
Volume & ADX confirm strength
✅ Short Entry:
Price breaks below midline
Sell signal appears (yellow dot)
Volume & ADX confirm weakness
For Reversals (Mean Reversion Mode)
✅ Buy at Lower Band:
Price touches red envelope + RSI oversold
Volume confirms exhaustion
✅ Sell at Upper Band:
Price touches blue envelope + RSI overbought
Volume confirms exhaustion
🔹 Step 4: Manage Your Trade
Hold until T1, T2, or T3 is hit (adjust based on risk tolerance)
Stop-loss moves with the trend (trailing stop logic)
Exit early if the trend reverses (price crosses midline)
🔹 Step 5: Optimize Settings (Optional)
Envelope Length (50 default) – Adjust for sensitivity (shorter = faster signals)
ATR Multiplier (0.8 default) – Controls target distances
Volume/ADX Filters – Tweak for stricter/looser confirmations
PS:
thank you to pinecoder that previously write about andean envelope, learn much from you!!
TERIMA KASIH (Thank you) !!

Vegas Trend Filter[SpeculationLab]This script combines Vegas Tunnel trend filtering with Engulfing Pattern detection to identify trend-following reversal entries.
It uses multi-timeframe EMA tunnels to determine market direction, and filters signals by combining engulfing patterns with price proximity to the tunnel.
Key Features:
1. Vegas Tunnel Trend Filter
・Short tunnel: 144 EMA & 169 EMA
・Long tunnel: 576 EMA & 676 EMA
・Trend definition: Short tunnel entirely above/below the long tunnel
・ATR gap filter to avoid false signals when tunnels are overlapping
2.Engulfing Pattern Detection
・Mode options:
・Body: Current candle’s body fully engulfs the previous body
・Range (default): Current candle’s wicks fully cover the previous high/low range
・Optional “Require opposite previous candle” filter
3.Touch Filter
・Mode options:
・Body: Candle body touches/approaches the Vegas tunnel
・Wick (default): Candle wick touches/approaches the Vegas tunnel
・Adjustable tolerance for proximity detection
4.Short-Term Trend Filter
・Linear regression slope to identify pullbacks or rebounds
・Avoids entering mid-trend without a retracement
5.Signal Marking
・BUY: Trend up + touch filter + bullish engulfing + EMA data valid
・SELL: Trend down + touch filter + bearish engulfing + EMA data valid
・Signals are confirmed at candle close to avoid intrabar repainting
Originality Statement:
This script is originally developed by SpeculationLab , with all logic independently designed and coded by the author. Do not copy, resell, or publish under another name.
Disclaimer:
This script is for technical research and market analysis purposes only and does not constitute financial advice. Any trading decisions made based on this script are solely at the user’s own risk.
本脚本结合 Vegas 通道趋势过滤 与 吞没形态识别,用于识别顺势反转的交易机会。
通过多周期 EMA 构建的 Vegas 通道判断趋势方向,并结合吞没形态与价格接触通道的条件,过滤掉大部分低质量信号。
主要功能:
1.Vegas Tunnel 趋势过滤
・短周期隧道(144 EMA、169 EMA)与长周期隧道(576 EMA、676 EMA)
・趋势判定:短隧道整体高于/低于长隧道
・ATR 间距过滤,避免通道缠绕产生假信号
2.吞没形态识别(Engulfing Pattern)
・模式选择:
・Body:实体包裹前一根实体
・Range(默认):影线包裹前一根区间
・可选“上一根必须颜色相反”条件
3.接触判定(Touch Filter)
・模式选择:
・Body:实体接触/接近 Vegas 通道
・Wick(默认):影线接触/接近 Vegas 通道
・容差可调(Tolerance)
4.短期趋势过滤
・线性回归斜率判断短期回调或反弹
・避免顺势中途乱入
5.信号标记
・多头信号(BUY):顺势 + 接触通道 + 符合吞没条件 + EMA 数据有效
・空头信号(SELL):顺势 + 接触通道 + 符合吞没条件 + EMA 数据有效
・信号在 K 线收盘确认后生成,避免盘中反复变化
原创声明:
本脚本为 SpeculationLab 原创开发,全部逻辑均由作者独立设计与编写。请勿抄袭、售卖或冒充作者发布。
免责声明:
本脚本仅供技术研究与市场分析参考,不构成投资建议。任何基于本脚本的交易决策及其后果,由使用者自行承担。

Correlation Heatmap Matrix [TradingFinder] 20 Assets Variable🔵 Introduction
Correlation is one of the most important statistical and analytical metrics in financial markets, data mining, and data science. It measures the strength and direction of the relationship between two variables.
The correlation coefficient always ranges between +1 and -1 : a perfect positive correlation (+1) means that two assets or currency pairs move together in the same direction and at a constant ratio, a correlation of zero (0) indicates no clear linear relationship, and a perfect negative correlation (-1) means they move in exactly opposite directions.
While the Pearson Correlation Coefficient is the most common method for calculation, other statistical methods like Spearman and Kendall are also used depending on the context.
In financial market analysis, correlation is a key tool for Forex, the Stock Market, and the Cryptocurrency Market because it allows traders to assess the price relationship between currency pairs, stocks, or coins. For example, in Forex, EUR/USD and GBP/USD often have a high positive correlation; in stocks, companies from the same sector such as Apple and Microsoft tend to move similarly; and in crypto, most altcoins show a strong positive correlation with Bitcoin.
Using a Correlation Heatmap in these markets visually displays the strength and direction of these relationships, helping traders make more accurate decisions for risk management and strategy optimization.
🟣 Correlation in Financial Markets
In finance, correlation refers to measuring how closely two assets move together over time. These assets can be stocks, currency pairs, commodities, indices, or cryptocurrencies. The main goal of correlation analysis in trading is to understand these movement patterns and use them for risk management, trend forecasting, and developing trading strategies.
🟣 Correlation Heatmap
A correlation heatmap is a visual tool that presents the correlation between multiple assets in a color-coded table. Each cell shows the correlation coefficient between two assets, with colors indicating its strength and direction. Warm colors (such as red or orange) represent strong negative correlation, cool colors (such as blue or cyan) represent strong positive correlation, and mid-range tones (such as yellow or green) indicate correlations that are close to neutral.
🟣 Practical Applications in Markets
Forex : Identify currency pairs that move together or in opposite directions, avoid overexposure to similar trades, and spot unusual divergences.
Crypto : Examine the dependency of altcoins on Bitcoin and find independent movers for portfolio diversification.
Stocks : Detect relationships between stocks in the same industry or find outliers that move differently from their sector.
🟣 Key Uses of Correlation in Trading
Risk management and diversification: Select assets with low or negative correlation to reduce portfolio volatility.
Avoiding overexposure: Prevent opening multiple positions on highly correlated assets.
Pairs trading: Exploit temporary deviations between historically correlated assets for arbitrage opportunities.
Intermarket analysis: Study the relationships between different markets like stocks, currencies, commodities, and bonds.
Divergence detection: Spot when two typically correlated assets move apart as a possible trend change signal.
Market forecasting: Use correlated asset movements to anticipate others’ behavior.
Event reaction analysis: Evaluate how groups of assets respond to economic or political events.
❗ Important Note
It’s important to note that correlation does not imply causation — it only reflects co-movement between assets. Correlation is also dynamic and can change over time, which is why analyzing it across multiple timeframes provides a more accurate picture. Combining correlation heatmaps with other analytical tools can significantly improve the precision of trading decisions.
🔵 How to Use
The Correlation Heatmap Matrix indicator is designed to analyze and manage the relationships between multiple assets at once. After adding the tool to your chart, start by selecting the assets you want to compare (up to 20).
Then, choose the Correlation Period that fits your trading strategy. Shorter periods (e.g., 20 bars) are more sensitive to recent price movements, making them suitable for short-term trading, while longer periods (e.g., 100 or 200 bars) provide a broader view of correlation trends over time.
The indicator outputs a color-coded matrix where each cell represents the correlation between two assets. Warm colors like red and orange signal strong negative correlation, while cool colors like blue and cyan indicate strong positive correlation. Mid-range tones such as yellow or green suggest correlations that are close to neutral. This visual representation makes it easy to spot market patterns at a glance.
One of the most valuable uses of this tool is in portfolio risk management. Portfolios with highly correlated assets are more vulnerable to market swings. By using the heatmap, traders can find assets with low or negative correlation to reduce overall risk.
Another key benefit is preventing overexposure. For example, if EUR/USD and GBP/USD have a high positive correlation, opening trades on both is almost like doubling the position size on one asset, increasing risk unnecessarily. The heatmap makes such relationships clear, helping you avoid them.
The indicator is also useful for pairs trading, where a trader identifies assets that are usually correlated but have temporarily diverged — a potential arbitrage or mean-reversion opportunity.
Additionally, the tool supports intermarket analysis, allowing traders to see how movements in one market (e.g., crude oil) may impact others (e.g., the Canadian dollar). Divergence detection is another advantage: if two typically aligned assets suddenly move in opposite directions, it could signal a major trend shift or a news-driven move.
Overall, the Correlation Heatmap Matrix is not just an analytical indicator but also a fast, visual alert system for monitoring multiple markets at once. This is particularly valuable for traders in fast-moving environments like Forex and crypto.
🔵 Settings
🟣 Logic
Correlation Period : Number of bars used to calculate correlation between assets.
🟣 Display
Table on Chart : Enable/disable displaying the heatmap directly on the chart.
Table Size : Choose the table size (from very small to very large).
Table Position : Set the table location on the chart (top, middle, or bottom in various alignments).
🟣 Symbol Custom
Select Market : Choose the market type (Forex, Stocks, Crypto, or Custom).
Symbol 1 to Symbol 20: In custom mode, you can define up to 20 assets for correlation calculation.
🔵 Conclusion
The Correlation Heatmap Matrix is a powerful tool for analyzing correlations across multiple assets in Forex, crypto, and stock markets. By displaying a color-coded table, it visually conveys both the strength and direction of correlations — warm colors for strong negative correlation, cool colors for strong positive correlation, and mid-range tones such as yellow or green for near-zero or neutral correlation.
This helps traders select assets with low or negative correlation for diversification, avoid overexposure to similar trades, identify arbitrage and pairs trading opportunities, and detect unusual divergences between typically aligned assets. With support for custom mode and up to 20 symbols, it offers high flexibility for different trading strategies, making it a valuable complement to technical analysis and risk management.

Camarilla Levels Pro Camarilla Levels Pro – Precision Intraday & Swing Trading Tool
Unlock the full potential of Camarilla Pivot Levels for identifying high-probability reversal zones, breakout triggers, and intraday bias shifts.
This indicator automatically calculates L1–L5 levels based on the Camarilla formula, updating daily for precise market adaptation. Whether you’re trading futures, forex, stocks, or crypto, you’ll instantly see:
Reversal Zones – Where price historically reacts and traps traders.
Breakout Zones – L4/L5 for bullish breakouts, L3/L2 for bearish reversals.
Bias Shifts – Quickly gauge if the market is leaning long or short.
Custom Alerts – Get notified when price touches or breaks your chosen level.
Features:
Auto-adjusting Camarilla levels for any symbol & timeframe
Color-coded zones for instant visual recognition
Optional mid-levels for scalpers
Fully customizable styling to match your chart setup
Ideal for:
Day traders wanting precision entry/exit zones
Swing traders watching key daily pivot breaks
Scalpers looking for high-probability reaction points
Gann Box LogicGann Box Logic
Overview
The Gann Box Logic indicator is a precision-based trading tool that combines the principles of Gann analysis with retracement logic to highlight high-probability zones of price action. It plots a structured box on the chart based on the previous day's high and low, overlays Fibonacci-derived retracement levels, and visually marks a critical “neutral zone” between 38.2% and 61.8% retracements.
This zone — shaded for emphasis — is a decision filter for traders:
- It warns against initiating trades in this area (low conviction zone).
- It identifies reversal pull targets when extremes are reached.
Core Principles Behind Gann Box Logic
Logic 1 — The Neutral Zone (38.2% ↔ 61.8%)
- The 38.2% and 61.8% retracement levels are key Fibonacci ratios often associated with consolidation or indecision.
- Price action between these two levels is considered a neutral, low-conviction zone.
- Trading Recommendation:
- Avoid initiating new trades while price remains within this shaded band.
- This zone tends to produce whipsaws and false signals.
- Wait for a decisive break above 61.8% or below 38.2% for clearer momentum.
- Why it matters:
- In Gann’s market structure thinking, the middle range of a swing is often a battleground where neither bulls nor bears are in full control.
- This is the zone where market makers often shake out weak hands before committing to a direction.
Logic 2 — Extremes Seek Balance (0% & 100% Reversal Bias)
- The indicator’s 0% and 100% levels represent the previous day’s low and high respectively.
- First Touch Rule:
- When the price touches 0% (previous low) or 100% (previous high) for the first time in the current session, there is a high probability it will attempt to revert toward the center zone (38.2% ↔ 61.8%).
- Trading Implication:
- If price spikes to an extreme, be alert for reversion trades toward the mid-zone rather than expecting a sustained breakout.
- Momentum traders may still pursue breakout trades, but this bias warns of potential pullbacks.
- Why it works:
- Extreme levels often trigger profit-taking by early entrants and counter-trend entries by mean-reversion traders.
- These forces naturally pull the market back toward equilibrium — often near the 50% level or within the shaded zone.
How the Indicator is Plotted
1. Previous Day High/Low Reference — The script locks onto the prior day’s range to establish the vertical bounds of the box.
2. Retracement Levels — Key Fibonacci levels plotted: 0%, 25%, 38.2%, 50%, 61.8%, 75%, 100%.
3. Box Structure — Outer Border marks the full prior day range, Mid Fill Zone is shaded between 38.2% and 61.8%.
4. VWAP (Optional) — Daily VWAP overlay for intraday bias confirmation.
Practical Usage Guide
- Avoid Trades in Neutral Zone — Stay out of the shaded area unless you’re already in a trade from outside this zone.
- Watch for First Touch Extremes — First touch at 0% or 100% → anticipate a pullback toward the shaded zone.
- Breakout Confirmation — Only commit to breakout trades when price leaves the 38.2–61.8% zone with strong volume and momentum.
- VWAP Confluence — VWAP crossing through the shaded zone often signals a balance day — breakout expectations should be tempered.
Strengths of Gann Box Logic
- Removes noise trades during low-conviction periods.
- Encourages patience and discipline.
- Highlights key market turning points.
- Provides clear visual structure for both new and advanced traders.
Limitations & Warnings
- Not a standalone entry system — best used in conjunction with price action and volume analysis.
- Extreme moves can sometimes trend without reversion, especially during news-driven sessions.
- Works best on intraday timeframes when referencing the previous day’s range.
In Summary
The Gann Box Logic indicator’s philosophy can be boiled down to two golden rules:
1. Do nothing in the middle — Avoid trades between 38.2% and 61.8%.
2. Expect balance from extremes — First touches at 0% or 100% often pull back toward the shaded mid-zone.
This dual approach makes the indicator both a trade filter and a targeting guide, allowing traders to navigate markets with a structured, Gann-inspired framework.
DISCLAIMER
The information provided by this indicator is for educational purposes only and should not be considered financial advice. Trading carries risk, including possible loss of capital. Past performance does not guarantee future results. Always conduct your own research and consult with a qualified financial professional before making trading decisions.

Elliott Wave Advanced Auto [CongTrader]🧾 INDICATOR DESCRIPTION
📌 Indicator: Elliott Wave Advanced Auto
Elliott Wave Advanced Auto is a professional automatic wave detection tool designed by CongTrader. It helps traders analyze market structure using Elliott Wave Theory, including:
📈 Automatic detection of impulsive waves (1-2-3-4-5)
🔷 Identification of triangle correction patterns (ABCDE)
⚠️ Detection of ending diagonal formations
🔮 Forecasting potential Wave 5 extension based on Fibonacci ratio
📊 Visually connecting waves with clean and clear lines
This indicator brings Elliott Wave analysis closer to all traders — whether beginner or advanced.
💡 How to Use It:
Add the indicator to your chart on TradingView.
Adjust Pivot Length to control the sensitivity of pivot detection.
Watch for wave labels (1 to 5 or A to E) appearing automatically on swing highs/lows.
Use signals to make trading decisions:
Wave 3 is often the strongest → possible entry point.
Wave 5 forecast gives a projected exit zone.
Ending Diagonal and Triangles warn of upcoming reversals.
Combine with other indicators (e.g., RSI, volume, support/resistance) for confirmation.
🎯 Features:
Automatic Elliott Wave labeling (1–5 / ABCDE)
Supports both bullish and bearish structures
Auto-line drawing between pivot points
Triangle pattern recognition (ABCDE)
Ending Diagonal pattern detection
Wave 5 forecast using 0.618 Fibonacci projection
Minimalist and clean layout, non-intrusive design
🙏 Credits & Thank You:
This indicator was developed by @CongTrader, a trader passionate about price action and algorithmic trading tools.
I hope this tool helps you improve your market timing and confidence in Elliott Wave analysis.
👉 If you find it helpful, don’t forget to leave a ⭐ or a kind comment to support!
⚠️ Disclaimer:
This script is for educational purposes only and does not constitute financial advice.
Use it with discretion and always validate with other tools.
You are responsible for your own trades. The author is not liable for any financial loss.#ElliottWave #WaveAnalysis #TechnicalAnalysis
#TradingViewScript #AutoElliott #WaveDetector
#TradingStrategy #PriceAction #CongTrader
#ImpulseWaves #Fibonacci #ForexTools
#CryptoTrading #StockTrading #WaveForecast

KhoiHV - Bollinger Bands Buy/Sell Area ProBollinger Bands Buy/Sell Area Pro is a professional-grade indicator designed to identify potential trading opportunities based on Bollinger Bands. It highlights dynamic buy and sell areas by combining price action with volatility, helping traders quickly visualize market conditions.
✨ Key Features
Automatically plots upper, middle, and lower Bollinger Bands.
Marks Buy Areas when price enters oversold zones near the lower band.
Marks Sell Areas when price enters overbought zones near the upper band.
Configurable inputs for length, source, and multiplier to fit any trading style.
Easy-to-read chart visuals with colored zones for instant recognition.
💡 How to Use
Look for Buy Areas near the lower band in trending markets to catch potential rebounds.
Watch for Sell Areas near the upper band to anticipate possible pullbacks.
Combine with volume, momentum, or trend indicators for stronger confirmation.
This tool is especially useful for traders who want a clear, visual edge in spotting volatility-based entries and exits without constantly recalculating signals.

OSAMA RASMIHow this script works?
- it finds and keeps Pivot Points
- when it found a new Pivot Point it clears older S/R channels then;
- for each pivot point it searches all pivot points in its own channel with dynamic width
- while creating the S/R channel it calculates its strength
- then sorts all S/R channels by strength
- it shows the strongest S/R channels, before doing this it checks old location in the list and adjust them for better visibility
- if any S/R channel was broken on last move then it gives alert and put shape below/above the candle
- The colors of the S/R channels are adjusted automatically

Currency Strength v3.0Currency Strength v3.0
Summary
The Currency Strength indicator is a powerful tool designed to gauge the relative strength of major and emerging market currencies. By plotting the True Strength Index (TSI) of various currency indices, it provides a clear visual representation of which currencies are gaining momentum and which are losing it. This indicator automatically detects the currency pair on your chart and highlights the corresponding strength lines, simplifying analysis and helping you quickly identify potential trading opportunities based on currency dynamics.
Key Features
Comprehensive Currency Analysis: Tracks the strength of 19 currencies, including major pairs and several emerging market currencies.
Automatic Pair Detection: Intelligently identifies the base and quote currency of the active chart, automatically highlighting the relevant strength lines.
Dynamic Coloring: The base currency is consistently colored blue, and the quote currency is colored gold, making it easy to distinguish between the two at a glance.
Non-Repainting TSI Calculation: Uses the True Strength Index (TSI) for smooth and reliable momentum readings that do not repaint.
Customizable Settings: Allows for adjustment of the fast and slow periods for the TSI calculation to fit your specific trading style.
Clean Interface: Features a minimalist legend table that only displays the currencies relevant to your current chart, keeping your workspace uncluttered.
How It Works
The indicator pulls data from major currency indices (like DXY for the US Dollar and EXY for the Euro). For currencies that don't have a dedicated index, it uses their USD pair (e.g., USDCNY) and inverts the calculation to derive the currency's strength relative to the dollar. It then applies the True Strength Index (TSI) to this data. The TSI is a momentum oscillator that is less volatile than other oscillators, providing a more reliable measure of strength. The resulting values are plotted on the chart, allowing you to see how different currencies are performing against each other in real-time.
How to Use
Trend Confirmation: When the base currency's line is rising and above the zero line, and the quote currency's line is falling, it can confirm a bullish trend for the pair. The opposite would suggest a bearish trend.
Identifying Divergences: Look for divergences between the currency strength lines and the price action of the pair. For example, if the price is making higher highs but the base currency's strength is making lower highs, it could signal a potential reversal.
Crossovers: A crossover of the base and quote currency lines can signal a shift in momentum. A bullish signal occurs when the base currency line crosses above the quote currency line. A bearish signal occurs when it crosses below.
Overbought/Oversold Levels: The horizontal dashed lines at 0.5 and -0.5 can be used as general guides for overbought and oversold conditions, respectively. Strength moving beyond these levels may indicate an unsustainable move that is due for a correction.
Settings
Fast Period: The short-term period for the TSI calculation. Default is 7.
Slow Period: The long-term period for the TSI calculation. Default is 15.
Index Source: The price source used for the calculations (e.g., Close, Open). Default is Close.
Base Currency Color: The color for the base currency line. Default is Royal Blue.
Quote Currency Color: The color for the quote currency line. Default is Goldenrod.
Disclaimer
This indicator is intended for educational and analytical purposes only. It is not financial advice. Trading involves substantial risk, and past performance is not indicative of future results. Always conduct your own research and risk management before making any trading decisions.

MistaB SMC Navigation ToolkitMistaB SMC Navigation Toolkit
A complete Smart Money Concepts (SMC) toolkit designed for precision navigation of market structure, order flow, and premium/discount trading zones. Perfect for traders following ICT-style concepts and multi-timeframe confluence.
Features
✅ Order Blocks (OBs)
• Automatic bullish & bearish OB detection
• Optional displacement & high-volume filters
• Midline display for quick equilibrium view
• Auto-expiry and broken OB cleanup
✅ Fair Value Gaps (FVGs)
• Bullish & bearish gap detection
• HTF bias filtering for higher accuracy
• Compact boxes with labels
• Automatic removal when filled
✅ Market Structure (BoS / CHoCH)
• Fractal-based swing detection
• Break of Structure & Change of Character labeling
• Dynamic HTF bias dimming
✅ Premium / Discount Zones
• Auto-calculated mid-level
• Highlighted zones for optimal trade placement
✅ Higher Timeframe (HTF) Confirmation
• Configurable confirmation timeframe
• On-chart HTF status label (Bullish / Bearish / Not Required)
✅ Automatic Cleanup System
• Fast or delayed cleanup for expired/broken zones
• Dimmed colors for invalidated levels
How to Use
Set your preferred HTF in the settings.
Look for OB/FVGs aligned with HTF bias.
Enter in discount zones for longs or premium zones for shorts.
Confirm with BoS / CHoCH signals before entry.
Manage trades towards opposing liquidity zones or HTF levels.
Disclaimer
This indicator is for educational purposes only. It does not provide financial advice or guarantee future results. Always practice proper risk management and test thoroughly before live trading.

Support and resistance channelsSupport and resistance channels on the wick which represents support and resistance

Smart Money Breakout Signals [GILDEX]Introducing the Smart Money Breakout Signals, a cutting-edge trading indicator designed to identify key structural shifts and breakout opportunities in the market. This tool leverages a blend of smart money concepts like Break of Structure (BOS) and Change of Character (CHoCH) to provide traders with actionable insights into market direction and potential entry or exit points.
Key Features:
✨ Market Structure Analysis: Automatically detects and labels BOS and CHoCH for trend confirmation and reversals.
🎨 Customizable Visualization: Tailor bullish and bearish colors for breakout lines and signals to suit your preferences.
📊 Dynamic Take-Profit Targets: Displays three tiered take-profit levels based on breakout volatility.
🔔 Real-Time Alerts: Stay ahead of the game with notifications for bullish and bearish breakouts.
📋 Performance Dashboard: Monitor signal statistics, including win rates and total signals, directly on your chart.
How to Use:
Add the Indicator: Add the script to your favourites ⭐ and customize settings like market structure horizon and confirmation type.

Volume Imbalance Heatmap + Delta Cluster [@darshakssc]🔥 Volume Imbalance Heatmap + Delta Cluster
Created by: @darshakssc
This indicator is designed to visually reveal institutional pressure zones using a combination of:
🔺 Delta Cluster Detection: Highlights candles with strong body ratios and volume spikes, helping identify aggressive buying or selling activity.
🌡️ Real-Time Heatmap Overlay: Background color dynamically adjusts based on volume imbalance relative to its moving average.
🧠 Adaptive Dashboard: Displays live insights into current market imbalance and directional flow (Buy/Sell clusters).
📈 How It Works:
A candle is marked as a Buy Cluster if it closes bullish, has a strong body, and exhibits a volume spike above average.
A Sell Cluster triggers under the inverse conditions.
The heatmap shades the chart background to reflect areas of high or low imbalance using a color gradient.
⚙️ Inputs You Can Adjust:
Volume MA Length
Minimum Body Ratio
Imbalance Multiplier Sensitivity
Dashboard Location
🚫 Note: This is not a buy/sell signal tool, but a visual aid to support institutional flow tracking and confluence with your existing system.
For educational use only. Not financial advice.
HTF Candles & ReversalsThis is a comprehensive multi-timeframe analysis tool designed to give you a broader perspective on market structure directly from your main chart. It overlays candles from up to six user-defined higher timeframes (HTF) and includes a built-in indicator to spot potential price reversals. This allows you to analyze the bigger picture and make more informed decisions without constantly switching between different chart layouts.
Key Features
Multi-Timeframe Candle Display: Renders candles from up to six different higher timeframes (the defaults are 5m, 15m, 1H, 4H, 1D, and 1W). You can see how the current price action fits within the larger trend.
Reversal Pattern Detection: The script identifies and highlights potential bullish and bearish reversal patterns. This works on both your main chart's candles and the displayed HTF candles, helping you spot potential shifts in momentum on multiple scales.
Imbalance (FVG) Highlighting: Automatically detects and draws Fair Value Gaps (FVGs) on the HTF candles, pointing out areas of inefficient price action that may act as magnets for future price movement.
Full Customization: You have complete control over the visual elements. Adjust the colors for candle bodies, borders, and wicks. Change the positioning of the HTF display, and toggle labels, timers, and imbalance boxes to create a clean workspace that fits your trading style.
How to Use This Indicator
Gain Market Context: Use the HTF candles to quickly gauge the dominant trend. For example, if the 4H and 1D candles are bullish, you might look for buying opportunities on your lower timeframe chart. The highs and lows of these HTF candles often serve as strong support and resistance levels.
Identify Reversals:
Triangles on the Main Chart: A green triangle below a candle suggests a potential bullish reversal, while a red triangle above suggests a potential bearish reversal. This pattern appears when a candle makes a new low/high but closes stronger/weaker than the previous one.
Colored HTF Candles: When an HTF candle is colored (lime for bullish, orange for bearish), it indicates that a reversal pattern has formed on that specific higher timeframe, which could signal a more significant change in market direction.
Utilize Imbalances: The highlighted FVG boxes can be treated as areas of interest. Price often revisits these zones, making them potential targets for trades or areas to watch for a reaction.
Settings Breakdown
Candle Color: Independently set the colors for bullish and bearish candle bodies, borders, and wicks.
Layout: Use the HTF Distance setting to control how far the displayed candles appear from the current price action.
Labels: Choose whether to display the timeframe name and a countdown timer for each HTF candle. You can position these labels at the top, bottom, or both.
Imbalances: Toggle the visibility of the FVG boxes and customize their color.
Reversal Indicator: Enable or disable the reversal triangles on your main chart and the special coloring for reversal candles on both the main chart and the HTF displays.
Disclaimer: This tool is intended for technical analysis and educational purposes. It does not provide financial advice or generate guaranteed trading signals. Always use risk management and conduct your own analysis before entering any trade.

Bullish Breakaway V2 (Publish)-FVG conceptThis is my Version 2 of the breakaway indicator based o the FVP concept.
In this version 2, I have session pre-set, ETH vs RTH, and your own session of choice ( The default setting is only for CME future product in New York timezone ).
ETH session is from 1800 to 1645.
RTH session is from 930 to 1645.
I have to end at 1645, so the data will reset at each day.
If you don't see anything on the screen, that is because you are not in an active session, so you should use replay to see the indicator.
This indicator will only work best at 1m, 5m, and 15m, if you use end time at 1645.
You may have to adjust the session time for stock product RTH vs ETH. I have not tried stock yet.
Version 2 has advanced display feature using shade, and a counter to count how many breakaway candle are in the chart.
There are several ways to use this indicator to help you trade.
In this chart 8-15-2025 NQ, you can see the 1st breakaway bullish direction formed at 1002am, if you long at 1003, you have enough space for a profitable trade in the long direction.
Notice if you even enter the low of the 2nd breakaway bullish candle, you still have room for profit in the long direction. You need to get comfortable about this trading experience. Basically you want to wait for the 1st bullish breakaway candle to form before you go for a long trade.

Ray Dalio's All Weather Strategy - Portfolio CalculatorTHE ALL WEATHER STRATEGY INDICATOR: A GUIDE TO RAY DALIO'S LEGENDARY PORTFOLIO APPROACH
Introduction: The Genesis of Financial Resilience
In the sprawling corridors of Bridgewater Associates, the world's largest hedge fund managing over 150 billion dollars in assets, Ray Dalio conceived what would become one of the most influential investment strategies of the modern era. The All Weather Strategy, born from decades of market observation and rigorous backtesting, represents a paradigm shift from traditional portfolio construction methods that have dominated Wall Street since Harry Markowitz's seminal work on Modern Portfolio Theory in 1952.
Unlike conventional approaches that chase returns through market timing or stock picking, the All Weather Strategy embraces a fundamental truth that has humbled countless investors throughout history: nobody can consistently predict the future direction of markets. Instead of fighting this uncertainty, Dalio's approach harnesses it, creating a portfolio designed to perform reasonably well across all economic environments, hence the evocative name "All Weather."
The strategy emerged from Bridgewater's extensive research into economic cycles and asset class behavior, culminating in what Dalio describes as "the Holy Grail of investing" in his bestselling book "Principles" (Dalio, 2017). This Holy Grail isn't about achieving spectacular returns, but rather about achieving consistent, risk-adjusted returns that compound steadily over time, much like the tortoise defeating the hare in Aesop's timeless fable.
HISTORICAL DEVELOPMENT AND EVOLUTION
The All Weather Strategy's origins trace back to the tumultuous economic periods of the 1970s and 1980s, when traditional portfolio construction methods proved inadequate for navigating simultaneous inflation and recession. Raymond Thomas Dalio, born in 1949 in Queens, New York, founded Bridgewater Associates from his Manhattan apartment in 1975, initially focusing on currency and fixed-income consulting for corporate clients.
Dalio's early experiences during the 1970s stagflation period profoundly shaped his investment philosophy. Unlike many of his contemporaries who viewed inflation and deflation as opposing forces, Dalio recognized that both conditions could coexist with either economic growth or contraction, creating four distinct economic environments rather than the traditional two-factor models that dominated academic finance.
The conceptual breakthrough came in the late 1980s when Dalio began systematically analyzing asset class performance across different economic regimes. Working with a small team of researchers, Bridgewater developed sophisticated models that decomposed economic conditions into growth and inflation components, then mapped historical asset class returns against these regimes. This research revealed that traditional portfolio construction, heavily weighted toward stocks and bonds, left investors vulnerable to specific economic scenarios.
The formal All Weather Strategy emerged in 1996 when Bridgewater was approached by a wealthy family seeking a portfolio that could protect their wealth across various economic conditions without requiring active management or market timing. Unlike Bridgewater's flagship Pure Alpha fund, which relied on active trading and leverage, the All Weather approach needed to be completely passive and unleveraged while still providing adequate diversification.
Dalio and his team spent months developing and testing various allocation schemes, ultimately settling on the 30/40/15/7.5/7.5 framework that balances risk contributions rather than dollar amounts. This approach was revolutionary because it focused on risk budgeting—ensuring that no single asset class dominated the portfolio's risk profile—rather than the traditional approach of equal dollar allocations or market-cap weighting.
The strategy's first institutional implementation began in 1996 with a family office client, followed by gradual expansion to other wealthy families and eventually institutional investors. By 2005, Bridgewater was managing over $15 billion in All Weather assets, making it one of the largest systematic strategy implementations in institutional investing.
The 2008 financial crisis provided the ultimate test of the All Weather methodology. While the S&P 500 declined by 37% and many hedge funds suffered double-digit losses, the All Weather strategy generated positive returns, validating Dalio's risk-balancing approach. This performance during extreme market stress attracted significant institutional attention, leading to rapid asset growth in subsequent years.
The strategy's theoretical foundations evolved throughout the 2000s as Bridgewater's research team, led by co-chief investment officers Greg Jensen and Bob Prince, refined the economic framework and incorporated insights from behavioral economics and complexity theory. Their research, published in numerous institutional white papers, demonstrated that traditional portfolio optimization methods consistently underperformed simpler risk-balanced approaches across various time periods and market conditions.
Academic validation came through partnerships with leading business schools and collaboration with prominent economists. The strategy's risk parity principles influenced an entire generation of institutional investors, leading to the creation of numerous risk parity funds managing hundreds of billions in aggregate assets.
In recent years, the democratization of sophisticated financial tools has made All Weather-style investing accessible to individual investors through ETFs and systematic platforms. The availability of high-quality, low-cost ETFs covering each required asset class has eliminated many of the barriers that previously limited sophisticated portfolio construction to institutional investors.
The development of advanced portfolio management software and platforms like TradingView has further democratized access to institutional-quality analytics and implementation tools. The All Weather Strategy Indicator represents the culmination of this trend, providing individual investors with capabilities that previously required teams of portfolio managers and risk analysts.
Understanding the Four Economic Seasons
The All Weather Strategy's theoretical foundation rests on Dalio's observation that all economic environments can be characterized by two primary variables: economic growth and inflation. These variables create four distinct "economic seasons," each favoring different asset classes. Rising growth benefits stocks and commodities, while falling growth favors bonds. Rising inflation helps commodities and inflation-protected securities, while falling inflation benefits nominal bonds and stocks.
This framework, detailed extensively in Bridgewater's research papers from the 1990s, suggests that by holding assets that perform well in each economic season, an investor can create a portfolio that remains resilient regardless of which season unfolds. The elegance lies not in predicting which season will occur, but in being prepared for all of them simultaneously.
Academic research supports this multi-environment approach. Ang and Bekaert (2002) demonstrated that regime changes in economic conditions significantly impact asset returns, while Fama and French (2004) showed that different asset classes exhibit varying sensitivities to economic factors. The All Weather Strategy essentially operationalizes these academic insights into a practical investment framework.
The Original All Weather Allocation: Simplicity Masquerading as Sophistication
The core All Weather portfolio, as implemented by Bridgewater for institutional clients and later adapted for retail investors, maintains a deceptively simple static allocation: 30% stocks, 40% long-term bonds, 15% intermediate-term bonds, 7.5% commodities, and 7.5% Treasury Inflation-Protected Securities (TIPS). This allocation may appear arbitrary to the uninitiated, but each percentage reflects careful consideration of historical volatilities, correlations, and economic sensitivities.
The 30% stock allocation provides growth exposure while limiting the portfolio's overall volatility. Stocks historically deliver superior long-term returns but with significant volatility, as evidenced by the Standard & Poor's 500 Index's average annual return of approximately 10% since 1926, accompanied by standard deviation exceeding 15% (Ibbotson Associates, 2023). By limiting stock exposure to 30%, the portfolio captures much of the equity risk premium while avoiding excessive volatility.
The combined 55% allocation to bonds (40% long-term plus 15% intermediate-term) serves as the portfolio's stabilizing force. Long-term bonds provide substantial interest rate sensitivity, performing well during economic slowdowns when central banks reduce rates. Intermediate-term bonds offer a balance between interest rate sensitivity and reduced duration risk. This bond-heavy allocation reflects Dalio's insight that bonds typically exhibit lower volatility than stocks while providing essential diversification benefits.
The 7.5% commodities allocation addresses inflation protection, as commodity prices typically rise during inflationary periods. Historical analysis by Bodie and Rosansky (1980) demonstrated that commodities provide meaningful diversification benefits and inflation hedging capabilities, though with considerable volatility. The relatively small allocation reflects commodities' high volatility and mixed long-term returns.
Finally, the 7.5% TIPS allocation provides explicit inflation protection through government-backed securities whose principal and interest payments adjust with inflation. Introduced by the U.S. Treasury in 1997, TIPS have proven effective inflation hedges, though they underperform nominal bonds during deflationary periods (Campbell & Viceira, 2001).
Historical Performance: The Evidence Speaks
Analyzing the All Weather Strategy's historical performance reveals both its strengths and limitations. Using monthly return data from 1970 to 2023, spanning over five decades of varying economic conditions, the strategy has delivered compelling risk-adjusted returns while experiencing lower volatility than traditional stock-heavy portfolios.
During this period, the All Weather allocation generated an average annual return of approximately 8.2%, compared to 10.5% for the S&P 500 Index. However, the strategy's annual volatility measured just 9.1%, substantially lower than the S&P 500's 15.8% volatility. This translated to a Sharpe ratio of 0.67 for the All Weather Strategy versus 0.54 for the S&P 500, indicating superior risk-adjusted performance.
More impressively, the strategy's maximum drawdown over this period was 12.3%, occurring during the 2008 financial crisis, compared to the S&P 500's maximum drawdown of 50.9% during the same period. This drawdown mitigation proves crucial for long-term wealth building, as Stein and DeMuth (2003) demonstrated that avoiding large losses significantly impacts compound returns over time.
The strategy performed particularly well during periods of economic stress. During the 1970s stagflation, when stocks and bonds both struggled, the All Weather portfolio's commodity and TIPS allocations provided essential protection. Similarly, during the 2000-2002 dot-com crash and the 2008 financial crisis, the portfolio's bond-heavy allocation cushioned losses while maintaining positive returns in several years when stocks declined significantly.
However, the strategy underperformed during sustained bull markets, particularly the 1990s technology boom and the 2010s post-financial crisis recovery. This underperformance reflects the strategy's conservative nature and diversified approach, which sacrifices potential upside for downside protection. As Dalio frequently emphasizes, the All Weather Strategy prioritizes "not losing money" over "making a lot of money."
Implementing the All Weather Strategy: A Practical Guide
The All Weather Strategy Indicator transforms Dalio's institutional-grade approach into an accessible tool for individual investors. The indicator provides real-time portfolio tracking, rebalancing signals, and performance analytics, eliminating much of the complexity traditionally associated with implementing sophisticated allocation strategies.
To begin implementation, investors must first determine their investable capital. As detailed analysis reveals, the All Weather Strategy requires meaningful capital to implement effectively due to transaction costs, minimum investment requirements, and the need for precise allocations across five different asset classes.
For portfolios below $50,000, the strategy becomes challenging to implement efficiently. Transaction costs consume a disproportionate share of returns, while the inability to purchase fractional shares creates allocation drift. Consider an investor with $25,000 attempting to allocate 7.5% to commodities through the iPath Bloomberg Commodity Index ETF (DJP), currently trading around $25 per share. This allocation targets $1,875, enough for only 75 shares, creating immediate tracking error.
At $50,000, implementation becomes feasible but not optimal. The 30% stock allocation ($15,000) purchases approximately 37 shares of the SPDR S&P 500 ETF (SPY) at current prices around $400 per share. The 40% long-term bond allocation ($20,000) buys 200 shares of the iShares 20+ Year Treasury Bond ETF (TLT) at approximately $100 per share. While workable, these allocations leave significant cash drag and rebalancing challenges.
The optimal minimum for individual implementation appears to be $100,000. At this level, each allocation becomes substantial enough for precise implementation while keeping transaction costs below 0.4% annually. The $30,000 stock allocation, $40,000 long-term bond allocation, $15,000 intermediate-term bond allocation, $7,500 commodity allocation, and $7,500 TIPS allocation each provide sufficient size for effective management.
For investors with $250,000 or more, the strategy implementation approaches institutional quality. Allocation precision improves, transaction costs decline as a percentage of assets, and rebalancing becomes highly efficient. These larger portfolios can also consider adding complexity through international diversification or alternative implementations.
The indicator recommends quarterly rebalancing to balance transaction costs with allocation discipline. Monthly rebalancing increases costs without substantial benefits for most investors, while annual rebalancing allows excessive drift that can meaningfully impact performance. Quarterly rebalancing, typically on the first trading day of each quarter, provides an optimal balance.
Understanding the Indicator's Functionality
The All Weather Strategy Indicator operates as a comprehensive portfolio management system, providing multiple analytical layers that professional money managers typically reserve for institutional clients. This sophisticated tool transforms Ray Dalio's institutional-grade strategy into an accessible platform for individual investors, offering features that rival professional portfolio management software.
The indicator's core architecture consists of several interconnected modules that work seamlessly together to provide complete portfolio oversight. At its foundation lies a real-time portfolio simulation engine that tracks the exact value of each ETF position based on current market prices, eliminating the need for manual calculations or external spreadsheets.
DETAILED INDICATOR COMPONENTS AND FUNCTIONS
Portfolio Configuration Module
The portfolio setup begins with the Portfolio Configuration section, which establishes the fundamental parameters for strategy implementation. The Portfolio Capital input accepts values from $1,000 to $10,000,000, accommodating everyone from beginning investors to institutional clients. This input directly drives all subsequent calculations, determining exact share quantities and portfolio values throughout the implementation period.
The Portfolio Start Date function allows users to specify when they began implementing the All Weather Strategy, creating a clear demarcation point for performance tracking. This feature proves essential for investors who want to track their actual implementation against theoretical performance, providing realistic assessment of strategy effectiveness including timing differences and implementation costs.
Rebalancing Frequency settings offer two options: Monthly and Quarterly. While monthly rebalancing provides more precise allocation control, quarterly rebalancing typically proves more cost-effective for most investors due to reduced transaction costs. The indicator automatically detects the first trading day of each period, ensuring rebalancing occurs at optimal times regardless of weekends, holidays, or market closures.
The Rebalancing Threshold parameter, adjustable from 0.5% to 10%, determines when allocation drift triggers rebalancing recommendations. Conservative settings like 1-2% maintain tight allocation control but increase trading frequency, while wider thresholds like 3-5% reduce trading costs but allow greater allocation drift. This flexibility accommodates different risk tolerances and cost structures.
Visual Display System
The Show All Weather Calculator toggle controls the main dashboard visibility, allowing users to focus on chart visualization when detailed metrics aren't needed. When enabled, this comprehensive dashboard displays current portfolio value, individual ETF allocations, target versus actual weights, rebalancing status, and performance metrics in a professionally formatted table.
Economic Environment Display provides context about current market conditions based on growth and inflation indicators. While simplified compared to Bridgewater's sophisticated regime detection, this feature helps users understand which economic "season" currently prevails and which asset classes should theoretically benefit.
Rebalancing Signals illuminate when portfolio drift exceeds user-defined thresholds, highlighting specific ETFs that require adjustment. These signals use color coding to indicate urgency: green for balanced allocations, yellow for moderate drift, and red for significant deviations requiring immediate attention.
Advanced Label System
The rebalancing label system represents one of the indicator's most innovative features, providing three distinct detail levels to accommodate different user needs and experience levels. The "None" setting displays simple symbols marking portfolio start and rebalancing events without cluttering the chart with text. This minimal approach suits experienced investors who understand the implications of each symbol.
"Basic" label mode shows essential information including portfolio values at each rebalancing point, enabling quick assessment of strategy performance over time. These labels display "START $X" for portfolio initiation and "RBL $Y" for rebalancing events, providing clear performance tracking without overwhelming detail.
"Detailed" labels provide comprehensive trading instructions including exact buy and sell quantities for each ETF. These labels might display "RBL $125,000 BUY 15 SPY SELL 25 TLT BUY 8 IEF NO TRADES DJP SELL 12 SCHP" providing complete implementation guidance. This feature essentially transforms the indicator into a personal portfolio manager, eliminating guesswork about exact trades required.
Professional Color Themes
Eight professionally designed color themes adapt the indicator's appearance to different aesthetic preferences and market analysis styles. The "Gold" theme reflects traditional wealth management aesthetics, while "EdgeTools" provides modern professional appearance. "Behavioral" uses psychologically informed colors that reinforce disciplined decision-making, while "Quant" employs high-contrast combinations favored by quantitative analysts.
"Ocean," "Fire," "Matrix," and "Arctic" themes provide distinctive visual identities for traders who prefer unique chart aesthetics. Each theme automatically adjusts for dark or light mode optimization, ensuring optimal readability across different TradingView configurations.
Real-Time Portfolio Tracking
The portfolio simulation engine continuously tracks five separate ETF positions: SPY for stocks, TLT for long-term bonds, IEF for intermediate-term bonds, DJP for commodities, and SCHP for TIPS. Each position's value updates in real-time based on current market prices, providing instant feedback about portfolio performance and allocation drift.
Current share calculations determine exact holdings based on the most recent rebalancing, while target shares reflect optimal allocation based on current portfolio value. Trade calculations show precisely how many shares to buy or sell during rebalancing, eliminating manual calculations and potential errors.
Performance Analytics Suite
The indicator's performance measurement capabilities rival professional portfolio analysis software. Sharpe ratio calculations incorporate current risk-free rates obtained from Treasury yield data, providing accurate risk-adjusted performance assessment. Volatility measurements use rolling periods to capture changing market conditions while maintaining statistical significance.
Portfolio return calculations track both absolute and relative performance, comparing the All Weather implementation against individual asset classes and benchmark indices. These metrics update continuously, providing real-time assessment of strategy effectiveness and implementation quality.
Data Quality Monitoring
Sophisticated data quality checks ensure reliable indicator operation across different market conditions and potential data interruptions. The system monitors all five ETF price feeds plus economic data sources, providing quality scores that alert users to potential data issues that might affect calculations.
When data quality degrades, the indicator automatically switches to fallback values or alternative data sources, maintaining functionality during temporary market data interruptions. This robust design ensures consistent operation even during volatile market conditions when data feeds occasionally experience disruptions.
Risk Management and Behavioral Considerations
Despite its sophisticated design, the All Weather Strategy faces behavioral challenges that have derailed countless well-intentioned investment plans. The strategy's conservative nature means it will underperform growth stocks during bull markets, potentially by substantial margins. Maintaining discipline during these periods requires understanding that the strategy optimizes for risk-adjusted returns over absolute returns.
Behavioral finance research by Kahneman and Tversky (1979) demonstrates that investors feel losses approximately twice as intensely as equivalent gains. This loss aversion creates powerful psychological pressure to abandon defensive strategies during bull markets when aggressive portfolios appear more attractive. The All Weather Strategy's bond-heavy allocation will seem overly conservative when technology stocks double in value, as occurred repeatedly during the 2010s.
Conversely, the strategy's defensive characteristics provide psychological comfort during market stress. When stocks crash 30-50%, as they periodically do, the All Weather portfolio's modest losses feel manageable rather than catastrophic. This emotional stability enables investors to maintain their investment discipline when others capitulate, often at the worst possible times.
Rebalancing discipline presents another behavioral challenge. Selling winners to buy losers contradicts natural human tendencies but remains essential for the strategy's success. When stocks have outperformed bonds for several quarters, rebalancing requires selling high-performing stock positions to purchase seemingly stagnant bond positions. This action feels counterintuitive but captures the strategy's systematic approach to risk management.
Tax considerations add complexity for taxable accounts. Frequent rebalancing generates taxable events that can erode after-tax returns, particularly for high-income investors facing elevated capital gains rates. Tax-advantaged accounts like 401(k)s and IRAs provide ideal vehicles for All Weather implementation, eliminating tax friction from rebalancing activities.
Capital Requirements and Cost Analysis
Comprehensive cost analysis reveals the capital requirements for effective All Weather implementation. Annual expenses include management fees for each ETF, transaction costs from rebalancing, and bid-ask spreads from trading less liquid securities.
ETF expense ratios vary significantly across asset classes. The SPDR S&P 500 ETF charges 0.09% annually, while the iShares 20+ Year Treasury Bond ETF charges 0.20%. The iShares 7-10 Year Treasury Bond ETF charges 0.15%, the Schwab US TIPS ETF charges 0.05%, and the iPath Bloomberg Commodity Index ETF charges 0.75%. Weighted by the All Weather allocations, total expense ratios average approximately 0.19% annually.
Transaction costs depend heavily on broker selection and account size. Premium brokers like Interactive Brokers charge $1-2 per trade, resulting in $20-40 annually for quarterly rebalancing. Discount brokers may charge higher per-trade fees but offer commission-free ETF trading for selected funds. Zero-commission brokers eliminate explicit trading costs but often impose wider bid-ask spreads that function as hidden fees.
Bid-ask spreads represent the difference between buying and selling prices for each security. Highly liquid ETFs like SPY maintain spreads of 1-2 basis points, while less liquid commodity ETFs may exhibit spreads of 5-10 basis points. These costs accumulate through rebalancing activities, typically totaling 10-15 basis points annually.
For a $100,000 portfolio, total annual costs including expense ratios, transaction fees, and spreads typically range from 0.35% to 0.45%, or $350-450 annually. These costs decline as a percentage of assets as portfolio size increases, reaching approximately 0.25% for portfolios exceeding $250,000.
Comparing costs to potential benefits reveals the strategy's value proposition. Historical analysis suggests the All Weather approach reduces portfolio volatility by 35-40% compared to stock-heavy allocations while maintaining competitive returns. This volatility reduction provides substantial value during market stress, potentially preventing behavioral mistakes that destroy long-term wealth.
Alternative Implementations and Customizations
While the original All Weather allocation provides an excellent starting point, investors may consider modifications based on personal circumstances, market conditions, or geographic considerations. International diversification represents one potential enhancement, adding exposure to developed and emerging market bonds and equities.
Geographic customization becomes important for non-US investors. European investors might replace US Treasury bonds with German Bunds or broader European government bond indices. Currency hedging decisions add complexity but may reduce volatility for investors whose spending occurs in non-dollar currencies.
Tax-location strategies optimize after-tax returns by placing tax-inefficient assets in tax-advantaged accounts while holding tax-efficient assets in taxable accounts. TIPS and commodity ETFs generate ordinary income taxed at higher rates, making them candidates for retirement account placement. Stock ETFs generate qualified dividends and long-term capital gains taxed at lower rates, making them suitable for taxable accounts.
Some investors prefer implementing the bond allocation through individual Treasury securities rather than ETFs, eliminating management fees while gaining precise maturity control. Treasury auctions provide access to new securities without bid-ask spreads, though this approach requires more sophisticated portfolio management.
Factor-based implementations replace broad market ETFs with factor-tilted alternatives. Value-tilted stock ETFs, quality-focused bond ETFs, or momentum-based commodity indices may enhance returns while maintaining the All Weather framework's diversification benefits. However, these modifications introduce additional complexity and potential tracking error.
Conclusion: Embracing the Long Game
The All Weather Strategy represents more than an investment approach; it embodies a philosophy of financial resilience that prioritizes sustainable wealth building over speculative gains. In an investment landscape increasingly dominated by algorithmic trading, meme stocks, and cryptocurrency volatility, Dalio's methodical approach offers a refreshing alternative grounded in economic theory and historical evidence.
The strategy's greatest strength lies not in its potential for extraordinary returns, but in its capacity to deliver reasonable returns across diverse economic environments while protecting capital during market stress. This characteristic becomes increasingly valuable as investors approach or enter retirement, when portfolio preservation assumes greater importance than aggressive growth.
Implementation requires discipline, adequate capital, and realistic expectations. The strategy will underperform growth-oriented approaches during bull markets while providing superior downside protection during bear markets. Investors must embrace this trade-off consciously, understanding that the strategy optimizes for long-term wealth building rather than short-term performance.
The All Weather Strategy Indicator democratizes access to institutional-quality portfolio management, providing individual investors with tools previously available only to wealthy families and institutions. By automating allocation tracking, rebalancing signals, and performance analysis, the indicator removes much of the complexity that has historically limited sophisticated strategy implementation.
For investors seeking a systematic, evidence-based approach to long-term wealth building, the All Weather Strategy provides a compelling framework. Its emphasis on diversification, risk management, and behavioral discipline aligns with the fundamental principles that have created lasting wealth throughout financial history. While the strategy may not generate headlines or inspire cocktail party conversations, it offers something more valuable: a reliable path toward financial security across all economic seasons.
As Dalio himself notes, "The biggest mistake investors make is to believe that what happened in the recent past is likely to persist, and they design their portfolios accordingly." The All Weather Strategy's enduring appeal lies in its rejection of this recency bias, instead embracing the uncertainty of markets while positioning for success regardless of which economic season unfolds.
STEP-BY-STEP INDICATOR SETUP GUIDE
Setting up the All Weather Strategy Indicator requires careful attention to each configuration parameter to ensure optimal implementation. This comprehensive setup guide walks through every setting and explains its impact on strategy performance.
Initial Setup Process
Begin by adding the indicator to your TradingView chart. Search for "Ray Dalio's All Weather Strategy" in the indicator library and apply it to any chart. The indicator operates independently of the underlying chart symbol, drawing data directly from the five required ETFs regardless of which security appears on the chart.
Portfolio Configuration Settings
Start with the Portfolio Capital input, which drives all subsequent calculations. Enter your exact investable capital, ranging from $1,000 to $10,000,000. This input determines share quantities, trade recommendations, and performance calculations. Conservative recommendations suggest minimum capitals of $50,000 for basic implementation or $100,000 for optimal precision.
Select your Portfolio Start Date carefully, as this establishes the baseline for all performance calculations. Choose the date when you actually began implementing the All Weather Strategy, not when you first learned about it. This date should reflect when you first purchased ETFs according to the target allocation, creating realistic performance tracking.
Choose your Rebalancing Frequency based on your cost structure and precision preferences. Monthly rebalancing provides tighter allocation control but increases transaction costs. Quarterly rebalancing offers the optimal balance for most investors between allocation precision and cost control. The indicator automatically detects appropriate trading days regardless of your selection.
Set the Rebalancing Threshold based on your tolerance for allocation drift and transaction costs. Conservative investors preferring tight control should use 1-2% thresholds, while cost-conscious investors may prefer 3-5% thresholds. Lower thresholds maintain more precise allocations but trigger more frequent trading.
Display Configuration Options
Enable Show All Weather Calculator to display the comprehensive dashboard containing portfolio values, allocations, and performance metrics. This dashboard provides essential information for portfolio management and should remain enabled for most users.
Show Economic Environment displays current economic regime classification based on growth and inflation indicators. While simplified compared to Bridgewater's sophisticated models, this feature provides useful context for understanding current market conditions.
Show Rebalancing Signals highlights when portfolio allocations drift beyond your threshold settings. These signals use color coding to indicate urgency levels, helping prioritize rebalancing activities.
Advanced Label Customization
Configure Show Rebalancing Labels based on your need for chart annotations. These labels mark important portfolio events and can provide valuable historical context, though they may clutter charts during extended time periods.
Select appropriate Label Detail Levels based on your experience and information needs. "None" provides minimal symbols suitable for experienced users. "Basic" shows portfolio values at key events. "Detailed" provides complete trading instructions including exact share quantities for each ETF.
Appearance Customization
Choose Color Themes based on your aesthetic preferences and trading style. "Gold" reflects traditional wealth management appearance, while "EdgeTools" provides modern professional styling. "Behavioral" uses psychologically informed colors that reinforce disciplined decision-making.
Enable Dark Mode Optimization if using TradingView's dark theme for optimal readability and contrast. This setting automatically adjusts all colors and transparency levels for the selected theme.
Set Main Line Width based on your chart resolution and visual preferences. Higher width values provide clearer allocation lines but may overwhelm smaller charts. Most users prefer width settings of 2-3 for optimal visibility.
Troubleshooting Common Setup Issues
If the indicator displays "Data not available" messages, verify that all five ETFs (SPY, TLT, IEF, DJP, SCHP) have valid price data on your selected timeframe. The indicator requires daily data availability for all components.
When rebalancing signals seem inconsistent, check your threshold settings and ensure sufficient time has passed since the last rebalancing event. The indicator only triggers signals on designated rebalancing days (first trading day of each period) when drift exceeds threshold levels.
If labels appear at unexpected chart locations, verify that your chart displays percentage values rather than price values. The indicator forces percentage formatting and 0-40% scaling for optimal allocation visualization.
COMPREHENSIVE BIBLIOGRAPHY AND FURTHER READING
PRIMARY SOURCES AND RAY DALIO WORKS
Dalio, R. (2017). Principles: Life and work. New York: Simon & Schuster.
Dalio, R. (2018). A template for understanding big debt crises. Bridgewater Associates.
Dalio, R. (2021). Principles for dealing with the changing world order: Why nations succeed and fail. New York: Simon & Schuster.
BRIDGEWATER ASSOCIATES RESEARCH PAPERS
Jensen, G., Kertesz, A. & Prince, B. (2010). All Weather strategy: Bridgewater's approach to portfolio construction. Bridgewater Associates Research.
Prince, B. (2011). An in-depth look at the investment logic behind the All Weather strategy. Bridgewater Associates Daily Observations.
Bridgewater Associates. (2015). Risk parity in the context of larger portfolio construction. Institutional Research.
ACADEMIC RESEARCH ON RISK PARITY AND PORTFOLIO CONSTRUCTION
Ang, A. & Bekaert, G. (2002). International asset allocation with regime shifts. The Review of Financial Studies, 15(4), 1137-1187.
Bodie, Z. & Rosansky, V. I. (1980). Risk and return in commodity futures. Financial Analysts Journal, 36(3), 27-39.
Campbell, J. Y. & Viceira, L. M. (2001). Who should buy long-term bonds? American Economic Review, 91(1), 99-127.
Clarke, R., De Silva, H. & Thorley, S. (2013). Risk parity, maximum diversification, and minimum variance: An analytic perspective. Journal of Portfolio Management, 39(3), 39-53.
Fama, E. F. & French, K. R. (2004). The capital asset pricing model: Theory and evidence. Journal of Economic Perspectives, 18(3), 25-46.
BEHAVIORAL FINANCE AND IMPLEMENTATION CHALLENGES
Kahneman, D. & Tversky, A. (1979). Prospect theory: An analysis of decision under risk. Econometrica, 47(2), 263-292.
Thaler, R. H. & Sunstein, C. R. (2008). Nudge: Improving decisions about health, wealth, and happiness. New Haven: Yale University Press.
Montier, J. (2007). Behavioural investing: A practitioner's guide to applying behavioural finance. Chichester: John Wiley & Sons.
MODERN PORTFOLIO THEORY AND QUANTITATIVE METHODS
Markowitz, H. (1952). Portfolio selection. The Journal of Finance, 7(1), 77-91.
Sharpe, W. F. (1964). Capital asset prices: A theory of market equilibrium under conditions of risk. The Journal of Finance, 19(3), 425-442.
Black, F. & Litterman, R. (1992). Global portfolio optimization. Financial Analysts Journal, 48(5), 28-43.
PRACTICAL IMPLEMENTATION AND ETF ANALYSIS
Gastineau, G. L. (2010). The exchange-traded funds manual. 2nd ed. Hoboken: John Wiley & Sons.
Poterba, J. M. & Shoven, J. B. (2002). Exchange-traded funds: A new investment option for taxable investors. American Economic Review, 92(2), 422-427.
Israelsen, C. L. (2005). A refinement to the Sharpe ratio and information ratio. Journal of Asset Management, 5(6), 423-427.
ECONOMIC CYCLE ANALYSIS AND ASSET CLASS RESEARCH
Ilmanen, A. (2011). Expected returns: An investor's guide to harvesting market rewards. Chichester: John Wiley & Sons.
Swensen, D. F. (2009). Pioneering portfolio management: An unconventional approach to institutional investment. Rev. ed. New York: Free Press.
Siegel, J. J. (2014). Stocks for the long run: The definitive guide to financial market returns & long-term investment strategies. 5th ed. New York: McGraw-Hill Education.
RISK MANAGEMENT AND ALTERNATIVE STRATEGIES
Taleb, N. N. (2007). The black swan: The impact of the highly improbable. New York: Random House.
Lowenstein, R. (2000). When genius failed: The rise and fall of Long-Term Capital Management. New York: Random House.
Stein, D. M. & DeMuth, P. (2003). Systematic withdrawal from retirement portfolios: The impact of asset allocation decisions on portfolio longevity. AAII Journal, 25(7), 8-12.
CONTEMPORARY DEVELOPMENTS AND FUTURE DIRECTIONS
Asness, C. S., Frazzini, A. & Pedersen, L. H. (2012). Leverage aversion and risk parity. Financial Analysts Journal, 68(1), 47-59.
Roncalli, T. (2013). Introduction to risk parity and budgeting. Boca Raton: CRC Press.
Ibbotson Associates. (2023). Stocks, bonds, bills, and inflation 2023 yearbook. Chicago: Morningstar.
PERIODICALS AND ONGOING RESEARCH
Journal of Portfolio Management - Quarterly publication featuring cutting-edge research on portfolio construction and risk management
Financial Analysts Journal - Bi-monthly publication of the CFA Institute with practical investment research
Bridgewater Associates Daily Observations - Regular market commentary and research from the creators of the All Weather Strategy
RECOMMENDED READING SEQUENCE
For investors new to the All Weather Strategy, begin with Dalio's "Principles" for philosophical foundation, then proceed to the Bridgewater research papers for technical details. Supplement with Markowitz's original portfolio theory work and behavioral finance literature from Kahneman and Tversky.
Intermediate students should focus on academic papers by Ang & Bekaert on regime shifts, Clarke et al. on risk parity methods, and Ilmanen's comprehensive analysis of expected returns across asset classes.
Advanced practitioners will benefit from Roncalli's technical treatment of risk parity mathematics, Asness et al.'s academic critique of leverage aversion, and ongoing research in the Journal of Portfolio Management.
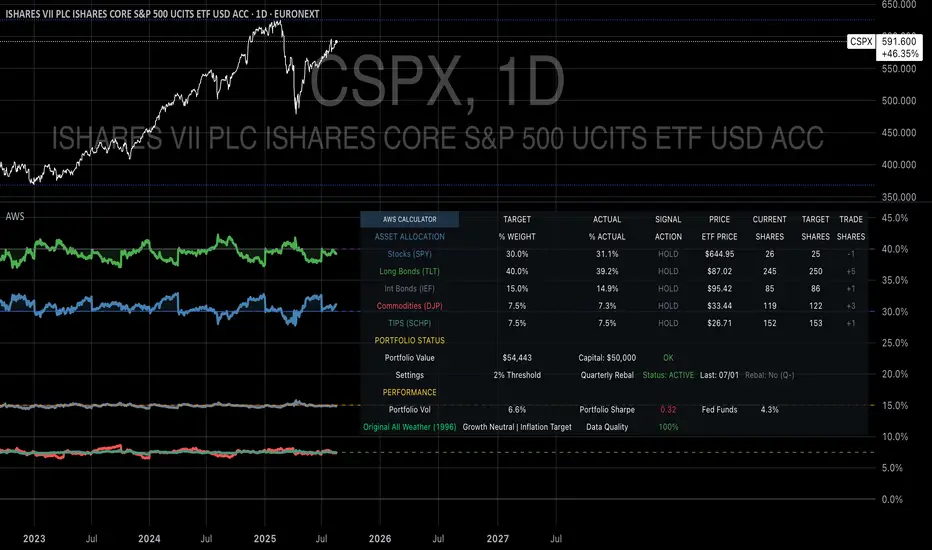
Мой скрипт// This Pine Script® code is subject to the terms of the Mozilla Public License 2.0 at mozilla.org
// © Mistab1009
//@version=6
indicator("MistaB SMC Navigation Toolkit", overlay=true, max_boxes_count=200)
// === USER INPUTS ===
extendBars = input.int(250, "Box Extension", group="Order Blocks")
opacity = input.int(75, "Box Opacity", group="Order Blocks")
showMidLine = input.bool(true, "Show Midline", group="Order Blocks")
bullColor = input.color(color.green, "Bullish OB Color", group="Order Blocks")
bearColor = input.color(color.red, "Bearish OB Color", group="Order Blocks")
useFractalSwings = input.bool(true, "Use Fractal Swings for OBs", group="Order Blocks")
useDisplacement = input.bool(true, "Require Displacement Candle", group="Order Blocks")
useHighVol = input.bool(true, "Require High Volume", group="Order Blocks")
obBuffer = input.float(0.0, "OB Buffer (points)", step=0.05, group="Order Blocks")
volLength = input.int(21, "Volume MA Length", group="Order Blocks")
volMultiplier = input.float(1.01, "Volume Multiplier", step=0.01, group="Order Blocks")
displacementMultiplier = input.float(1.0, "Displacement Multiplier", minval=0.5, maxval=1.0, step=0.05, group="Order Blocks")
lineExtendLength = input.int(20, "Structure Line Length", group="Structure")
showOB = input.bool(true, "Show Order Blocks", group="Order Blocks")
showFVG = input.bool(true, "Show Fair Value Gaps", group="FVG")
cleanupDelay = input.int(20, "Cleanup Delay (bars)", minval=1, group="Cleanup Settings")
fastCleanup = input.bool(false, "Fast Cleanup Mode", group="Cleanup Settings")
brokenColor = input.color(color.gray, "Broken OB/FVG Color", group="Cleanup Settings")
// Market Structure dimming
msDimOpacity = input.int(70, "Dimmed Structure/FVG Opacity (HTF mismatch)", minval=0, maxval=100, group="Structure")
// Premium/Discount Zones
showZones = input.bool(true, "Show Premium/Discount Zones", group="Premium/Discount Zones")
premiumColor = input.color(color.red, "Premium Zone Color", group="Premium/Discount Zones")
discountColor = input.color(color.green, "Discount Zone Color", group="Premium/Discount Zones")
// FVG Colors
bullish_fvg_color = input.color(color.new(color.green, 70), "Bullish FVG Color", group="FVG")
bearish_fvg_color = input.color(color.new(color.red, 70), "Bearish FVG Color", group="FVG")
// HTF Confirmation
confirmationTF = input.timeframe("60", "HTF Confirmation TF", group="HTF Confirmation")
requireHTF = input.bool(true, "Require HTF Alignment", group="HTF Confirmation")
// === ARRAYS ===
var box bullOBs = array.new_box()
var box bearOBs = array.new_box()
var line bullLines = array.new_line()
var line bearLines = array.new_line()
var int brokenTimestampsBull = array.new_int()
var int brokenTimestampsBear = array.new_int()
// === FRACTAL LOGIC ===
useFractal = input.string("5", "Fractal Type", options= , group="Structure")
fractalOffset = useFractal == "5" ? 2 : useFractal == "3" ? 1 : na
isSwingHigh = useFractal != "None" and not na(fractalOffset) and high > high and high > high and (useFractal != "5" or (high > high and high > high ))
isSwingLow = useFractal != "None" and not na(fractalOffset) and low < low and low < low and (useFractal != "5" or (low < low and low < low ))
// === OPPOSITE CANDLE FINDER ===
f_findOppositeCandle(_bull) =>
int retIndex = na
float retHigh = na
float retLow = na
for i = 1 to 50
bool isOpp = _bull ? (open > close ) : (close > open )
if isOpp
retIndex := bar_index - i
retHigh := high
retLow := low
break
// === HTF STRUCTURE DETECTION ===
htfTrendUp = request.security(syminfo.tickerid, confirmationTF, close > ta.sma(close, 20))
htfBullOB = request.security(syminfo.tickerid, confirmationTF, isSwingLow)
htfBearOB = request.security(syminfo.tickerid, confirmationTF, isSwingHigh)
// === HTF STATUS LABEL ===
var label htfLabel = na
var string htfTxt = ""
var color htfCol = color.gray
if barstate.islast
if not requireHTF
htfTxt := "HTF: Not Required"
htfCol := color.gray
else
if htfTrendUp
htfTxt := "HTF: Bullish ✅"
htfCol := color.green
else
htfTxt := "HTF: Bearish ✅"
htfCol := color.red
if na(htfLabel)
htfLabel := label.new(bar_index, high, text=htfTxt, style=label.style_label_left, textcolor=color.white, color=htfCol)
else
label.set_xy(htfLabel, bar_index, high)
label.set_text(htfLabel, htfTxt)
label.set_color(htfLabel, htfCol)
// === CLEANUP FUNCTION ===
f_cleanOB(_boxes, _lines, _timestamps, _isBull) =>
sz = array.size(_boxes)
if sz > 0
for i = sz - 1 to 0
b = array.get(_boxes, i)
l = array.get(_lines, i)
top = box.get_top(b)
bottom = box.get_bottom(b)
_broken = _isBull ? (close < bottom) : (close > top)
expired = bar_index - box.get_left(b) > extendBars
if _broken
if fastCleanup
box.delete(b)
if not na(l)
line.delete(l)
array.remove(_boxes, i)
array.remove(_lines, i)
if array.size(_timestamps) > i
array.remove(_timestamps, i)
continue
else
if array.size(_timestamps) <= i
array.push(_timestamps, bar_index)
else
array.set(_timestamps, i, bar_index)
box.set_bgcolor(b, color.new(brokenColor, opacity))
if not na(l)
line.set_color(l, brokenColor)
if expired or (array.size(_timestamps) > i and bar_index - array.get(_timestamps, i) >= cleanupDelay)
box.delete(b)
if not na(l)
line.delete(l)
array.remove(_boxes, i)
array.remove(_lines, i)
if array.size(_timestamps) > i
array.remove(_timestamps, i)
// === OB DETECTION ===
isDisplacementBull = close - open > ta.atr(14) * displacementMultiplier
isDisplacementBear = open - close > ta.atr(14) * displacementMultiplier
isHighVolume = volume > ta.sma(volume, volLength) * volMultiplier
if showOB and isSwingLow and bar_index > fractalOffset + 2
ok = (not useDisplacement or isDisplacementBull) and (not useHighVol or isHighVolume)
htfOK = not requireHTF or (htfTrendUp and htfBullOB)
= f_findOppositeCandle(true)
if ok and htfOK and not na(idxB)
hiB += obBuffer
loB -= obBuffer
array.push(bullOBs, box.new(left=idxB, top=hiB, right=bar_index + extendBars, bottom=loB, bgcolor=color.new(bullColor, opacity), border_color=bullColor, xloc=xloc.bar_index))
array.push(bullLines, showMidLine ? line.new(x1=idxB, y1=(hiB+loB)/2, x2=bar_index + extendBars, y2=(hiB+loB)/2, color=bullColor, style=line.style_dashed, xloc=xloc.bar_index) : na)
if showOB and isSwingHigh and bar_index > fractalOffset + 2
ok = (not useDisplacement or isDisplacementBear) and (not useHighVol or isHighVolume)
htfOK = not requireHTF or (not htfTrendUp and htfBearOB)
= f_findOppositeCandle(false)
if ok and htfOK and not na(idxS)
hiS += obBuffer
loS -= obBuffer
array.push(bearOBs, box.new(left=idxS, top=hiS, right=bar_index + extendBars, bottom=loS, bgcolor=color.new(bearColor, opacity), border_color=bearColor, xloc=xloc.bar_index))
array.push(bearLines, showMidLine ? line.new(x1=idxS, y1=(hiS+loS)/2, x2=bar_index + extendBars, y2=(hiS+loS)/2, color=bearColor, style=line.style_dashed, xloc=xloc.bar_index) : na)
f_cleanOB(bullOBs, bullLines, brokenTimestampsBull, true)
f_cleanOB(bearOBs, bearLines, brokenTimestampsBear, false)
// === MARKET STRUCTURE ===
var float lastHigh = na
var float lastLow = na
var bool trendUp = false
var bool prevTrendUp = false
if useFractal != "None" and bar_index > fractalOffset + 2
if isSwingHigh
swingHigh = high
if not na(lastHigh)
prevTrendUp := trendUp
trendUp := swingHigh > lastHigh
colorLine = trendUp ? color.green : color.red
structIsBull = trendUp
htfMatches = not requireHTF or (structIsBull and htfTrendUp) or (not structIsBull and not htfTrendUp)
colorUsed = htfMatches ? colorLine : color.new(colorLine, msDimOpacity)
txt = trendUp ? (prevTrendUp ? "HH BoS" : "HH CHoCH") : (prevTrendUp ? "LH CHoCH" : "LH BoS")
label.new(bar_index - fractalOffset - 1, swingHigh, text=txt, style=label.style_label_down, color=colorUsed, textcolor=color.white, size=size.small)
line.new(x1=bar_index - fractalOffset - 1, y1=swingHigh, x2=bar_index - fractalOffset - 1 + lineExtendLength, y2=swingHigh, color=colorUsed, width=1, xloc=xloc.bar_index)
lastHigh := swingHigh
if isSwingLow
swingLow = low
if not na(lastLow)
prevTrendUp := trendUp
trendUp := swingLow > lastLow
colorLine = trendUp ? color.green : color.red
structIsBull = trendUp
htfMatches = not requireHTF or (structIsBull and htfTrendUp) or (not structIsBull and not htfTrendUp)
colorUsed = htfMatches ? colorLine : color.new(colorLine, msDimOpacity)
txt = trendUp ? (prevTrendUp ? "HL BoS" : "HL CHoCH") : (prevTrendUp ? "LL CHoCH" : "LL BoS")
label.new(bar_index - fractalOffset - 1, swingLow, text=txt, style=label.style_label_up, color=colorUsed, textcolor=color.white, size=size.small)
line.new(x1=bar_index - fractalOffset - 1, y1=swingLow, x2=bar_index - fractalOffset - 1 + lineExtendLength, y2=swingLow, color=colorUsed, width=1, xloc=xloc.bar_index)
lastLow := swingLow
// === FVG LOGIC ===
var box bullish_fvg_boxes = array.new_box()
var label bullish_labels = array.new_label()
var box bearish_fvg_boxes = array.new_box()
var label bearish_labels = array.new_label()
var int bullFvgTimestamps = array.new_int()
var int bearFvgTimestamps = array.new_int()
if showFVG and bar_index >= 2
if low > high // Bullish FVG
htfMatches = not requireHTF or htfTrendUp
colorUsed = htfMatches ? bullish_fvg_color : color.new(bullish_fvg_color, msDimOpacity)
b = box.new(left=bar_index - 2, top=low, right=bar_index, bottom=high , bgcolor=colorUsed, border_color=na, extend=extend.right, xloc=xloc.bar_index)
array.push(bullish_fvg_boxes, b)
l = label.new(x=bar_index + 20, y=(low + high ) / 2, text="FVG", style=label.style_label_left, color=na, textcolor=color.green, xloc=xloc.bar_index)
array.push(bullish_labels, l)
if high < low // Bearish FVG
htfMatches = not requireHTF or not htfTrendUp
colorUsed = htfMatches ? bearish_fvg_color : color.new(bearish_fvg_color, msDimOpacity)
b = box.new(left=bar_index - 2, top=low , right=bar_index, bottom=high, bgcolor=colorUsed, border_color=na, extend=extend.right, xloc=xloc.bar_index)
array.push(bearish_fvg_boxes, b)
l = label.new(x=bar_index + 20, y=(low + high) / 2, text="FVG", style=label.style_label_left, color=na, textcolor=color.red, xloc=xloc.bar_index)
array.push(bearish_labels, l)
// === FVG Cleanup ===
f_cleanFVG(_boxes, _labels, _timestamps, _isBull) =>
sz = array.size(_boxes)
if sz > 0
for j = sz - 1 to 0
b = array.get(_boxes, j)
l = array.get(_labels, j)
bool filled = _isBull ? (bar_index > (box.get_left(b) + 1) and close < box.get_bottom(b)) : (bar_index > (box.get_left(b) + 1) and close > box.get_top(b))
if filled
if fastCleanup
box.delete(b)
label.delete(l)
array.remove(_boxes, j)
array.remove(_labels, j)
if array.size(_timestamps) > j
array.remove(_timestamps, j)
continue
if array.size(_timestamps) <= j
array.push(_timestamps, bar_index)
box.set_bgcolor(b, color.new(brokenColor, opacity))
label.set_textcolor(l, brokenColor)
if array.size(_timestamps) > j and bar_index - array.get(_timestamps, j) >= cleanupDelay
box.delete(b)
label.delete(l)
array.remove(_boxes, j)
array.remove(_labels, j)
array.remove(_timestamps, j)
f_cleanFVG(bullish_fvg_boxes, bullish_labels, bullFvgTimestamps, true)
f_cleanFVG(bearish_fvg_boxes, bearish_labels, bearFvgTimestamps, false)
// === PREMIUM / DISCOUNT ZONES ===
var box premBox = na
var box discBox = na
mid = (lastHigh + lastLow) / 2
if showZones and not na(mid) and not na(lastHigh) and not na(lastLow)
if not na(premBox)
box.delete(premBox)
if not na(discBox)
box.delete(discBox)
premBox := box.new(left=bar_index - 10, right=bar_index, top=lastHigh, bottom=mid, bgcolor=color.new(premiumColor, 85), border_color=na, xloc=xloc.bar_index)
discBox := box.new(left=bar_index - 10, right=bar_index, top=mid, bottom=lastLow, bgcolor=color.new(discountColor, 85), border_color=na, xloc=xloc.bar_index)

Bearish Breakaway V2 (Publish) FVG concept This is the version 2 of bearish breakaway indicator. This is the bearish version. Please also use the bullish v2 version in my page.
Here is an example, 8-15-2025, NQ,
you see the 1st 1m bearish breakaway candle formed at 941am, then you are looking for short entry, if you enter at the low of this breakaway candle, you still have enough room for a profitable trade in the short direction.
By no means, this indicator is telling to short the moment you see a bearish breakaway candle at anytime.
However, if you don't see the formation yet, it is better to not to enter the trade. It takes a lot of skills to execute the trade, how do you enter the trade based on the indicator , that will be your edge, and the indicator can only give you a visual signal.

liquidity reversalThis script detects liquidity sweeps and confirms reversals based on price action. It looks for:
- A sweep of a recent high or low
- A reversal candle closing back inside range
- (Optional) Confirmation via market structure break (MSB)
When confirmed, it plots:
- BUY signals after low sweep + bullish break
- SELL signals after high sweep + bearish break
Works on any timeframe. Designed for MNQ scalping during NY open.