Future Option OI VOL Index Terminal (JITENDRA)Future Option OI VOL Index Terminal
This indicator is a real-time institutional flow terminal designed for Futures & Options traders.
It combines Futures LTP, OI, Volume, OI Action with Options Call/Put Volume, Delta, Premium, CPRV & Heatmap analytics into a powerful table dashboard.
Overview Summary of This Indicator
It works on Symentensly Fetching Future Open Interest Change ,Volume and, Option Strike Volume Data
NIFTY
BANKNIFTY
MCX Commodities
Stock Futures
Setting Snapshot/ Image
What This Indicator Shows
This is a complete order flow activity terminal that provides:
All data is displayed in a heatmap table with last 5 closed candles + live candle.
Futures Side
LTP Change (Momentum)
OI Change (Position buildup / unwinding)
Futures Volume (Participation strength)
OI Action (Long/Short buildup & covering)
Options Side
CALL Volume (multi-strike combined)
PUT Volume (multi-strike combined)
Delta (Call – Put volume)
CPRV (Call to Put volume ratio)
CALL % Change
PUT % Change
Delta %
CALL Premium strength vs VWAP
PUT Premium strength vs VWAP
Core Concept
This script is based on trading logic:
Futures price + OI → tells directional bias
Options volume + delta → tells market pressure
CPRV → tells who is dominating (Calls or Puts)
Premium vs VWAP → tells smart money positioning
Heatmaps → show strength & aggression
KEY FEATURES INPUT SETTINGS — COMPLETE EXPLANATION
Auto Detect Instrument From Chart
NIFTY
BANKNIFTY
MCX Commodities
Stock Futures & Spot
Uses correct futures & option symbols automatically.
Auto Detect Instrument From Chart = true
Turn OFF if you want to use manual instrument selection.
Manual Instrument
Manual Instrument = NIFTY / BANKNIFTY / CRUDEOIL / NATURALGAS / GOLDMINI / SILVERMINI / COPPER / ZINC / STOCK
Strike Balance Mode
| 2 ITM + ATM + 2 OTM | 5 strikes combined (strong flow)
| 1 ITM + ATM + 1 OTM | 3 strikes combined (lighter data load)
Expiry, ATM & Gap Settings
Each instrument has:
Expiry = YYMMDD
ATM Strike
Strike Gap
NIFTY Expiry = 260127
ATM = 25500
Gap = 100
ATM Setting Snapshot/ Image
% CALCULATION METHOD
Option 1= % change from previous candle
Option 2= EMA. % deviation from EMA, EMA Length is USER configurable.
Premium Strength
Compares option premium vs VWAP:
Green → Premium above VWAP (buying pressure)
Red → Premium below VWAP (selling pressure)
UI SETTINGS
Table Position All
Text Size All
COLUMN TOGGLES
You can enable/disable any column individually. This allows you to build a custom terminal layout.
HOW TO TRADE USING THIS TERMINAL
It helps to Identify Reversal, Trend Continuation at Major levels.
Bullish Setup
LTP Δ → Green
OI Action → LB / SC
CALL Volume > PUT Volume
Delta → Positive
CPRV > 1.2
CALL Premium → Green
Bearish Setup
LTP Δ → Red
OI Action → SB / LC
PUT Volume > CALL Volume
Delta → Negative
CPRV < 0.8
PUT Premium → Green
Thanks
TradindView Community
Vwaps

Confluence Framework ProConfluence Framework Pro is a discretionary market-context indicator that evaluates whether trend, structure, momentum, volume, and value are aligned in the same direction.
Instead of producing frequent entry signals, the script focuses on identifying periods of strong participation and avoiding low-quality or extended market conditions.
All calculations are performed on confirmed bar close and the indicator does not repaint.
How the indicator works
The framework evaluates eight independent components on every bar:
Trend & Direction
Supertrend direction
EMA position (price above/below long-term EMA)
Value
Distance of price from session VWAP using ATR-normalized thresholds
Momentum & Participation RSI slope and level (above/below 40)
Recent MACD crossover strength
ADX trend strength with DI confirmation
Volume Current volume compared to its moving average
Market Structure
Breakout of recent swing highs/lows using an ATR buffer
Each component contributes:
A binary match (used for minimum confluence requirements)
A weighted score (used for strength grading)
Confluence scoring & grading
Each condition contributes a fixed weight to a total score:
Supertrend (20%)
EMA alignment (18%)
VWAP context (17%)
ADX trend strength (16%)
MACD momentum (12%)
Market structure breakout (7%)
RSI participation (5%)
Volume confirmation (5%)
The final score is converted into a grade:
A+ / A → strong multi-factor alignment
B → partial alignment
C → weak or early formation
The dominant side (bullish or bearish) becomes the displayed market bias.
Risk & market quality filters
Before any signal is allowed, the script blocks setups when:
Price is excessively far from EMA or VWAP (chasing condition)
Candle size is unusually large relative to ATR
Volume is below threshold
Market structure is weak
The dashboard displays the blocking reason (weak structure, low volume, big candle, or extended price).
Trading modes & risk profiles
Trading modes adjust indicator sensitivity:
Intraday: 5m–15m
Swing: 1H–4H
Positional: Daily+
Risk profiles modify thresholds:
Aggressive – earlier signals, looser filters
Balanced – default
Conservative – stronger confirmation, fewer signals
These settings affect ADX thresholds, minimum confluence count, volatility filters, and volume requirements.
Dashboard information
The on-chart dashboard displays:
Buy & sell scores
Current market bias
Market regime (Trending / Balanced / Chop)
Structure strength (Strong / Forming / Weak)
Setup context (Aligned / Wait)
Confluence grade
How to use
This indicator is intended as a market quality and bias filter, not a mechanical trading system.
Common uses:
Trade only in the direction of the displayed bias
Avoid entries when setup context is “WAIT”
Prefer A/A+ grades for continuation trades
Use structure state and regime to filter choppy markets
Best used alongside price action and risk management.
Important notes This is not an automated strategy
It does not provide take-profit or stop-loss levels
Alerts are contextual only
All trading decisions remain the user’s responsibility
Disclaimer
This indicator is provided for educational and informational purposes only and does not constitute financial advice. Past performance does not guarantee future results.

SA_Multi-Timeframe Execution_ORB_RANGE_CLOUDCORE IDEA (Read This First)
This indicator does not give entries by itself.
It answers three critical questions:
Where is weekly balance vs expansion? (Cloud)
Has the week declared intent? (BRK)
Is price aligned across auction speeds? (30 → 15 → 5)
When multiple timeframes agree, price reacts strongly because you’re trading institutional reference points, not indicators.
SECTION I — TIMEFRAME ROLES (VERY IMPORTANT)
🟦 30-Minute Chart — STRUCTURE / BIAS
Role: Weekly map
Defines whether the week is:
Balanced (inside cloud)
Expanding (outside cloud)
You do not enter from 30m
You decide directional bias only
Think of 30m as the “Where am I allowed to trade?” chart.
🟨 15-Minute Chart — CONFIRMATION
Role: Decision layer
Confirms whether price is:
Holding weekly support/resistance
Accepting or rejecting the cloud
First place where BRK matters meaningfully
15m answers:
“Is the market agreeing with the weekly map?”
🟥 5-Minute Chart — EXECUTION
Role: Timing & precision
Used only after 30m + 15m alignment
Provides:
Entry timing
Stop placement
Early failure detection
5m answers:
“When do I engage?”
SECTION II — PAIRING SETUPS
🔷 SETUP A: 30-15-5 (Highest Conviction)
When to Use
You want swing-intraday hybrids
Best for NQ, ES
Best on trend days
Conditions
30m
Price outside weekly cloud
Or clean rejection from cloud boundary
15m
BRK confirms in same direction
OR price holds above/below cloud edge
5m
Pullback or continuation trigger
No counter-BRK against higher frames
Behavior Expectation
Clean directional follow-through
Strong support/resistance reactions
Fewer fakeouts
🔷 SETUP B: 30-15 (Context Only)
When to Use
You’re not trading actively
Or managing runners / swings
Conditions
Use 30m + 15m to:
Hold bias
Avoid counter-trend trades
Stay patient
This pairing prevents over-trading.
🔷 SETUP C: 15-5 (Intraday Precision)
When to Use
You want scalps or short intraday swings
Works extremely well after the weekly cloud is broken
Conditions
15m
Either:
First BRK of the week
Or price firmly outside cloud
5m
Entry after pullback
Or first continuation after compression
This is where you’ll see the “crazy support” you mentioned.
SECTION III — ENVIRONMENT RULES (DO NOT SKIP)
🟧 Price INSIDE the Weekly Cloud
Market State: Compression / Balance
What to expect:
Chop
Fades
Failed breakouts
Best actions:
Smaller targets
Faster exits
Mean-reversion mindset
Avoid:
Holding large trend positions
Forcing continuation trades
🟩 Price OUTSIDE the Weekly Cloud (with BRK)
Market State: Expansion / Trend
What to expect:
Momentum
Strong pullback support
One-directional pressure
Best actions:
Pullback entries
Let winners run
Scale instead of scalp
SECTION IV — PROFIT TARGETS BY PRODUCT
(REALISTIC, STRUCTURE-BASED)
🟦 NASDAQ FUTURES (/NQ)
High volatility, fast expansion
5-Minute
Inside cloud: 5–10 points
Outside cloud / BRK: 10–20 points
15-Minute
Continuation: 15–30 points
Strong weekly trend: 30–50 points
🟨 S&P 500 (/ES)
Cleaner structure, slower moves
5-Minute
Inside cloud: 2–4 points
Outside cloud: 4–8 points
15-Minute
Trend continuation: 6–12 points
Strong week: 12–20 points
🟥 Russell 2000 (/RTY)
Choppy but explosive when aligned
5-Minute
Inside cloud: 3–6 points
Outside cloud: 6–12 points
15-Minute
Trend days: 10–20 points
🟪 Dow Jones (/YM)
Slow but persistent
5-Minute
Inside cloud: 30–60 points
Outside cloud: 60–120 points
15-Minute
Trend continuation: 120–250 points
🟨 Gold Futures (/GC)
Mean-reverting, respect structure
5-Minute
Inside cloud: 3–6 points
Outside cloud: 6–10 points
15-Minute
Continuation: 10–20 points
Weekly trend: 20–35 points
SECTION V — GOLDEN RULES (PRINT THESE)
✅ Trade with the weekly map
✅ Let 30m define bias
✅ Let 15m confirm
✅ Let 5m execute
❌ Do NOT fight the cloud
❌ Do NOT over-size inside balance
Final Thought
When the 15m and 5m align with the weekly structure, you’re trading where liquidity must react — that’s why the support and continuation feel so strong.
Signal Inside the Indicator - trianchor.gumroad.com
chatgpt.com
chatgpt.com
chatgpt.com

SA_ORB_ONR_CLOUD_vwapBandsSIGNAL ARCHITECT™ — ORB / ONR Cloud with VWAP Bands
Optimized for the 15-Minute Timeframe
Overview
The Signal Architect™ ORB / ONR Cloud is a session-structure and probability framework designed to help traders understand where price is statistically compressed, transitioning, or escaping value during the regular trading session.
On the 15-minute chart, this study excels at identifying:
High-probability consolidation zones
Early session directional intent
Fade vs continuation environments
Context for VWAP-based mean reversion or trend extension
Rather than predicting price, the indicator classifies market behavior using time-anchored ranges and volume-weighted statistics.
Core Components (15-Minute Context)
1️⃣ Overnight Range (ONR)
The Overnight Range captures price extremes formed before the regular session opens.
On the 15-minute timeframe, ONR acts as:
A higher-timeframe reference level
A source of institutional liquidity memory
A boundary where early session reactions often occur
2️⃣ Opening Range (ORB)
The Opening Range is defined as the first X minutes after the session open (default: 15 minutes).
On a 15-minute chart:
The ORB often forms entirely within a single candle
It represents initial institutional positioning
It helps differentiate initiative vs responsive behavior
3️⃣ ORB–ONR Cloud (Key Feature)
The Cloud is the overlapping area between the Overnight Range and the Opening Range.
This zone is critical on the 15-minute timeframe because it often represents:
Compressed auction
Balance / indecision
Liquidity absorption
Interpretation:
Price inside the cloud → Higher probability of consolidation, fade, or contraction
Price exiting the cloud → Transition toward expansion or trend resolution
The cloud is not a signal — it is a probability environment.
4️⃣ VWAP with Session-Weighted σ Bands
The study plots VWAP starting from the regular session open, along with true volume-weighted standard deviation bands (±1σ, ±2σ).
On the 15-minute timeframe:
VWAP defines fair value
σ bands help distinguish normal rotation vs statistical extension
Interaction with VWAP while inside the cloud often suggests mean-reverting conditions
Interaction with VWAP after leaving the cloud often confirms trend continuation
5️⃣ Breakout Classification (BRK)
A BRK event occurs when price closes outside BOTH:
The Overnight Range
The Opening Range
On the 15-minute chart:
BRK events often mark session regime changes
They are contextual markers, not entries
Arrows are color-matched to the candle (green candle → green arrow, red candle → red arrow)
To avoid clutter, breakouts can be limited to first-occurrence only.
Probability Layer (15-Minute Edge)
The indicator includes rolling probability calculations to quantify market behavior:
📊 Inside-Cloud Probability
Shows how often price remains inside the ORB–ONR cloud over the selected lookback.
Higher values → balance / compression dominant
Lower values → trend / expansion dominant
📉 Fade / Contraction Probability (Inside Cloud)
When price is inside the cloud, the study measures volatility contraction using ATR behavior.
Higher contraction % → Greater likelihood of rotation or fade
Lower contraction % → Cloud acting as launchpad rather than balance
📈 State Occupancy (5-State Model)
Tracks how price distributes its time across:
Above both ranges
Below both ranges
Inside ORB only
Inside ONR only
Inside the Cloud
This helps traders understand where the market statistically prefers to trade on the 15-minute structure.
Best Use Cases (15-Minute Chart)
✔ Contextual bias for intraday swing trades
✔ Identifying fade vs trend conditions
✔ VWAP-based execution alignment
✔ Avoiding low-probability entries inside compression
✔ Session structure awareness without lower-timeframe noise
What This Indicator Is NOT
❌ Not a buy/sell system
❌ Not predictive
❌ Not a guarantee of outcomes
It is a market structure and probability framework — designed to improve decision quality, not replace risk management.
Recommended Settings (15-Minute)
ORB Length: 15 minutes
VWAP Bands: ±1σ / ±2σ
Probability Lookback: 100–200 bars
Breakout Mode: First-occurrence only
Cloud Enabled: Yes
Risk & Compliance Notice
This tool is provided for educational and informational purposes only.
It does not constitute financial advice, investment recommendations, or trade instructions.
All trading involves risk, including the possible loss of capital.
Standalone Signal - trianchor.gumroad.com
chatgpt.com
chatgpt.com
chatgpt.com

Ultimate Futures Daytrade Suite v1 - The Strategy GuideHere is the complete **Strategy Guide** translated into English.
---
# 📘 Ultimate Futures Daytrade Suite – The Strategy Guide
### 1. The Visual Legend (What is what?)
Before you trade, you need to understand the hierarchy of your lines. Not every line has the same importance.
* **🟣 Daily EMA 50 (Neon Violet):** The **"Big Boss"**. It determines the **Macro Trend**.
* *Price above:* We are primarily looking for Longs.
* *Price below:* We are primarily looking for Shorts.
* **🟢 4h EMA 50 (Neon Green):** The **"Swing Trend"**. Your most important level for **Pullback Entries** (Re-entries).
* **🟡 POC (Gold) & TPO:** The **"Magnet"**. Price often returns here.
* *Rule:* Never open a trade directly *on* the POC (Risk of "Chop"). Use it as a **Target** (Take Profit).
* **🟠 IB High/Low (Orange Lines):** The **"Daily Structure"**.
* A breakout from the IB (Initial Balance) often indicates the trend direction for the day.
* **🟥/🟩 Boxes (Supply/Demand):** Resistance and Support zones from the 1h timeframe.
* **⬜ FVG Boxes:** "Gaps" in the market that are often filled.
---
### 2. The Trading Workflow (Top-Down Method)
Go through this mental checklist before every trade:
#### Step 1: Trend Check (The Traffic Light)
Look at the **Violet Line (Daily)** and the **Green Line (4h)**.
* **Bullish:** Price is above Violet AND above Green. -> *Focus: Buy dips.*
* **Bearish:** Price is below Violet AND below Green. -> *Focus: Sell rallies.*
* **Mixed:** Price is between Violet and Green. -> *Caution! Market is undecided (Range Trading).*
#### Step 2: Location (The Context)
Where is the price currently located?
* Are we at a **Green Demand Zone**?
* Are we testing the **4h EMA 50 (Green)** from above?
* Are we at the **VWAP**?
* *Never trade in "No Man's Land"!* Wait until the price touches one of your lines.
#### Step 3: Trigger (The Execution)
Now zoom into your lower timeframe (e.g., 5min or 15min).
* Wait for a reaction at the zone.
* Use the **EMA 9 (Yellow)** as a momentum trigger. If price breaks the EMA 9 and closes above/below it, that is your "Go".
---
### 3. The Setup Blueprints
Here are the two most profitable scenarios you can trade with this script:
#### A) The "Golden Trend" Setup (Long)
* **Context:** Price > **Daily EMA (Violet)**.
* **Preparation:** Price corrects (drops) back to the **4h EMA 50 (Green)** or to the **VWAP**.
* **Confluence:** Ideally, there is also a **Demand Zone (Green Box)** or an **FVG** at that level.
* **Entry:** As soon as a candle touches the zone and closes bullish again (or reclaims the EMA 9).
* **Stop-Loss:** Below the 4h EMA 50.
* **Take-Profit:** Next **Supply Zone (Red)** or the **IB High (Orange)**.
#### B) The "Daytrade Breakout" (Intraday)
* **Context:** Price opens inside yesterday's Value Area.
* **Signal:** Price breaks through the **IB High (Orange)** with momentum.
* **Filter:** Price must be above the **VWAP**.
* **Entry:** On the retest of the IB High or directly on the breakout.
* **Target:** Price often trends in that direction for the rest of the day.
---
### 4. Warning Signals (When NOT to trade)
1. **The "Concrete Ceiling":** If you want to go Long, but the **Violet Daily EMA 50** is running directly above you. This is massive resistance. Better wait until it is broken.
2. **The "POC Dance":** If price is dancing sideways around the **Gold Line (POC)**. This is a "No-Trade Zone". Day traders lose the most money here due to fees and whipsaws.
3. **Overextension:** If price is extremely far away from the **4h EMA 50 (Green)** (Rubber Band Effect). Do not enter in the trend direction here; wait for a pullback to the line.
### Summary
Your chart is now telling you a story:
* **Violet** tells you the Direction.
* **Green** gives you the Entry.
* **Red/Green Boxes** show you the Obstacles.
* **Yellow (EMA 9)** gives you the Timing.
Good luck with the Suite! This is a setup similar to what institutional traders use.

Auction Context Engine ( Value Area, VWAP & Regime)📌 Indicator Name
Auction Context Engine (Value Area, VWAP & Regime)
Short name: ACE Context
🧠 Description
Auction Context Engine (ACE) is a professional market context and structure indicator based on Auction Market Theory.It is designed to help traders understand where the market is positioned, not to generate trade signals.
ACE focuses on:
• Developing Value Area (VAH / VAL)
• Developing Point of Control (POC)
• Session VWAP positioning
• Volatility regime expansion
• Opening Range context
• Failed auction / trap detection
• Market bias and environment quality
This indicator provides context only and is intended to be used alongside a separate execution strategy or system.
🎯 What This Indicator Is
✔ A context engine
✔ A market structure filter
✔ A bias alignment tool
✔ A regime and environment classifier
❌ What This Indicator Is NOT
✘ Not a signal generator
✘ Not a buy/sell system
✘ Not a strategy
✘ Not a profitability promise
📊 How To Use
Use ACE to answer:
• Is price accepting or rejecting value?
• Is the market in balance or expansion?
• Is VWAP supporting or opposing price?
• Is this a breakout environment or a trap?
• Is volatility expanding?
• Is the market trending or ranging?
You may then use your own execution strategy aligned with this context.
🟢 Core Components
Developing Value Area
• VAH / VAL dynamically update through the session
• POC tracks highest traded volume area
VWAP Position
• Above VWAP = bullish bias
• Below VWAP = bearish bias
Opening Range Context
• Detects breakouts or balance after session open
Volatility Regime
• Identifies expansion vs normal conditions
Failed Auction Detection
• Highlights trap conditions near value extremes
Market Quality
• Strong / Mixed / Weak environment classification
Context Table
• Clean 1-column vertical dashboard with color-coded bias
🔵 Visual Elements
• Developing VAH, VAL, POC lines
• Session VWAP
• Small context dots when environment turns READY
• Compact professional context table
⚙️ Settings
• Value Area bin size
• Value area percentage
• Opening range duration
• Regime expansion factor
• Line colors and thickness
• Context table ON/OFF
• Context dots ON/OFF
🧩 Best Use Case
This indicator is ideal for:
• Intraday trading
• Index futures and equities
• Options context filtering
• Trend / range regime identification
• Professional discretionary traders
⚠️ Disclaimer
This script is provided for educational and informational purposes only.It does not constitute financial or investment advice.Trading involves risk. Always use proper risk management.

VWAP Pullback Signals This indicator helps you visualise a classic VWAP break–pullback–breakout setup inside a defined trading window (default 10:10 AM–3:00 PM EST). It plots TradingView’s built‑in VWAP and highlights the three key
events in the sequence:
1. Breakout: Price crosses VWAP (“start of trend”).
2. Pullback: The first opposite-colour candle that stays completely on the new side of VWAP, after price has moved at least a user-defined number of points away (default 2 pts). These candles get green/red
circles.
3. Breakout Again: When price closes through the pullback’s open with sufficient distance (also configurable), a triangle marks the entry signal and the script draws the projected entry, stop, and take-profit
lines using the selected risk/reward ratio and VWAP-offset stop.
All parameters—session, minimum distances, SL offset, R:R—are inputs, so you can align the indicator with your trading plan. Use it to confirm VWAP continuation setups, build alerts, or mirror the logic with
your own order execution. The companion strategy in this repo takes the same signals, placing orders at the triangle bars with VWAP-based stops and optional break-even management.

Apex ICT Delivery & Session Flow ProDescription
The Apex ICT Delivery & Session Flow Pro is a high-precision technical analysis indicator designed for inner-circle traders who prioritize a clean, institutional-grade chart. This script specializes in identifying real-time liquidity levels and displacement zones while utilizing an automated "Cleanup Engine" to ensure that only the most relevant, unmitigated data remains visible.
Core Functionalities
Multi-Timeframe Displacement Engine: The script scans across multiple timeframes (1m, 5m, 15m, 1H) to identify Fair Value Gaps (FVG) created by high-displacement price action. It automatically plots the FVG boxes and the 50% Consequent Encroachment (CE) line for precise entry and target mapping.
Dynamic Session Liquidity: Automatically identifies and tracks the Highs and Lows of the Asia, London, and New York sessions. These levels are explicitly labeled and extended to act as magnet levels for price or points of liquidity reversal.
CISD (Change in State of Delivery): Visualizes shifts in order flow by marking the opening prices of the last opposite candle when price action confirms a change in delivery state. This provides immediate visual feedback on market sentiment shifts.
NY-Specific VWAP: Features a strict New York Session VWAP that resets daily at the NY open (08:00). This serves as the "Mean" for the session, helping traders identify premium and discount zones specifically within the high-volume New York hours.
The "Clean Chart" Cleanup Engine: Unlike standard indicators that clutter the screen with historical data, this script features an intelligent removal system:
FVGs & Order Blocks: Automatically deleted once price trades through them or if they move too far from current price (Proximity Filter).
Broken Session Levels: Highs and Lows are instantly removed once they are breached by price.
Temporal Decay: CISD markers are automatically cleared after 20 candles to keep the focus on immediate delivery.

0DTE Credit-Spread Morning FilterUPDATE: NATIVE ALERTS ADDED!
You asked, we delivered. You no longer need to sit and stare at the dashboard waiting for a green signal.
1. New "Trade Entry Signal" Alert:
I have added a custom alert condition to the code. This triggers the exact moment the dashboard flips from "NO TRADE" to "GREEN" (Strategy Found).
2. How to set it:
Simply click the "Create Alert" button (clock icon) in TradingView, select this indicator, and choose "Trade Entry Signal" from the list.
Now you can get notified on your phone or desktop instantly when the market conditions align for a 0DTE play.
Happy Trading!

TTS Orb Orderflow NexusTTS Orb Orderflow Nexus is a comprehensive trading dashboard that combines multiple technical analysis concepts into a single, unified tool. It integrates Opening Range Breakout (ORB) analysis, Anchored VWAP, ES/NQ correlation tracking, volume profile concepts, cumulative volume delta, orderflow patterns, and liquidity detection to help traders identify high-probability setups.
Credits
This indicator was built upon and inspired by Tradeseekers' "Opening Range Breakout and Price Targets" indicator. Full credit to Tradeseekers for the original ORB logic and price target framework that serves as the foundation for this expanded version. This script extends that work by adding correlation analysis, orderflow tools, liquidity detection, and a comprehensive dashboard.
Key Features
15-Minute Opening Range Breakout (ORB)
Automatically identifies and plots the 15-minute opening range (default 8:30-8:45 AM CT)
Displays ORB high, low, mid, and quarter levels
Calculates price targets at 50%, 100%, and 150% extensions
Visual ORB box that extends throughout the trading session
Anchored VWAP with Standard Deviation Bands
VWAP anchored to market open
Configurable 1σ, 2σ, and 3σ standard deviation bands
Identifies extended price conditions and mean reversion zones
ES/NQ Correlation Analysis
Tracks ES1! futures alongside your chart (designed for NQ)
Monitors both instruments' positions relative to their respective ORBs
Detects divergence and convergence between the two markets
Generates setup alerts when one market leads or lags the other
Volume & Orderflow Analysis
Cumulative Volume Delta (CVD) with divergence detection
Buy/sell pressure percentage
Volume ratio compared to 20-period average
High and low volume node identification
Orderflow Pattern Detection
Absorption patterns (high volume with minimal price movement)
Iceberg/hidden order detection
Exhaustion pattern identification
Liquidity Detection
Swing high/low tracking
Liquidity sweep alerts (stop hunts)
Unusual wick detection with configurable thresholds
Rejection candle identification
Candlestick Pattern Recognition
Engulfing patterns
Hammer and shooting star
Doji
Morning and evening star
Dynamic Dashboard
Real-time display of all indicators and their current states
ES/NQ setup recommendations with strength ratings
Confluence scoring system
Position tracking
Fully customizable size and position
Signal Generation
Three signal modes: Aggressive, Conservative, and Ultra-Conservative
Configurable minimum confluence requirements
Automatic long and short entries with exit conditions
Multiple alert conditions for all major events
Recommended Use
This indicator is designed primarily for trading NQ (Nasdaq futures) while monitoring ES (S&P futures) correlation, but can be adapted to other instruments. The ES/NQ correlation setups identify opportunities when one market breaks out or fails while the other lags, providing potential mean-reversion or trend-continuation entries.
Inputs & Customization
Session times and timezone
ORB box colors and styling
VWAP standard deviation multipliers
EMA length
Correlation period
Volume and absorption thresholds
Liquidity sweep parameters
Signal mode and confluence requirements
Dashboard position, size, and colors
🙏 Acknowledgments
Special thanks to Tradeseekers for the original "Opening Range Breakout and Price Targets" indicator. Their work on ORB logic and price target calculations provided the foundation upon which this expanded indicator was built.
⚠️ RISK DISCLAIMER
IMPORTANT: Please read this disclaimer carefully before using this indicator.
This indicator is provided for educational and informational purposes only. It is not intended as, and should not be construed as, financial advice, investment advice, or trading recommendations.
I am not a licensed financial advisor, registered investment advisor, broker, or dealer. I do not provide personalized investment advice or recommendations tailored to your individual circumstances.
Trading futures, options, and other financial instruments involves substantial risk of loss and is not suitable for all investors. You could lose some or all of your initial investment. Only trade with capital you can afford to lose.
Past performance of any trading strategy, indicator, or system is not indicative of future results. No representation is being made that any account will or is likely to achieve profits or losses similar to those discussed or shown.
Before trading:
Understand that all trading involves risk
Never trade with money you cannot afford to lose
Consider consulting with a qualified financial professional
Paper trade and backtest thoroughly before risking real capital
Develop proper risk management and position sizing strategies
By using this indicator, you acknowledge that:
All trading decisions are your own responsibility
You understand and accept the risks involved in trading
The creator of this indicator is not liable for any losses you may incur
No guarantees of profitability are made or implied
Trade responsibly and at your own risk.Claude is AI and can make mistakes. Please double-check responses.

Volume + VWAP + Prior Session Levels DashboardVolume Spike + VWAP + Session Levels Dashboard
This indicator is a real-time market context dashboard designed to help traders quickly understand participation, value, and key reference levels without cluttering the chart with multiple indicators.
Instead of plotting lines or signals, the script summarizes critical intraday information into a compact on-chart table, allowing traders to make faster, more informed decisions based on how active the market is, where fair value is, and where important reference levels exist.
Core Concepts Used
This script is built on three widely used market principles:
Relative Volume Participation
Volume-Weighted Average Price (VWAP)
Prior Session Reference Levels
The indicator does not attempt to predict direction. Its purpose is to provide objective context that traders can combine with their own strategies.
How the Indicator Works
1. Volume Spike Analysis (Relative Volume)
Rather than showing raw volume, the script measures how unusual the current bar’s volume is compared to recent activity.
A moving average of volume is calculated using a user-defined lookback period.
Current volume is divided by this average to produce a volume multiple (for example, 2.0× normal volume).
This multiple is translated into a descriptive strength label, ranging from Below Threshold to Legendary.
This approach helps traders immediately recognize when participation is significantly above normal, which often coincides with institutional activity, breakouts, or important reactions near key levels.
2. Daily VWAP (Current and Prior Day)
VWAP (Volume-Weighted Average Price) represents the average price traded, weighted by volume, and is commonly used as a measure of fair value.
This script calculates VWAP internally by:
Accumulating price × volume throughout the day
Dividing by total volume
Automatically resetting at the start of each new trading day
The dashboard displays:
Current day VWAP – real-time session fair value
Prior day VWAP – an important reference from the previous session
Traders often use these levels to evaluate whether price is trading at a premium, discount, or near equilibrium.
3. Previous Day High and Low
The indicator also displays:
Previous day high
Previous day low
These levels frequently act as liquidity targets, support/resistance zones, or reaction points, especially during intraday trading sessions.
Dashboard Design
All information is presented in a two-column dashboard showing:
Metric name
Current value or status
The dashboard can be positioned in any corner of the chart and updates in real time, allowing traders to maintain awareness without constantly switching indicators or timeframes.
How to Use This Indicator
This script is best used as a decision-support tool, not a standalone trading system.
Typical uses include:
Identifying abnormally high volume near important price levels
Evaluating price position relative to VWAP
Monitoring reactions around prior day highs and lows
Staying oriented during fast market conditions without chart clutter
The indicator works on any timeframe and adapts automatically to the instrument’s trading session.
Customization Options
Users can:
Adjust the volume moving average length to define what “normal” volume means
Choose the price source used for VWAP calculation
Change the dashboard’s on-screen position
Summary
The Volume Spike + VWAP + Session Levels Dashboard provides a clear, objective snapshot of market conditions by combining participation, value, and reference levels into a single visual tool. It is designed to help traders answer a simple but critical question:
“Is the market doing something meaningful right now — and where?”
This indicator focuses on context, clarity, and usability for traders who want insight without unnecessary complexity.

Anchored VWAP ProAnchored VWAP Pro - Multi-Timeframe VWAP System with Advanced Signal Filters
Core Functionality:
Plots five anchored VWAPs (NY Open, HOD, LOD, Start-of-Day at 18:00 ET, Previous Day) with optional standard deviation bands and generates high-probability mean reversion signals.
Key Features:
Multiple VWAP Anchors: Tracks price equilibrium from critical intraday levels
Standard Deviation Bands: 3-level configurable bands for NYO and SOD VWAPs
Opening Range Breakout (ORB): Customizable period (5-60 min) with high/low/midpoint levels
Midnight Open Reference: Horizontal line marking 00:00 ET open price
Signal Generation:
Buy Signal: Price retraces to NYO/SOD VWAP support, then closes above HOD VWAP
Sell Signal: Price retraces to NYO/SOD VWAP resistance, then closes below LOD VWAP
Advanced Filters (Optional):
Midnight Open Bias: Mean reversion logic using midnight price position (bullish/bearish/neutral states)
A+ Setup Window: Time-based signal quality designation with custom colors
Formation Delay: Minimum time requirement since HOD/LOD formation
Daily Signal Limit: Caps maximum signals per session
Candle Quality: Body percentage and directional alignment requirements
True Retracement: Requires price bounce before validating retracement signals
Customization:
All colors, widths, and line styles fully configurable
Flexible time windows for signals and A+ setups
Toggle individual VWAPs and features independently
Comprehensive alert system with detailed context
Use Cases:
Intraday mean reversion trading, VWAP-based support/resistance, institutional price level tracking, multi-timeframe confluence analysis.

Daytrading Suite: Neon TPO + FVG v6.1Here is the summary of the code and the trading guide in English.
---
### 1. Code Summary: What does the chart show?
The script combines three dimensions of trading into a single chart:
* **The Context (TPO / Market Profile - Yesterday):**
* **Gold Zone (Center):** Yesterday's **POC (Point of Control)**. This was the "fairest price". It often acts as a magnet.
* **White Dashed Lines:** The **VAH (Value Area High)** and **VAL (Value Area Low)**. Yesterday, 70% of all trading volume happened between these lines. This is the area of "Balance".
* **The Structure (HTF - 1 Hour+):**
* **Red/Green Boxes (Right Edge):** Automatic **Supply & Demand Zones** based on the 1-hour chart (or your setting). They indicate major resistance and support levels.
* **The Timing (Entries):**
* **Neon FVG Boxes (Small):** "Fair Value Gaps". These represent imbalances in price. If price revisits these, it is often your **entry signal**.
* **Lines (VWAP, EMA, PDH/PDL):** Act as dynamic support and trend indicators.
---
### 2. Trading Strategy: How to use it
Do not just trade every colored spot. You must combine **Location (TPO)** with **Signal (FVG)**.
#### Step A: The Open (Where are we?)
In the morning (or at the US Open), check where the price is relative to the **white TPO lines**.
1. **Inside the White Lines (In Balance):**
* The market is undecided. Expect ranging/choppy behavior.
* **Strategy:** Buy at the bottom edge (VAL), Sell at the top edge (VAH). The target is often the Gold Zone (POC) in the middle.
2. **Outside the White Lines (Imbalance):**
* The market is seeking new prices. Danger of a Trend!
* **Strategy:** If price breaks above VAH and tests it from above -> **Long**. If it breaks below VAL -> **Short**.
#### Step B: The Setup (The High Probability Scenario)
Here is the "Rejection" Setup (Long Example):
1. Price drops to the lower white line (**VAL**) or into a green **Demand Zone**.
2. It bounces (shows a wick).
3. In the process, a small **green Neon FVG** is formed.
4. **Entry:** Limit Order at the top of the Neon FVG.
5. **Target:** The Gold Zone (POC) or the upper white line (VAH).
6. **Stop Loss:** Below the recent swing low.
#### Step C: Warning Signals (When NOT to trade)
* **In "No Man's Land":** If the price is sitting right in the middle between Gold (POC) and White (VAH/VAL), do nothing. The risk is 50/50. Wait until price hits an edge.
* **Against the Flow:** If EMA 9 and 21 are pointing steeply downwards, do not buy blindly at the VAL just because the line is there. Wait for confirmation (FVG).
### Pre-Trade Checklist:
1. **Level:** Am I at a white line (VAH/VAL) or the Gold Zone (POC)?
2. **Structure:** Do I have an HTF Demand/Supply Zone backing me up?
3. **Trigger:** Do I see a Neon FVG pointing in my direction?

[ARTIO] TTG Levels Pro: The Grail (S.C.T.) TTG Levels Pro Professional Multi-Timeframe & Intraday Analysis Tool
This indicator is a comprehensive solution for analyzing Key Levels across multiple timeframes and tracking intraday structure. It automates the calculation of significant Support/Resistance zones and provides real-time Volume Weighted data.
How it works (Technical Methodology):
Multi-Timeframe Levels (HTF): The script uses request.security() to fetch High and Low pivot data from higher timeframes (1M, 1W, 1D, 4H, 1H). It identifies the most relevant "unbroken" range levels and projects them onto the current chart.
Intraday Structure (VWAP & Bisector):
VWAP (Volume Weighted Average Price): Calculated cumulatively from the start of the trading day. This represents the fair value based on volume distribution.
Daily Bisector (Midpoint): Calculates the 50% retracement level of the current daily range (High + Low) / 2. This updates dynamically with every tick as the daily range expands.
Visualization Engine:
History Mode: Users can toggle "Path" mode to see how the VWAP and Bisector levels evolved throughout the session (stepline visualization).
Clean Mode: Users can switch to a straight-line projection to keep the chart clean, focusing only on current values.
Features:
Monitor 6 Timeframes simultaneously.
Dynamic Alert System (Price Proximity & Trend Direction).
Synergy Detection: Alerts when multiple timeframe levels cluster together within a defined % range.
Customizable Dashboard Table.
Settings are fully customizable via the inputs menu.

PRO TREND PULLBACK
PRO TREND PULLBACK – trend-following pullback strategy (NAS100 / US30 focus, 1m)
What is this?
- EMA-based trend + pullback entry logic, with optional VWAP and EMA-order filters.
- Built-in preset system for NAS100/US30 on the 1-minute timeframe (Safe / Balanced / Turbo), plus a fully manual “Custom” mode.
Core logic (quick overview)
1) Trend filter:
- Above EMA TREND: long bias, below: short bias
- Optional: VWAP filter, EMA order filter, HTF EMA TREND filter, Multi-EMA direction filter
2) Pullback trigger:
- Pullback level selectable: FAST / MID / SLOW EMA
- Long: touch + bullish confirmation, Short: touch + bearish confirmation (toggleable)
3) Quality filters:
- RSI zone filter (separate for long/short)
- Candle filters: doji / oversized candle / wick (pin-zone) / low-volatility block
- ADX trend-strength filter (via ta.dmi), entry cooldown (bar-based)
- Sideways/range handling: Filter / Penalty / Edge-only mode (ADX + slope + “chop” cross counter)
Risk management / trade management (backtest & automation)
- ATR-based SL/TP: SL, TP1, TP2 (TP1 partial close optional)
- Break-even trigger based on ATR (optional)
- “Max bars in trade” time-based exit (optional)
- Volatility-regime scaling: dynamic SL/TP scaling in high-volatility regimes (optional)
Signal grading (Grade / Score)
- Radar-style scoring + grade: S / A / B / C
- Structural penalties (e.g., lower low / higher high, EMA50 touch, proximity to swing high)
- Trend “fatigue” penalty (down-weights repeated same-direction signals)
- Optional “Lux SMC-lite” score layer (BOS/CHoCH + OB + EQH/EQL + Premium/Discount)
- Optional “ABC-lite (Elliott A-B-C)” score layer (pivot-based)
Alerts / Robot JSON (for webhook)
- Built-in JSON alerts via alert() with watchlist-friendly fields:
secret, strategy, signal, signal_type, symbol, timeframe, time (UTC), price, + optional grade/score
- TradingView alert setup: Condition = “Any alert() function call”
(Webhook URL + your own secret is recommended)
Important notes
- This is a STRATEGY (strategy) intended for backtesting and signal logic. Before live use, test thoroughly and account for slippage/spread differences.
- Pivot-based components (SMC-lite / ABC-lite) are naturally confirmation-based (delayed), so “structure/ABC” values do not print instantly.
- Not financial advice. Use at your own risk.
Suggested starting setup
- Presets: Auto + Balanced (NAS100/US30 1m), then fine-tune with Safe/Turbo.
- For robot mode: turn useRobotAlert=ON and change payloadSecret to a unique value.

Volume Weighted Average Price @Marx_CapitalSimple VWAP indicator edited to not connect the lines between sessions for a cleaner look without vertical lines at session ends.
Session end and start times are customizable.

VWAP Pro [cryptalent]VWAP Pro (Multi-Period + Standard Deviation)
1. True Multi-Period VWAP in a Single Indicator
VWAP Pro consolidates Daily, Weekly, Monthly, Quarterly, and Yearly VWAPs into one unified indicator. This eliminates the need for multiple scripts and allows traders to assess short-, medium-, and long-term value simultaneously on any timeframe.
This design supports:
Multi-timeframe value alignment
Institutional-style reference points
Cleaner charts with fewer indicators
2. Accurate Volume-Weighted Standard Deviation
Unlike generic volatility bands, the standard deviation in VWAP Pro is fully volume-weighted and derived directly from the VWAP calculation. This ensures that dispersion reflects where real trading activity occurred, not just price fluctuation.
Benefits include:
More realistic value boundaries
Improved identification of statistically stretched prices
Reduced noise compared to time-based indicators
3. Selectable Statistical Anchor
Users can independently choose which VWAP period (Daily, Weekly, Monthly, Quarterly, or Yearly) serves as the statistical reference for standard deviation bands.
This allows traders to:
Analyze intraday mean reversion around Daily VWAP
Track swing-level extensions from Weekly or Monthly VWAP
Maintain consistency between strategy horizon and statistical context
4. Current and Previous Period VWAP Visibility
VWAP Pro optionally plots previous period VWAPs alongside current ones. These prior value references often act as:
High-probability reaction levels
Acceptance or rejection zones
Structural support and resistance
This feature provides historical context without clutter, enabling more informed decision-making.
5. Highly Configurable and User-Controlled
Every VWAP and standard deviation component can be toggled independently. Traders can:
Display only relevant periods
Adjust standard deviation multipliers (1σ, 2σ, 3σ)
Customize colors for immediate visual clarity
The indicator adapts easily to different trading styles, from scalping to position trading.
6. Designed for Market Structure and Value Analysis
VWAP Pro is built around value discovery, not prediction. It excels at highlighting:
Fair value zones
Overextended price conditions
Areas where acceptance or rejection is likely to occur
This makes it especially effective for traders focused on market structure, auction behavior, and liquidity-driven price movement.
7. Clean Visualization with Professional Aesthetics
Careful use of transparency, fills, and plotting styles ensures that:
VWAP levels remain clearly visible
Standard deviation zones provide context without dominating the chart
Multiple periods can coexist without visual overload
The result is a professional-grade visual tool suitable for continuous use.
Summary
VWAP Pro (Multi-Period + Standard Deviation) is a comprehensive value-based indicator that combines multi-timeframe VWAPs, volume-weighted statistical bands, and flexible configuration into a single, efficient framework. It is designed for traders who prioritize structure, context, and statistically grounded decision-making over lagging signals or predictive indicators.

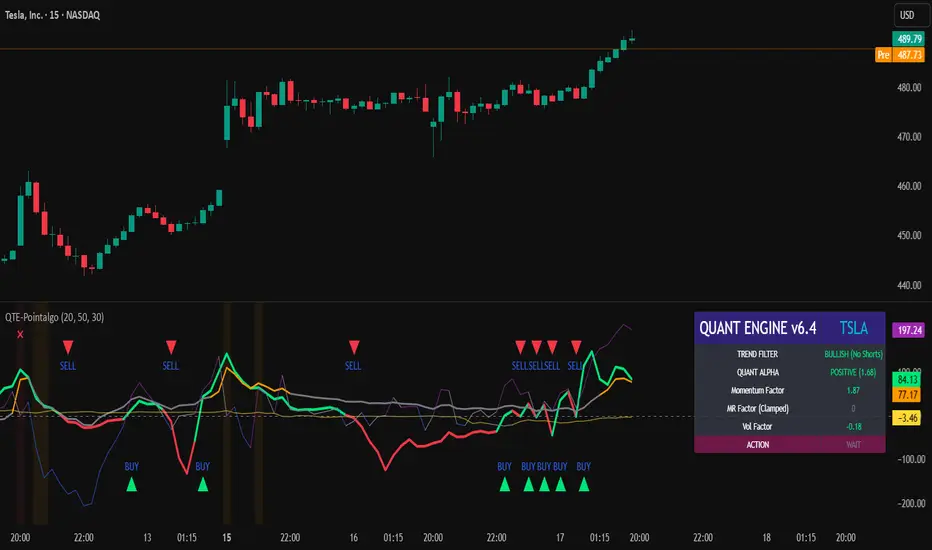
QUANT TRADING ENGINE [PointAlgo]Quant Trading Engine is a quantitative market-analysis indicator that combines multiple statistical factors to study trend behavior, mean reversion, volatility, execution efficiency, and market stability.
The indicator converts raw price behavior into standardized signals to help evaluate directional bias and risk conditions in a systematic way.
This script focuses on factor alignment and regime awareness, not prediction certainty.
Design Philosophy
Markets move through different regimes such as trending, ranging, volatile expansion, and instability.
This indicator attempts to model these regimes by blending:
Momentum strength
Mean-reversion pressure
Volatility risk
Trend filtering
Execution context (VWAP)
Correlation structure
Each component is normalized and combined into a single Quant Alpha framework.
Factor Construction
1. Momentum Factor
Measures directional strength using percentage price change over a rolling window.
Standardized using mean and standard deviation.
Represents trend continuation pressure.
2. Mean Reversion Factor
Measures deviation from a longer moving average.
Standardized to identify stretched conditions.
Designed to capture counter-trend behavior.
Directional Clamping
Mean-reversion signals are dynamically restricted:
No counter-trend buying during downtrends.
No counter-trend selling during uptrends.
Allows both sides only in neutral regimes.
This prevents conflicting signals in strong trends.
3. Volatility Factor
Uses realized volatility derived from price changes.
Penalizes environments where volatility deviates significantly from its norm.
Acts as a risk adjustment rather than a directional driver.
4. Composite Quant Alpha
The final Quant Alpha is a weighted blend of:
Momentum
Mean reversion (trend-clamped)
Volatility risk
The composite is standardized into a Z-score, allowing consistent interpretation across instruments and timeframes.
Signal Logic
Buy signal occurs when Quant Alpha crosses above zero.
Sell signal occurs when Quant Alpha crosses below zero.
Zero-cross logic is used to represent shifts from negative to positive statistical bias and vice versa.
Signals reflect statistical regime change, not trade instructions.
Volatility Smile Context
Measures price deviation from its statistical distribution.
Identifies skewed conditions where upside or downside volatility becomes dominant.
Highlights extreme deviations that may imply elevated derivative risk.
Exotic Risk Conditions
Detects sudden price expansion combined with volatility spikes.
Highlights environments where execution and risk become unstable.
Visual background cues are used for awareness only.
Execution Context (VWAP)
Measures price distance from VWAP.
Used to assess execution efficiency rather than direction.
Helps identify stretched conditions relative to average traded price.
Correlation Structure
Evaluates short-term return correlations.
Detects when price behavior becomes less predictable.
Flags structural instability rather than trend direction.
Visualization
The indicator plots:
Quant Alpha (scaled) with directional coloring
Volatility smile deviation
Price vs VWAP distance
Correlation structure
Signal markers indicate Quant Alpha zero-cross events and risk conditions.
Dashboard
A compact dashboard summarizes:
Trend filter state
Quant Alpha polarity and value
Individual factor readings
Current action state (Buy / Sell / Wait / Risk)
The dashboard provides a real-time snapshot of internal model conditions.
Usage Notes
Designed for analytical interpretation and research.
Best used alongside price action and risk management tools.
Factor behavior depends on instrument liquidity and volatility.
Not optimized for illiquid or irregular markets.
Disclaimer
This script is provided for educational and analytical purposes only.
It does not provide financial, investment, or trading advice.
All outputs should be independently validated before making any trading decisions.
Microstructure Participation & Acceptance Indicator📊 Microstructure Participation & Acceptance Indicator
An advanced participation-based filter combining VWAP distance analysis, volume delta detection, and real-time acceptance/rejection state identification—designed for smaller timeframe trading.
📊 FEATURES
VWAP Distance Normalization
Context-aware fair value measurement:
Automatically resets based on selected anchor (Session/Week/Month)
ATR-normalized distance calculation for universal application
Identifies when price is extended or compressed relative to equilibrium
Configurable extreme distance threshold (default: 1.5 ATR)
Adjustable source input (default: HLC3)
Volume Delta Proxy
Bull vs Bear participation tracking:
Calculates volume imbalance between bullish and bearish candles
EMA smoothing for cleaner signal generation (default: 9 periods)
Delta ratio measurement to identify dominant side
Expansion/compression detection to gauge momentum commitment
Configurable expansion threshold (default: 1.3x)
Acceptance/Rejection State Machine
Real-time market regime identification with six distinct states:
🟢 Accepted Long
Price moving away from VWAP with expanding bullish delta
Distance from VWAP increasing
Volume confirming the move
Indicates real buying pressure—trade WITH the move
🟢 Accepted Short
Price moving away from VWAP with expanding bearish delta
Distance from VWAP increasing
Volume confirming the move
Indicates real selling pressure—trade WITH the move
🟠 Fade Long
Price extended beyond threshold (>1.5 ATR above VWAP)
Delta not supporting the extension
Volume participation absent or diminishing
Potential mean-reversion short setup
🟠 Fade Short
Price extended beyond threshold (>1.5 ATR below VWAP)
Delta not supporting the extension
Volume participation absent or diminishing
Potential mean-reversion long setup
⚪ Chop
Price compressed near VWAP
Bollinger Bands tight (width compressed)
Delta neutral—no clear commitment
NO TRADE ZONE—wait for expansion
⚪ Neutral
Transitional state between regimes
Momentum shifting but not yet confirmed
Monitor for next acceptance signal
Bollinger Bands
Standard volatility measurement with TradingView default styling:
Adjustable period length (default: 20)
Configurable standard deviation multiplier (default: 2.0)
Visual fill between bands for volatility context
Used internally for chop/compression detection
Live Dashboard
Real-time metrics display (top-right corner):
Current market state with color coding
VWAP distance in ATR units
Delta ratio (bull/bear volume balance)
Delta state (Expanding/Compressing)
High-contrast design for instant readability
🎯 HOW TO USE
For Trend Trading:
Accepted Long/Short backgrounds indicate confirmed participation—stay with the trend
Strong moves typically travel 1-1.5 ATR from VWAP with delta support
Use VWAP as dynamic support/resistance
Combine with momentum indicators (MACD, RSI) for confluence
Price above VWAP + Accepted Long state = bullish bias
Price below VWAP + Accepted Short state = bearish bias
For Mean Reversion:
Fade Long/Short states signal overextension without participation
Price beyond 1.5 ATR from VWAP with weak delta = potential reversal
Look for price return to VWAP when extended
Bollinger Band extremes + Fade state = high-probability mean reversion setup
VWAP acts as mean reversion anchor during range-bound sessions
For Risk Management:
Chop state = avoid new entries
Bollinger Band compression + Chop = pre-expansion zone (wait for breakout)
Delta compression after strong move = early exhaustion warning
State transitions (Accepted → Neutral → Fade) = tighten stops
Signal Confirmation:
Strongest setups occur when multiple factors align:
BB breakout + Accepted state + price above/below VWAP
Price rejection at BB bands + Fade state
VWAP support/resistance hold + state transition
Delta expansion + distance increasing + trend direction
⚙️ SETTINGS
All components are fully customizable through organized input groups:
VWAP Distance Group:
VWAP source (default: HLC3)
Anchor period (Session/Week/Month)
ATR length for normalization (default: 14)
Extreme distance threshold in ATR multiples (default: 1.5)
Volume Delta Group:
Delta EMA length (default: 9)
Delta expansion threshold (default: 1.3)
Acceptance Logic Group:
Acceptance lookback period (default: 5)
Chop threshold in VWAP/ATR units (default: 0.3)
Bollinger Bands Group:
BB length (default: 20)
Standard deviation multiplier (default: 2.0)
Display Group:
Toggle state backgrounds
Toggle state change labels
Toggle VWAP line
Toggle Bollinger Bands
💡 EDUCATIONAL VALUE
This indicator teaches important concepts:
How institutional money identifies fair value (VWAP)
The difference between price movement and market acceptance
Why volume participation matters more than price action alone
How to distinguish between noise and committed directional moves
The relationship between volatility compression and expansion cycles
Why distance from equilibrium predicts mean reversion probability
⚠️ IMPORTANT NOTES
This indicator is for educational and informational purposes only
This is a filter, not a standalone trading system
No indicator is perfect—always use proper risk management
Past performance does not guarantee future results
Combine with your own analysis and risk tolerance
Test thoroughly on historical data before live trading
This is not financial advice—use at your own risk
🔧 TECHNICAL DETAILS
Pine Script Version 6
Overlay indicator (displays on price chart)
All calculations use standard, well-documented formulas
No repainting—all signals are confirmed on bar close
Compatible with all timeframes and instruments
Optimized for smaller timeframes (1-5 minute charts)
Minimal computational overhead
📝 CHANGELOG
Version 1.0
Initial release
VWAP distance normalization with ATR scaling
Volume delta proxy system (bull/bear EMA)
6-state acceptance/rejection state machine
Bollinger Bands integration
Real-time dashboard with live metrics
State change labels and background coloring
Full customization options
Developed for traders who need objective participation filters to distinguish high-probability setups from low-quality noise—without cluttering their charts with multiple indicator panels.

RTH & ETH VWAPs (Unified Style)AVWAP indicator showing only the current session. Shows ETH VWAP even when RTH is turned on. Has standard deviation and fills for settings.

SuperLazyTradeSuperLazyTrade transforms SuperTrend into a professional day-trading system with intelligent quality filtering.
Instead of showing every signal, it rates each setup on a 100-point scale analyzing:
- Signal Freshness - Catch moves early
- Volume Strength - Confirm momentum
- VWAP Alignment - Trade with institutions
- Volatility Regime - Optimal market conditions
- RSI Confirmation - Momentum validation
The system blocks 35-40% of low-quality signals automatically, enforcing discipline with clear verdicts:
✅ JUMP (80+) - Best setups
⚡ TRADE (65-79) - Strong entries
⚠️ CAUTION (55-64) - Proceed carefully
🟡 TREND (45-54) - Mid-trend opportunities
🔴 AVOID (0-44) - Skip it
Features live P&L tracking, professional 11-row dashboard, and anti-repainting architecture. Perfect for traders who value quality over quantity.
⚠️ DISCLAIMER
This indicator does not guarantee profits. Trading involves substantial risk of loss. Past performance is not indicative of future results. Use at your own risk.

Bollinger Bands + VWAP + 4-State MACD BackgroundBollinger Bands + VWAP + 4-State MACD Background
An all-in-one technical analysis indicator combining three proven tools with an intelligent momentum-based background visualization system.
📊 FEATURES
Bollinger Bands
Standard Bollinger Bands implementation with full customization options:
Adjustable period length (default: 20)
Multiple moving average types: SMA, EMA, SMMA (RMA), WMA, VWMA
Configurable standard deviation multiplier (default: 2.0)
Visual fill between bands to highlight volatility zones
Offset capability for forward/backward display
Session VWAP (Volume Weighted Average Price)
Automatically resets at the start of each trading session:
Calculates true volume-weighted average price
Resets daily to provide fresh reference levels
Customizable source input (default: HLC3)
Adjustable line appearance (color and width)
Can be toggled on/off as needed
4-State MACD Background System
This is the unique feature of this indicator. The chart background dynamically changes based on MACD momentum analysis, providing instant visual feedback on trend strength and direction:
🟢 Strong Bullish (Bright Green)
MACD line is above signal line
Histogram is growing (momentum accelerating upward)
Indicates strong upward momentum
🟢 Weak Bullish (Pale Green)
MACD line is above signal line
Histogram is shrinking (momentum decelerating)
Early warning signal that uptrend may be weakening
🔴 Strong Bearish (Bright Red)
MACD line is below signal line
Histogram is falling (momentum accelerating downward)
Indicates strong downward momentum
🔴 Weak Bearish (Pale Red)
MACD line is below signal line
Histogram is rising (momentum decelerating)
Early warning signal that downtrend may be weakening
🎯 HOW TO USE
For Trend Trading:
Strong colored backgrounds indicate confirmed momentum in that direction - consider staying with the trend
Weak colored backgrounds signal potential momentum exhaustion - watch for possible reversals
Use VWAP as a dynamic support/resistance level
Bollinger Band breakouts combined with strong MACD backgrounds can confirm trend strength
Price above VWAP + strong bullish background = bullish bias
Price below VWAP + strong bearish background = bearish bias
For Mean Reversion:
Price touching upper/lower Bollinger Bands with weak MACD background may suggest potential reversal
VWAP acts as a mean reversion anchor during range-bound sessions
Background color shifts from strong to weak often precede price direction changes
Look for price return to VWAP when extended beyond bands with weakening momentum
Signal Confirmation:
Strongest signals occur when multiple indicators align:
BB breakout + MACD strong color + price above/below VWAP
Price rejection at BB bands + MACD color weakening
VWAP support/resistance hold + MACD color change
⚙️ SETTINGS
All components are fully customizable through organized input groups:
Bollinger Bands Group:
Period length
Moving average type (SMA/EMA/SMMA/WMA/VWMA)
Source (close/open/high/low/etc.)
Standard deviation multiplier
Offset
VWAP Group:
Toggle show/hide
Source calculation method
Line color
Line width
MACD Group:
Toggle background on/off
Fast length (default: 12)
Slow length (default: 26)
Signal length (default: 9)
Source
Four separate color settings for each momentum state
All colors include transparency controls
💡 EDUCATIONAL VALUE
This indicator teaches important concepts:
How volatility (Bollinger Bands) relates to price movement
The importance of volume-weighted pricing (VWAP)
Momentum analysis through MACD
How combining multiple timeframes and indicators can provide confluence
The difference between trend strength and trend direction
⚠️ IMPORTANT NOTES
This indicator is for educational and informational purposes only
No indicator is perfect - always use proper risk management
Past performance does not guarantee future results
Combine with your own analysis and risk tolerance
Test thoroughly on historical data before live trading
This is not financial advice - use at your own risk
🔧 TECHNICAL DETAILS
Pine Script Version 6
Overlay indicator (displays on price chart)
All calculations use standard, well-documented formulas
Minimal lag due to efficient coding
Compatible with all timeframes and instruments
No repainting - all signals are confirmed on bar close
📝 CHANGELOG
Version 1.0
Initial release
Bollinger Bands with multiple MA types
Session VWAP with daily reset
4-state MACD background system
Full customization options
Developed for traders who want multiple confirmation signals in a clean, organized format without cluttering their charts with separate indicator panels.

VOLX+ VWAP Range BandsVOLX+ plots multiple VWAP-weighted high/low channels across different lookback periods to show how price behaves relative to short-term and long-term value zones.
Instead of using a single VWAP line, this tool creates four rolling VWAP envelopes:
Short-term range (fast reaction)
Mid-term range
Mid-mid range (transitional layer)
Long-term range (macro context)
Each band is computed as:
VWAP-High = SMA(high × volume, length) ÷ SMA(volume, length)
VWAP-Low = SMA(low × volume, length) ÷ SMA(volume, length)
This produces dynamic price channels that account for both price and traded volume, offering a clearer sense of where the market is accepting or rejecting value.
What It Shows
Four VWAP-weighted high/low bands
A short-term VWAP midline
Price line
Three SMAs for trend context
Optional visibility switches for each VWAP band
The filled regions between VWAP highs and lows create a layered “value map,” helping you interpret:
Trend continuation (price hugging outer VWAP bands)
Mean reversion (price returning toward inner bands)
Volatility contraction/expansion
Shifts in short-term vs long-term balance
🧠 How to Use
Use the short-term band for day-trading context or detecting short-term excess.
Use mid-term and mid-mid bands to confirm developing structure.
Use the long-term VWAP band to understand broader value zones.
Combine VWAP bands with SMAs and structure analysis for confluence.
This indicator is intended for price interpretation and analytical support.
✔ Does Not Repaint
The script uses rolling VWAP formulas and standard MAs; everything is stable and non-repainting.
