Fibonacci Sequence Grid [BigBeluga]🔵 OVERVIEW
A geometric price mapping tool that projects Fibonacci sequence levels and grid structures from recent price swings to help traders visualize natural expansion and reversion zones.
This indicator overlays Fibonacci-based structures directly on the chart, utilizing both grid projections and horizontal levels based on the classic Fibonacci integer sequence (0, 1, 1, 2, 3, 5, 8, ...). It identifies recent swing highs or lows and builds precision-aligned levels based on the trend direction.
🔵 CONCEPTS
Uses the Fibonacci integer sequence (not ratios) to define distances from the most recent swing point.
Identifies a trend based on EMA cross of fast and slow periods.
Projects two types of Fibonacci tools:
A grid projection from the swing point, displaying multiple sloped levels based on the sequence.
A set of horizontal Fibonacci levels for clean structural references.
Levels can be plotted from either swing low or high depending on the current trend direction.
Adjustable “Size” inputs control spacing between levels for better price alignment.
Lookback period defines how far the script searches for recent swing extremes.
🔵 FEATURES
Fibonacci Grid Projection:
Draws two mirrored Fibonacci grids—one expanding away from the swing high/low, the other converging toward price.
Swing-Based Trend Detection:
Uses a fast/slow EMA crossover to determine trend direction and reference swing points for projections.
Fibonacci Sequence Levels:
Displays horizontal levels based on the Fibonacci number sequence (0, 1, 2, 3, 5, 8, 13, 21...) for natural price targets.
Dynamic Labels and Coloring:
Each level is labeled with its sequence value and colored based on trend direction (e.g., red = downtrend, green = uptrend).
Both grids and levels can be toggled on/off independently.
Sizing controls allow tighter or looser clustering of levels depending on chart scale.
🔵 HOW TO USE
Enable Fibonacci Grid to visualize price expansion zones during impulsive trends.
Use Fibonacci Levels as horizontal support/resistance or target zones.
A label below price means the current trend is up and levels are projected from swing low.
A label above price means trend is down and levels are projected from swing high.
Adjust “Size” input to fit grid/level projection to your preferred chart scale or instrument volatility.
Use in confluence with price action, trend indicators, or volume tools for layered trading decisions.
🔵 CONCLUSION
Fibonacci Sequence Grid reimagines Fibonacci analysis using whole-number spacing from natural math progressions. Whether used for projecting grid-based expansions or horizontal support/resistance zones, it provides a powerful and intuitive structure to trade within. Perfect for traders who rely on symmetry, market geometry, and mathematically consistent levels.
Fibonnacci

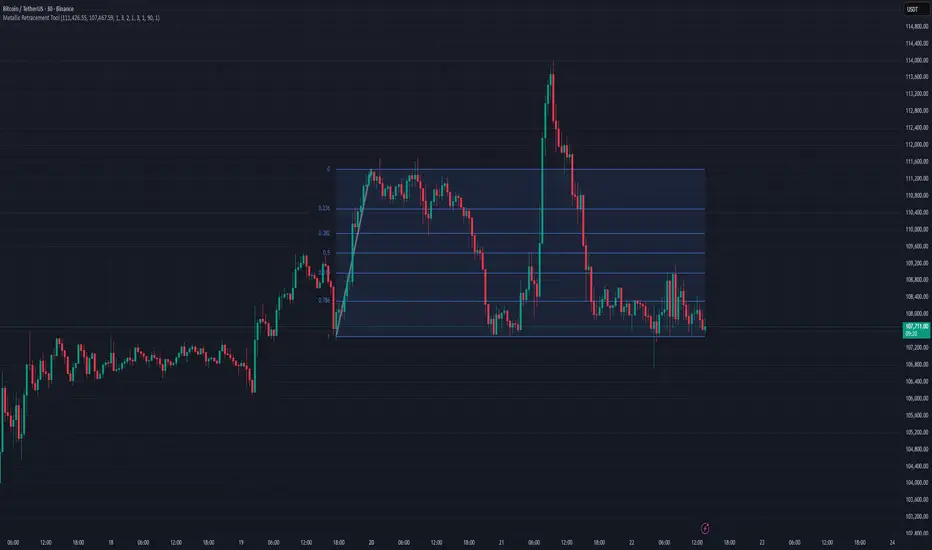
eBacktesting - Learning: Fibonacci RetracementeBacktesting - Learning: Fibonacci Retracement helps you practice one of the most common “pullback” tools in trading: Fibonacci retracements.
It automatically finds the most recent swing and draws your chosen Fibonacci levels (for example 0.382, 0.5, 0.618, 0.786) so you can clearly see where price is pulling back into “discount/premium” areas. When price taps a level (or the Golden Zone), the indicator marks it so you can review what happened next and build pattern recognition.
These indicators are built to pair perfectly with the eBacktesting extension, where traders can practice these concepts step-by-step. Backtesting concepts visually like this is one of the fastest ways to learn, build confidence, and improve trading performance.
Educational use only. Not financial advice.

CamTrades Premium IndicatorCamTrades Premium Indicator – Institutional Market Structure & Session Mapping System
The CamTrades Premium Indicator is a precision market-structure and session-mapping system built to help traders identify where liquidity lives, where institutions engage, and where price is most likely to react.
This is not a buy/sell signal tool.
It is a context and execution framework for discretionary traders who want clarity, structure, and higher-probability trading environments.
Instead of cluttering your chart with lagging indicators and random signals, CamTrades Premium focuses on the levels that actually move markets.
The CamTrades Philosophy
Markets don’t move randomly.
Price moves when liquidity is targeted and capital is committed.
CamTrades Premium visualizes:
• Where sessions establish their range
• Where liquidity pools form
• Where price is most likely to react
• Where structure shifts matter
If price isn’t at a meaningful level — you don’t trade.
Core Features
Session Structure Mapping
• Asia, London, & New York 15-Minute Opening Ranges (High, Low, Midpoint)
• Asia & London Session High/Low rays projected forward
• Previous NY (RTH) High & Low (PDH / PDL)
• True Day Open (TDO) reference level
These levels define intraday liquidity pools where reactions are statistically more likely to occur.
Auto Fibonacci Framework
• Sydney → Asia 1H Auto Fibonacci
• Clean right-side price labels
• Designed for precision targeting, not clutter
This Fibonacci system provides objective structure-based projections, not random extensions.
Clean, Modular Design
Every module is:
• Fully toggleable
• Fully customizable
• Designed for clarity
Your chart stays readable, professional, and distraction-free.
Who This Is For
• ICT / Smart Money traders
• Futures, Forex, Crypto, and Index traders
• Traders who value precision over frequency
• Traders tired of signal spam
• Traders who want context, not noise
What Makes CamTrades Premium Different
No guessing
No signal chasing
No clutter
No emotional entries
Just clean structure, institutional context, and execution clarity.
CamTrades Premium doesn’t tell you what to trade.
It shows you when trading actually makes sense.
How To Use It (Best Practices)
1️⃣ Wait for price to reach a key Session or Daily Level
2️⃣ Look for structure shifts or displacement
3️⃣ Use Fibonacci & opposing liquidity as targets
4️⃣ Trade during high-volume windows (London & NY)
The tool provides the map.
You provide the execution.
Purpose & Disclaimer
This indicator provides market context and reference levels only.
It does not generate trade entries, exits, or signals.
All trading decisions, risk management, and outcomes are the sole responsibility of the user.
Use at your own discretion.

MAWHOOB PROMAWHOOB PRO INDICATOR
Professional Analysis & Trading System
━━━━━━━━━━━━━━━━
🎯 OVERVIEW
━━━━━━━━━━━━━━━━
MAWHOOB PRO is a professional, all-in-one Pine Script® indicator designed for traders seeking institutional-grade market analysis combined with systematic, rule-based trading execution. It seamlessly overlays intelligent Higher Timeframe structures, advanced Volume Profile analysis, and Automatic Fibonacci levels — directly on your chart.
Beyond powerful market visualization, MAWHOOB PRO integrates a fully-featured, complete, and backtestable trading system with instant signals, advanced risk management, and real-time alerts.
━━━━━━━━━━━━━━━━
⚡ CORE CAPABILITIES
━━━━━━━━━━━━━━━━
Higher Timeframe Structure – Multi-timeframe support (15m to 12M).
Advanced Volume Profile – POC, Value Area, with Moving Averages.
Automatic Fibonacci Levels – Dynamic retracements and extensions.
Multi-Strategy System – 4 specialized algorithms for different market conditions.
Smart Trading Signals – Entry signals, exit management with real‑time updates.
Professional Position Sizing – Advanced risk calculations with leverage support.
Multi-TP Management – 3 configurable take profits with fractional position scaling.
Advanced Risk Management – Multiple SL types, trailing stop, and risk limiters.
Real-Time Alerts – Instant notifications for all trading events and signals.
Performance Analytics – Comprehensive backtesting with detailed trade statistics.
━━━━━━━━━━━━━━━━
💠 SECTION 1: PROFESSIONAL MARKET ANALYSIS
━━━━━━━━━━━━━━━━
🕒 Higher Timeframe Structure
MAWHOOB PRO's HTF system goes beyond simple candle plotting. It displays creative higher timeframe structures (e.g., 15m, 1H, Daily, etc.) to identify dominant trends and key liquidity levels without switching your current chart.
❖ Key Features:
Multi-timeframe analysis across 18 different timeframes.
Creative OHLC box visualization with intelligent projection.
Smart "Super Bars" detection for high-probability setups.
Customizable boxes with professional styling options.
Dual visualization modes (HTF_End projection or Bars_Offset).
Performance-optimized rendering with intelligent cleanup system.
📊 Advanced Volume Profile
Understanding where institutional volume concentrates is critical. MAWHOOB PRO's Volume Profile system automatically identifies key levels using proprietary algorithms — giving you the same edge professional traders use to spot accumulation and distribution zones.
❖ Key Features:
Automatic Point of Control (POC) detection and real-time updates.
Dynamic Value Area (VAH/VAL) calculations with configurable sensitivity.
Multiple volume analysis modes (Total, Bullish, Bearish directional filtering).
Customizable row resolution for precision analysis.
Histogram Display: Detailed volume distribution visualization.
Box Display: Clean POC representation for minimal chart clutter.
Intelligent Volume Profile Moving Averages for trend confirmation.
Advanced POC Bands for mean-reversion and confluence identification.
Real-time updates with optional confirmed-only display mode.
Lite Mode optimization for resource-constrained environments.
📐 Automatic Fibonacci Levels
Manual Fibonacci drawing is time-consuming and subjective. MAWHOOB PRO automatically calculates and displays Fibonacci levels using intelligent swing detection algorithms — eliminating manual work while ensuring consistency. Each level is fully customizable with professional styling.
❖ Key Features:
Intelligent bullish/bearish swing detection.
Comprehensive retracement levels (0% to 100%).
Extended projection levels for target identification (113% to 423%).
Flexible display modes (retracements only, extensions only, or combined).
Customizable lines with professional styling (solid, dashed, dotted).
Dynamic label positioning and text customization.
Single color mode or multi-color differentiation.
Right-extension capability for forward projections.
Automatic level adjustment based on market structure.
━━━━━━━━━━━━━━━━
💠 SECTION 2: PROFESSIONAL TRADING SYSTEM
━━━━━━━━━━━━━━━━
📈 Multi-Strategy Signal Generation
Markets don't stay in one condition forever. The ability to adapt your strategy to current market conditions is what separates consistently profitable traders from the rest. MAWHOOB PRO provides four proprietary strategies, each independently optimized for specific market environments:
HTF Structure Strategy
Volume Profile POC Strategy
POC Moving Average Strategy
Value Area Moving Average Strategy
💡 Advanced Entry Management
Professional traders don't use one-size-fits-all entry execution. MAWHOOB PRO provides intelligent entry management with multiple execution types and sophisticated validation:
Entry Types: Immediate market execution or intelligent limit order simulation.
Direction Control: Long-only, short-only, or bidirectional trading.
Smart Filters: Multi-layer validation system maximizing signal quality.
💰 Professional Position Management
Execute trades with institutional-grade position sizing and risk control:
Flexible Sizing Options – Choose percentage-based (% of capital) or fixed USD per trade.
Leverage Support – Scale exposure from 1× to 100× for any market condition.
Fractional Position Scaling – Close portions at TP1, TP2, TP3 independently.
🎯 Advanced Take Profit System
Exiting positions at the right levels separates winners from break-even traders. MAWHOOB PRO provides sophisticated TP management:
Three Take Profit System: Configurable position scaling across three profit targets.
Profit Modes: Custom calculation methods and risk-reward based targeting.
Intelligent Optimization: Adaptive profit placement for optimal risk/reward ratios.
⛔️ Comprehensive Stop Loss System
Proper stop loss placement is essential for consistent trading. MAWHOOB PRO provides multiple intelligent stop loss methods:
Four Stop Loss Types: Range-based, ATR-based, percentage-based, and adaptive algorithms.
Risk Limiter – Automatic SL tightening to prevent extensive losses from gap moves:
ATR-based limits for market-responsive protection.
Percentage-based limits for consistent risk caps.
Minimum Distance Validation – Adaptive stop placement to prevent quick stops:
Correct-side validation (SL always on opposite side of entry).
Realistic tick-size constraints.
Smart adaption to market volatility.
🛡️ Dynamic Trailing System
Maximize profit potential while protecting capital:
Break Even Mode: Intelligent break-even activation with buffer protection.
Move Target Mode: Progressive trailing using advanced profit protection algorithms.
Real-time visual updates showing current TS status.
Tolerance percentage to prevent being stopped out by noise.
State-aware activation (only after partial profit taking).
Multiple exit types tracked separately (TP hits vs. TS exits).
🔔 Smart Alert System
Stay informed of every important trade event with instant notifications:
Entry Alerts – Instant notification when long/short signals.
Exit Alerts– Individual notifications for each exit event: (TP1/TP2/TP3 hits, Stop Loss trigger, Break Even protection).
Trade Summary – Comprehensive recap with duration, exit type, and P&L.
Frequency-controlled to prevent notification spam.
Contextual information (Symbol, Trade ID, Price, Direction).
Real-time account balance updates.
Professional formatting for quick information scanning.
📊 Professional Performance Analytics
MAWHOOB PRO's backtesting system provides institutional-quality performance analytics and comprehensive statistics:
Real-time statistics updates.
Total trades executed in period.
Win rate analysis (separate Pure SL vs. Partial SL tracking).
Trades by direction (Long vs. Short breakdown).
TP1, TP2, TP3 hit counts and profitability.
Direct stop loss vs. partial stop loss separation.
Trailing stop protection count.
Exit type distribution analysis.
Gross profit from all exits.
Leverage-adjusted returns.
Win/Loss percentage breakdown.
Total net PnL (including fees).
Fee impact analysis.
Trade duration tracking per trade.
Average hold time by exit type.
Historical time-based performance patterns.
Visual statistics table with custom positioning.
🔍 Backtesting & Validation
Comprehensive period-based backtesting for rigorous strategy validation:
Custom date range selection (Start and End dates).
Period-based filtering for specific market conditions.
Automatic trade pruning outside selected periods.
Multiple strategy comparison capability.
Optional display of all historical trades.
Entry and exit points clearly marked.
Entry/exit labels with detailed information.
Visual price action context preservation.
Trade-by-trade P&L tracking.
👁️🗨️ Real-Time Trade Monitoring
Monitor your active positions with professional visual displays:
Real-time price level indicators for Entry, TPs, and SL.
Live update on position status as price moves.
Visual indicators showing which TPs have been executed.
Trailing stop level visualization with current status.
Customizable label positioning (Left, Right, Center).
Multiple label size options (Tiny, Small, Normal).
Color-coded by trade direction and exit type.
Professional formatting with essential information.
Toggle on/off for chart cleanliness.
━━━━━━━━━━━━━━━━
🔍 WHO CAN USE MAWHOOB PRO ?
━━━━━━━━━━━━━━━━
✔️ MAWHOOB PRO Is Designed For Traders Who:
Require Professional Tools – Need institutional-grade analysis and execution.
Seek Systematic Trading – Replace emotional decisions with rule-based processes.
Value Strategy Validation – Backtest thoroughly before risking capital.
Demand Precision – Need reliable signals with comprehensive monitoring.
Trade Actively – Benefit from real-time alerts and position management.
Manage Risk Professionally – Apply mathematical position sizing and stop loss logic.
✔️ Compatible Trading Environments:
Forex markets (Major, Minor, Exotic pairs).
Stock markets (with appropriate timeframes).
Cryptocurrency markets (Bitcoin, Altcoins).
Futures markets (with leverage support).
Day trading timeframes (1m to 4H).
Swing trading timeframes (4H to Weekly).
Position trading timeframes (Daily to Monthly).
✔️ Supported Trading Styles:
Discretionary trading with professional tools.
Semi-automated trading with smart signals.
Systematic strategy validation and backtesting.
Multiple market condition adaptation.
Bidirectional trading (Long/Short).
Directional bias trading (Long-only or Short-only).
━━━━━━━━━━━━━━━━
📋 QUICK START GUIDE
━━━━━━━━━━━━━━━━
1️⃣ Analysis Tools Configuration (10-15 minutes)
Add MAWHOOB PRO indicator to your chart.
Select your desired Higher Timeframe (HTF).
Customize visual elements to match your preferences.
Use displayed levels as confluence zones for manual trading.
Monitor Volume Profile and Fibonacci levels for trade setup identification.
2️⃣ Trading System Configuration (15-20 minutes)
Enable Trading System in settings.
Select Strategy Type (HTF_Range, VP_POC, POC_MA, or VA_MA).
Choose Trading Type (Spot or Futures).
Configure Position Sizing (Percentage or Fixed USD).
Set Account Capital and leverage (if applicable).
Configure Take Profits (TP1/TP2/TP3 with fractions).
Select Stop Loss Type and parameters.
Enable Trailing Stop (optional, recommended).
Set backtesting date range.
Enable Alerts for signal notifications.
Run historical backtest to validate strategy.
Demo test minimum 30 days before live deployment.
━━━━━━━━━━━━━━━━
🛑 TECHNICAL DISCLOSURES & IMPORTANT INFORMATION
━━━━━━━━━━━━━━━━
📌 Data Accuracy & Signal Quality
Real-time calculations for developing structures may adjust until HTF bar completion.
Historical signals maintain integrity and non-repaint on confirmed bars.
Signal generation uses only confirmed (non-repainting) data for backtesting validity.
Volume Profile updates in real-time until HTF period closure.
Fibonacci levels automatically recalculate on new swing identification.
━━━━━━━━━━━━━━━━
⚠️ RISK DISCLOSURE & DISCLAIMERS
━━━━━━━━━━━━━━━━
⚙️ MAWHOOB PRO Is Designed For:
Professional market analysis and structure identification.
Systematic strategy backtesting and validation.
Educational purposes for trading strategy development.
Real-time monitoring of active positions.
NOT for providing financial advice or guaranteed outcomes.
🛑 Important Disclaimers
Past performance does NOT guarantee future results.
Backtesting results are simulated and may differ from live trading.
Real trading includes slippage, requotes, and execution delays not simulated.
All trading involves substantial risk of loss.
Test all strategies in simulated environments before live implementation.
Never risk more than you can afford to lose.
Leverage magnifies both profits and losses exponentially.
📋 Testing Protocol Recommendation
Backtest Phase – Run 6-12 months of historical data minimum.
Demo Testing Phase – Live practice for minimum 30 days without real capital.
Performance Tracking – Document all demo trades and results.
Risk Assessment – Verify acceptable drawdown and profit ratios.
Live Deployment – Start with conservative position sizing.
Ongoing Monitoring – Track live performance vs. backtest results.
🔐 Disclaimer of Liability
By using MAWHOOB PRO, you acknowledge and accept:
All trading risks and potential loss of capital.
That past performance does not guarantee future results.
That you are solely responsible for all trading decisions.
That you have tested the system appropriately before live trading.
That losses are possible regardless of system quality.
That market conditions change and strategies may underperform.
Full responsibility for all financial outcomes.
━━━━━━━━━━━━━━━━
🏆 EXCLUSIVE ACCESS (INVITE-ONLY)
━━━━━━━━━━━━━━━━
MAWHOOB PRO is an invite-only indicator reserved for serious traders committed to professional execution and risk management.
🔒 Why Invite-Only ?
Quality Assurance – Ensures users understand and respect proper risk management.
Strategy Integrity – Protects strategy methodology from mass distribution.
Professional Community – Maintains focus on serious, disciplined traders.
Dedicated Support – Provides personalized assistance to qualified users.
Continuous Improvement – Collects quality feedback for enhancement.
✔️ Access Requirements
Eligible users typically demonstrate:
Understanding of technical analysis fundamentals.
Experience with systematic trading or backtesting.
Commitment to proper risk management practices.
Intention to demo test before live deployment.
Professional approach to trading (not gambling).
Respect for intellectual property and terms of use.
━━━━━━━━━━━━━━━━
📚 DOCUMENTATION & SUPPORT
━━━━━━━━━━━━━━━━
📖 Built-in Guidance & Support
Comprehensive tooltips for every indicator setting (hover ⓘ for instant help).
Context-sensitive assistance for advanced parameters (explaining the "why").
Strategic recommendations adapted to different market conditions.
Detailed inline documentation for configuration options.
Invite-only user community for shared strategies and feedback.
💬 Professional Support Includes:
Strategy optimization consultation.
Configuration assistance for your specific market.
Performance review of backtest results.
Troubleshooting and technical support.
Updates and improvements to core algorithms.
🧪 Validation Protocol
Historical Backtest – Minimum 6-12 months recommended.
Demo Testing – Minimum 30 days without real capital.
Performance Review – Compare live results to backtest.
Ongoing Optimization – Adjust parameters based on results.
Risk Monitoring – Track PnL and account equity.
⚙️ Professional Trading Principles
Position sizing based on risk, not reward.
Stop loss placement before entry execution.
Take profit targets set with realistic expectations.
Risk-reward ratios of minimum 1:1.5 or better.
Account preservation over aggressive profit taking.
Consistency over home-run trades.
━━━━━━━━━━━━━━━━
🔄 UPDATES & CONTINUOUS DEVELOPMENT
━━━━━━━━━━━━━━━━
MAWHOOB PRO is a continuously evolving system. Development is guided by:
User feedback and real-world trading results.
Market condition changes and emerging opportunities.
Performance optimization and efficiency improvements.
Trading community insights and professional recommendations.
💬 Community Feedback Loop:
Your trading results shape future development:
Report strategies that work exceptionally well.
Suggest improvements based on your experience.
Identify market conditions requiring adaptation.
Help validate new features during beta testing.
━━━━━━━━━━━━━━━━
💡 MAWHOOB PRO – Where Professional Analysis Meets Systematic Execution
Created & Designed by @mawhoobx
📝 REMEMBER
The best indicator is the one combined with proper risk management, discipline, and a solid trading plan. MAWHOOB PRO is designed to assist your trading, not replace your judgment.
Trade Smart. Trade Safe. Trade Profitable.

Fibonacci HarmonyFibonacci/OTE and Range key levels
Automatically plots key Fibonacci retracement levels (23.6%, 38.2%, 50%, 61.8%, 78.6%) and optional extension levels between user-selected swing high and low points. Helps traders identify potential support/resistance zones and price targets in trending markets.

Pivot Master LITEPIVOT FORGE LITE – The Strategy Forge Ecosystem
I created my previous indicator (Multi-TF Fibonacci Pivot Points) to save myself time every day having to manually track and add pivots to my setups. I knew they worked from watching price action - but eyeballing something and proving it can be profitable are very different.
Before I waste weeks on a strategy, I want proof it works.
This is a proof-of-concept strategy tester to show that pivot trading strategies can be profitable.
*Optimized for 8H and lower timeframes. Daily pivots need intraday charts to generate enough entry signals. Won't work on Daily/Weekly charts
WHAT IT DOES:
→ Enters when price crosses Daily pivots (S1/R1, S2/R2, etc)
→ TP/SL at % you choose
→ Shows: Win rate, Profit Factor, trades, P&L
Includes all 3 pivot types: Fibonacci, Standard, Camarilla
REAL EXAMPLES (my crypto tests):
## 📊 Example Backtest Results
The following are real results from specific instruments and timeframes. Your results will vary—always conduct your own testing.
**BTC/USD, 2HR Chart** – BloFin Perps (Jan 2023 – Dec 2025)
*Settings: Long Only, Fibonacci Pivots, S2 Entry, 4% TP / 4.5% SL*
| Metric | Value |
|---------------------|------------- |
| Profit Factor | 1.352 |
| Win Rate | 60% |
| Net Profit | +5.72% |
| Total Trades | 90 |
| Max Drawdown | 2.41% |
S2 entry filters noise while 4% targets allow room for normal volatility.
**BTC/USD, 6HR Chart** – BloFin Perps (Jan 2023 – Dec 2025)
*Settings: Long Only, Fibonacci Pivots, S2 Entry, 7.5% TP / 2.5% SL*
| Metric | Value |
|---------------------|------------- |
| Profit Factor | 1.944 |
| Win Rate | 40.32% |
| Net Profit | +8.61% |
| Total Trades | 62 |
| Max Drawdown | 2.18% |
6HR timeframe gives pivots more room to develop.
**ETH/USD, 2HR Chart** – BloFin Perps (Jan 2023 – Dec 2025)
*Settings: Both Directions, Fibonacci Pivots, Long Entry S1, Short Entry R3, 3.5% TP / 2% SL*
| Metric | Value |
|---------------------|------------- |
| Profit Factor | 1.312 |
| Win Rate | 45.96% |
| Net Profit | +8.92% |
| Total Trades | 235 |
| Max Drawdown | 3.32% |
This is a proof-of-concept tool - not a production trading system.
Profitable results here = pivot strategies work on this instrument.
Want full automation? Strategy Forge Suite (coming soon) adds real execution, advanced filters, and multi-condition logic. See profile for details
PROFIT FACTOR (Primary Metric):
- Below 1.0 = Losing strategy (avoid)
- 1.0-1.5 = Marginal (break even to slight profit)
- 1.5-2.0 = Viable strategy (worth considering)
- Above 2.0 = Strong (verify it's not overfit)
WIN RATE (Context-dependent):
Win rate alone doesn't mean profitability. It depends on your TP/SL ratio:
- 40% WR with 3:1 R:R = Excellent (PF ~1.8)
- 50% WR with 2:1 R:R = Good (PF ~1.5)
- 60% WR with 1:1 R:R = Marginal (PF ~1.2)
- 70%+ WR = Check for overfitting
Always evaluate Profit Factor first, then assess if win rate makes sense for your risk/reward ratio.
PAIRS WITH:
• Multi-TF Fibonacci Pivot Points (find confluence across timeframes)
• Pitchfork Forge LITE (add pattern analysis - launching this week)
Part of The Strategy Forge Ecosystem
───────────────────────────────────────────────────
Educational tool for strategy validation. Always test before live trading.
Results vary by instrument, timeframe, and market conditions.

SMC Pro Max Ultra [ by josh]This indicator is a comprehensive hybrid trading system and market-structure assistant designed for **EDUCATIONAL PURPOSES ONLY**. It synergizes advanced Smart Money Concepts (SMC) with quantitative algorithmic filtering (Hybrid Logic) to help traders visualize market context, filter out noise, and identify high-probability areas of interest.
**What it shows**
* **Advanced Market Structure:** Visualizes dual-layer structure mapping (Swing vs. Internal) with automated labeling for BOS (Break of Structure), CHoCH (Change of Character), and MSS (Market Structure Shift), including Strong/Weak High & Low identification.
* **Smart Zones & Logic:** Automatically plots Order Blocks (OB), Breaker Blocks, Fair Value Gaps (FVG), and Supply/Demand zones. Includes a "Mitigation Filter" to auto-hide zones that have already been tested to keep the chart clean.
* **Liquidity & Traps:** Highlights structural liquidity pools (EQH/EQL), detects real-time Liquidity Sweeps (Stop Hunts), and identifies potential Bull/Bear Trap zones.
* **"Sniper" Signal Models:** Features multiple signal engines ranging from Classic RSI reversals (Sni 1) and Trend Following (Sni 2) to the strict "Sniper Protocol" (Sni 3/4) for precision entries.
* **Algorithmic Confluence (The Brain):** A sophisticated rule-based scoring system that weights Higher Timeframe (HTF) alignment, ADX Momentum, Volume Spikes, and Fibonacci "Golden Pocket" confluence.
* **Safety Protocols:** Includes a "Chop Filter" (based on Choppiness Index) to detect low-quality sideways markets and suppress signals during dangerous conditions.
* **Risk Management:** Visualizes simulated Entry, Stop Loss, and Take Profit lines based on customizable Risk:Reward ratios or structural invalidation points.
**About “AI” / Scoring**
The "AI" features in this script refer to **Algorithmic Intelligence**—a complex set of hard-coded conditional logic designed to process multiple data points simultaneously. It is **NOT** Machine Learning and does **NOT** predict the future. The "AI Score" displayed on the dashboard is a statistical evaluation of the current market conditions (Trend + Momentum + Volatility) to serve as a confirmation filter only.
**Important Disclaimer**
This indicator does **NOT** provide financial advice and does **NOT** guarantee profits. Trading involves significant risk, and you can lose money. Any signals, backtest simulations, or dashboard statistics are strictly informational and for research purposes only. Past performance shown in the simulation is not indicative of future results. Always perform your own analysis and manage risk responsibly.
**Recommended Use**
Use it as a systematic decision-support tool:
1. **Identify Context:** Use the structure mapping to determine the dominant trend bias.
2. **Wait for Zone Interaction:** Allow price to retrace into High-Probability zones (OB/FVG).
3. **Check the "Score":** Use the Dashboard to ensure the Market is not "Choppy" and the Confluence Score is high.
4. **Confirm Entry:** Execute only when a specific signal (e.g., Sniper 3 or Engulfing Pattern) aligns with your analysis.
**Automation Note**
This script includes alert functionality compatible with third-party bridges. However, if you choose to connect alerts to an external system for automated execution, you do so entirely at your own risk and responsibility. This script is primarily designed as a visual technical indicator, not a "set-and-forget" trading bot.

The Road MapThe Road Map is a price‑driven framework that builds a complete “map” of the market: major extremes, key support and resistance, and the specific bands where trends tend to pause or accelerate. It works on any liquid market and any timeframe.
The script takes a structural range from past price action and projects it forward as a set of colored horizontal lines. Each color has a defined role, and the density of each color on the chart also carries information.
Core Structural Lines (GRN, AQU, ORN, RED)
These four lines are the backbone of the indicator. Always start your analysis with them.
GRN – Upper Structure Line (Green)
Marks an important upper boundary created by strong prior price action.
Acts as major resistance while price trades below it.
When price breaks and holds above GRN, it often signals that the market is shifting into a stronger bullish phase.
You can see GRN acting as an upper cap and later being reclaimed here:
AQU – Major Resistance Line (Aqua)
Represents a higher‑tier resistance level formed after extended advances.
Often behaves like a “ceiling”: first touches tend to produce sharp reactions or consolidations.
A clean break and acceptance above AQU usually opens the door for further trend extension.
Example of AQU capping extended moves:
ORN – Primary Support / Mid‑Structure Line (Orange)
Identifies a key structural low made during a strong downward move.
Functions as primary support; bounces from ORN often start meaningful recoveries.
In the ideal configuration, ORN is the second‑lowest important line on the chart, sitting just above RED.
Examples of ORN acting as the second‑lowest structural level and catching pullbacks:
RED – Deep Support / Structural Floor (Red)
The most critical downside level in the system.
Represents the deepest structural support derived from prior extremes.
When RED is the lowest line on the chart, it defines the base of the current cycle.
Strong advances that start above RED often become major legs; losing RED usually means the entire structure is changing.
Ideal structural setup:
RED is the lowest line on the chart.
ORN (orange) is the second‑lowest line.
When you see this, the downside has already been fully explored and the structure is at its strongest. Moves that build on top of this RED/ORN base can develop into powerful, sustained trends.
Fibonacci Road Map Levels
Once the core range is defined, the indicator creates a full ladder of Fibonacci‑based levels above and below price. These levels show where moves are likely to slow down, reverse, or speed up.
Overhead Extensions – Purple, Yellow, Fuchsia
Purple lines
Early and intermediate upside extensions.
Proven behavior in this system: when price crosses above the purple lines, the bars tend to move up faster.
These breaks often mark the point where a controlled trend turns into a more impulsive leg.
Yellow lines
Classic Fibonacci extension areas.
Common zones for profit‑taking, short‑term pauses, or minor pullbacks inside a trend.
Fuchsia (magenta) lines
Outer extension targets beyond the standard Fibonacci range.
Frequently align with blow‑off type moves, exhaustion spikes, and the ends of aggressive pushes.
Retracement and Support Ladder – Lime and White
Lime lines
Internal retracement and support levels between the structural extremes.
Help you judge whether a pullback is shallow and trend‑healthy or deep and more corrective.
White lines
The most important retracement bands inside the range.
Price often reacts sharply at these levels during corrections within a larger trend.
Together, these levels form a continuous “road” that price tends to follow: stepping from one band to the next, either grinding, pausing, or accelerating.
Line Density and Importance
In this system, the variety and quantity of colors carry a specific signal:
The less colors in the lines mean the more important the lines are.
A single, isolated line in a distinct color (for example, one RED or one ORN at an extreme) is more structurally significant than a cluster of lines in the same color.
If there are many lines in the same color, they are less important than one line in one different color.
Dense groups of identical colors provide useful context, but they are secondary. The unique, solitary structural lines should dominate your decision‑making.
In practice:
Treat RED and ORN as your main structural base.
Treat GRN and AQU as main overhead structure and potential distribution or breakout zones.
Use the purple, yellow, fuchsia, lime and white levels as the detailed roadmap between those anchors.
How to Work With The Road Map
Start with structure
Check where RED and ORN sit.
Confirm whether you have the ideal pattern: RED lowest, ORN second‑lowest.
Locate GRN and AQU above price to see where major resistance and possible breakouts are.
Watch the acceleration levels
Focus on how price behaves around the purple lines.
When price breaks and holds above them, the market often shifts into a faster, more vertical phase.
Respect unique lines
A lone RED or ORN far from other clusters is a key reference for invalidation, swing entries, and long‑term bias.
Clusters of same‑colored lines are helpful, but they do not override a single, well‑placed structural line.
Use the ladder to manage trades
Lime and white bands help with scaling in/out and managing pullbacks.
Purple, yellow, and fuchsia bands provide target zones and context for how extended a move is.
GRN and AQU help decide when to de‑risk or when a breakout is gaining real traction.
For visual examples of how these behaviors play out on different markets and timeframes, you can review:
The Road Map is meant to give you a clear, structured view of where price is likely to accelerate, where it is likely to stall, and which levels truly matter in the current regime.
Disclaimer
Risk Disclosure and Terms of Use
The Road Map indicator is a technical analysis tool designed for informational and educational purposes only. Trading financial instruments—including but not limited to stocks, indices, forex, commodities, and cryptocurrencies—involves substantial risk and the potential for significant financial loss.
By using this indicator, you acknowledge and agree to the following:
Not Financial Advice: The levels, signals, and observations generated by this script DO NOT constitute investment advice, financial advice, or a recommendation to buy, sell, or hold any security. All trading decisions are the sole responsibility of the user.
No Guarantee of Accuracy : While the Road Map is based on historical price behavior and structural logic, past performance is not indicative of future results. Market conditions can change rapidly, and technical levels may be breached or ignored without warning.
User Responsibility: You are responsible for your own risk management. It is highly recommended to use this tool in conjunction with other forms of analysis and to practice in a demo environment before committing real capital.
Limitation of Liability: The author of this script shall not be held liable for any losses, damages, or expenses arising from the use or reliance upon the information provided by this indicator.
Trading involves the risk of loss. Never trade with money you cannot afford to lose.

[ICT Sebo] FIBOverview
This indicator identifies and plots Fibonacci-based retracement levels derived from short-term price swings. It uses simple two-candle reversal patterns to define a completed swing sequence and calculates a configurable Fibonacci level within that range as a structural reference.
The script is designed as a lightweight swing-structure and retracement visualization tool and does not generate trade signals.
How it works
The indicator monitors consecutive candle behavior to detect short-term directional shifts. A bullish sequence is defined by a bearish candle followed by a bullish candle, while a bearish sequence is defined by a bullish candle followed by a bearish candle.
Once a valid low-to-high or high-to-low swing sequence is confirmed, the indicator calculates a Fibonacci retracement level between the swing high and swing low using a user-defined ratio. This level represents a potential internal reference within the completed price movement.
Each Fibonacci level is plotted as a horizontal line and extended forward for a configurable number of bars.
Visualization
Bullish Fibonacci levels are displayed in green and bearish Fibonacci levels are displayed in red. Lines are drawn only after a full swing sequence is completed and remain fixed once plotted.
The indicator does not repaint previously confirmed Fibonacci levels.
Intended use
This tool supports swing-based market structure analysis, retracement context evaluation and price behavior studies. It is suitable for intraday analysis and should be used in combination with broader market context and risk management.
Notes
This indicator does not predict price direction, does not provide entry or exit signals and is intended purely as a visual reference for Fibonacci retracement levels.

LJ Parsons Adjustable expanding MRT Fib Version 2Based on premium/discount/fair-value levels the indicator will expand with the market by settable dates.
The levels are not fib based as such but are resonant levels within an multiplicative /12 log scale using the LJ Parsons Market resonance hypothesis.

Auto-Anchored Fibonacci Volume Profile [Custom Array Engine]Description:
1. The Theoretical Foundation: Structure vs. Participation In professional technical analysis, traders often struggle to reconcile two distinct datasets: Price Geometry (where price should go) and Market Participation (where money actually went).
Why Fibonacci? (The Structure) Fibonacci Retracements map the mathematical structure of a trend. They identify psychological and algorithmic "interest zones" (0.382, 0.5, 0.618) where a correction is statistically likely to terminate. However, Fibonacci levels are theoretical—they are "lines in the sand" that do not guarantee liquidity or reaction.
Why Volume Profile? (The Verification) Volume Profile maps the historical exchange of shares at specific price levels. It reveals "fair value" (High Volume Nodes) and "market imbalance" (Low Volume Nodes). It is the only tool that verifies if a specific price level was actually accepted by institutional participants.
2. Underlying Calculations (The Custom Engine) This script operates on a custom-built calculation engine that bypasses standard built-in functions entirely. It uses Pine Script Arrays to build a Volume Profile from scratch. Here is the breakdown of the proprietary code logic:
A. The "Smart-Fill" Distribution Algorithm (Solves Gapping)
The Problem: Standard volume scripts often assign a candle's entire volume to a single price row. In volatile markets or steep trends, this creates visual "gaps" or a "barcode" effect because price moved too fast to register on every row.
My Solution: I wrote a custom loop that calculates the vertical overlap of every candle against the profile grid.
The Math: Volume Per Bin = Total Candle Volume / Bins Touched.
The Result: If a single volatile candle spans 10 price rows (bins), the script mathematically divides that volume and distributes it equally into all 10 array indices. This generates a solid, continuous distribution curve that accurately reflects price action through the entire candle range, not just the close.
B. Dynamic Arrays & Split-Volume Logic The script initializes two separate floating-point arrays (buyVolArray and sellVolArray) sized to the user's resolution (up to 300 rows). It iterates through the specific time-window of the swing:
If Close >= Open, the calculated volume slice is injected into the Buy Array.
If Close < Open, it is injected into the Sell Array.
These arrays are then visually stacked to render the dual-color profile, allowing traders to see the "Delta" (Buyer vs. Seller aggression) at key structural levels.
C. Custom Garbage Collection (Performance) To enable the "Auto-Anchoring" feature without causing chart lag or visual artifacts ("ghosting"), the script includes a Garbage Collection System. Before drawing a new profile, the script iterates through a tracking array of all existing objects (box.delete, line.delete) and clears them from memory. This ensures the indicator remains lightweight and responsive even when dragging chart margins or switching timeframes.
3. The Synthesis: Why Combine Them? The core philosophy of this script is Confluence . A Fibonacci level without volume is merely a suggestion; a Fibonacci level backed by volume is a defensive wall. By algorithmically anchoring a Volume Profile to the exact coordinates of a Fibonacci swing, this tool allows traders to instantly answer critical questions:
"Is the Golden Pocket (0.618) supported by a High Volume Node (HVN), or is it a Low Volume Node (LVN) that price might slice through?"
"Is the Shallow Retracement (0.382) holding because of structural support, or just a lack of selling pressure?"
4. How to Read the Indicator
The Geometry: The script automatically detects the trend and draws standard Fib levels (0, 0.236, 0.382, 0.5, 0.618, 0.786, 1.0).
The Confluence Check: Look for the Point of Control (Red Line). If this High Volume Node aligns with a key Fib level (e.g., the 0.618), the probability of a reversal increases significantly.
The Imbalance Check: Look for "Valleys" in the profile (Low Volume Nodes). These gaps often act as "slippage zones" where price travels quickly between structural levels.
Buy/Sell Splits: The dual-color bars (Teal/Red) reveal the composition of the volume. A 0.618 level held up by dominant Buy Volume is a stronger bullish signal than one with mixed volume.
5. Settings & Customization
Lookback Length: Sensitivity of the swing detection (Default: 200 bars).
Resolution: Granularity of the profile rows (Default: 100). Higher values provide smoother definition.
Width (%): Responsive sizing that scales the profile relative to the trend's duration.
Extend Lines: Option to project structural levels infinitely to the right.
Disclaimer This script is an analytical tool for visualizing historical market data. It does not provide trade signals or financial advice.

ORB Pro: Sniper Edition [Hybrid Scanner + Smart Ranking]الوصف (Description):
🚀 ORB Pro: Sniper Edition – The Ultimate Day Trading System
The ORB Pro: Sniper Edition is not just an indicator; it is a complete algorithmic trading system designed for scalpers and day traders who trade the Opening Range Breakout (ORB) strategy.
This edition features a revolutionary "Hybrid Scanner" with "Smart Opportunity Ranking" logic that prioritizes fresh signals over old ones, ensuring you never miss a breakout.
🔥 Key Features:
Hybrid Scanner System:
Manual Mode: Monitor your own top 5 favorite stocks.
Auto Scanner Mode: Automatically scans a pre-defined list of Top 20 High-Momentum Stocks (TSLA, NVDA, AMD, COIN, MSTR, etc.) inside the code.
🧠 Sniper Ranking Logic (The Game Changer): Unlike standard scanners that show static lists, this system sorts stocks dynamically in the table based on opportunity:
🥇 Priority 1: Fresh Breakouts (RUN 🚀) that haven't hit targets yet (The Entry Zone).
🥈 Priority 2: Winning Trades (WIN ✅) that already hit targets.
🥉 Priority 3: Weak or Stopped out trades.
Advanced Strategy Logic:
Fibonacci Targets: Precision exits at 1.618, 2.0, 2.618, and 3.618 extensions.
Smart Reversal: Detects "Fakeouts" and flips the signal immediately (e.g., from CALL to PUT) to catch institutional traps.
Trend Filtering: Uses EMA 50 to filter out low-probability trades.
Risk Management:
Auto Breakeven: Moves stop-loss to entry after Target 1.
Trailing Stop: Dynamic stop-loss that follows the price action.
⚙️ How to Use:
Add the indicator to a 5-minute chart.
Go to Settings > Table System > Select "Auto Scanner".
Watch the table: Focus on the top rows showing "RUN 🚀". These are your live entry signals!
----------------------------------
🚀 مؤشر القناص: ORB Pro Sniper Edition – نظام المضاربة اللحظية المتكامل
يعتبر هذا المؤشر نظاماً آلياً متطوراً للمضاربين اللحظيين (Scalpers/Day Traders) يعتمد على استراتيجية كسر نطاق الافتتاح (ORB) الشهيرة، ولكنه معزز بخوارزميات ذكية لتصفية الفرص.
يتميز هذا الإصدار بوجود "ماسح هجين" (Hybrid Scanner) ونظام "تصنيف ذكي" يعطيك الزبدة ويعرض لك الفرص الحية فور حدوثها.
🔥 أهم المميزات:
نظام الماسح الهجين (Hybrid Scanner):
الوضع اليدوي (Manual): لمراقبة قائمتك الخاصة (5 أسهم تختارها أنت).
الماسح الآلي (Auto Scanner): يقوم المؤشر بمسح فوري لقائمة مدمجة تضم أقوى 20 سهم سيولة ومضاربة في السوق الأمريكي (مثل TSLA, NVDA, MSTR, COIN, وغيرها).
🧠 خوارزمية "القناص" للترتيب (Sniper Ranking): الجدول لا يعرض الأسهم عشوائياً، بل يركز على الفرصة الحالية:
🥇 الأولوية القصوى: للأسهم التي أعطت إشارة دخول (RUN 🚀) ولم تحقق الهدف بعد (هذه هي منطقة الدخول الذهبية).
🥈 الأولوية الثانية: للأسهم التي حققت أهدافها (WIN ✅).
🥉 الأولوية الأخيرة: للأسهم المتذبذبة أو الخاسرة.
دقة فنية عالية:
أهداف فيبوناتشي: تحديد آلي لأهداف جني الأرباح (1.618، 2.0، 2.618).
كشف الانعكاس (Reversal): يكتشف الاختراقات الكاذبة (Fakeouts) ويقلب الإشارة فوراً للدخول مع صناع السوق.
فلتر الترند: يستخدم متوسط 50 لمنع الدخول عكس الاتجاه العام.
إدارة المخاطر:
تأمين الصفقة (Breakeven): يرفع الوقف لسعر الدخول تلقائياً بعد تحقق الهدف الأول.
الوقف المتحرك: يلاحق الأرباح للحفاظ عليها.
⚙️ طريقة الاستخدام:
ضع المؤشر على فريم 5 دقائق.
من الإعدادات، اختر نظام الجدول "Auto Scanner".
راقب الجدول: ركز نظرك على الأسهم التي تظهر في أعلى القائمة بحالة "RUN 🚀".
⚠️ Disclaimer / إخلاء مسؤولية: This tool is for educational and analytical purposes only. Trading involves significant risk. Always manage your risk properly. هذه الأداة للأغراض التعليمية والتحليلية فقط. التداول ينطوي على مخاطر عالية.

Reversal Signal by Vahid.jafarzadehReversal Signal by Vahid.j is a technical analysis tool designed to identify potential market turning points using a combination of Donchian channels, Fibonacci levels, and multi-oscillator divergences. This indicator calculates dynamic support and resistance levels based on recent highs and lows, applies key Fibonacci retracement zones, and evaluates divergences across multiple oscillators including RSI, MACD, Momentum, CCI, OBV, Stochastic, DI Oscillator, VWMA, CMF, and MFI.
Signals are displayed as bull 🐂 and bear 🐻 icons on the chart to indicate potential buy and sell zones. The indicator also tracks the cumulative divergence count, offering a quantitative perspective of market strength and trend reversal probability.
Alerts can be set for both bullish and bearish signals, enabling timely entries and exits based on divergence and Donchian-Fibonacci confluence.
-------
فارسی :
سیگنال بازگشت توسط Vahid.j یک ابزار تحلیل تکنیکال است که برای شناسایی نقاط احتمالی تغییر جهت بازار طراحی شده و از ترکیبی از کانالهای دونچیان، سطوح فیبوناچی و واگرایی چند نوسانگر استفاده میکند. این اندیکاتور سطوح حمایت و مقاومت پویا را بر اساس بالاترین و پایینترین قیمتهای اخیر محاسبه کرده، سطوح کلیدی فیبوناچی را اعمال میکند و واگراییها را در چندین نوسانگر شامل RSI، MACD، مومنتوم، CCI، OBV، استوکاستیک، DI اسیلاتور، VWMA، CMF و MFI ارزیابی میکند.
سیگنالها به صورت آیکون گاو 🐂 و خرس 🐻 روی چارت نمایش داده میشوند تا مناطق خرید و فروش احتمالی را نشان دهند. همچنین این اندیکاتور تعداد واگراییهای تجمعی را ردیابی میکند و دید کمی نسبت به قدرت بازار و احتمال بازگشت روند ارائه میدهد.
امکان فعالسازی آلارم برای سیگنالهای صعودی و نزولی وجود دارد تا بر اساس همگرایی واگرایی و سطوح دونچیان-فیبوناچی، ورود و خروجهای به موقع انجام شود

TDI Fibonacci Volatility Bands Candle Coloring [cryptalent]"This is an advanced Traders Dynamic Index (TDI) candle coloring system, designed for traders seeking precise dynamic analysis. Unlike traditional TDI, which typically relies on a 50 midline with a single standard deviation band (±1 SD), this indicator innovatively incorporates Fibonacci golden ratio multiples (1.618, 2.618, 3.618 times standard deviation) to create multi-layered dynamic bands. It precisely divides the RSI fast line (green line) position into five distinct strength zones, instantly reflecting them on the candle colors, allowing you to grasp market sentiment in real-time without switching to a sub-chart.
Core Calculation Logic:
RSI Period (default 20), Band Length (default 50), and Fast MA Smoothing Period (default 1) are all adjustable.
The midline is the Simple Moving Average (SMA) of RSI, with upper and lower bands calculated by multiplying Fibonacci multiples with Standard Deviation (STDEV), generating three dynamic band sets: 1.618, 2.618, and 3.618.
Traders can quickly identify the following scenarios:
Extreme Overbought Zone (Strong Bullish, Red): Fast line exceeds custom threshold (default 82) and breaks above the specified band (default 2.618). This often signals overheating, potentially a profit-taking point or reversal short entry, especially at trend tops.
Extreme Oversold Zone (Strong Bearish, Green): Fast line drops below custom threshold (default 28) and breaks below the specified band (default 2.618). This is a potential strong rebound starting point, ideal for bottom-fishing or long entries.
Medium Bullish Zone (Yellow): Fast line surpasses medium threshold (default 66) and stands above the specified band (default 1.618), indicating bullish dominance in trend continuation.
Medium Bearish Zone (Orange): Fast line falls below medium threshold (default 33) and breaks below the specified band (default 1.618), signaling bearish control in segment transitions.
Neutral Zone (No Color Change): Fast line within custom upper and lower limits (default 34~65), retaining original candle colors to avoid noise interference during consolidation.
Color priority logic flows from strong to weak (Extreme > Medium > Neutral), ensuring no conflicts. All parameters are highly customizable, including thresholds, band selections (1.618/2.618/3.618/Midline/None), color schemes, and even optional semi-transparent background coloring (default off, transparency 90%) for enhanced visual layering.
Applicable Scenarios:
Intraday Trading: Capture extreme color shifts as entry/exit signals.
Swing Trading: Use medium colors to confirm trend extensions.
Long-Term Trend Following: Filter noise in neutral zones to focus on major trends.
Supports various markets like forex, stocks, and cryptocurrencies. After installation, adjust parameters in settings to match your strategy, and combine with other indicators like moving averages or support/resistance for improved accuracy.
If you're a TDI enthusiast, this will make your trading more intuitive and efficient!

Pivot Points Standard w/ Future PivotsPivot Points Standard with Future Projections
This indicator displays traditional pivot point levels with an added feature to project future pivot levels based on the current period's price action.
Key Features:
Multiple Pivot Types: Choose from Traditional, Fibonacci, Woodie, Classic, DM, and Camarilla pivot calculations
Flexible Timeframes: Auto-detect or manually select Daily, Weekly, Monthly, Quarterly, Yearly, and multi-year periods
Future Pivot Projections: Visualize potential pivot levels for the next period based on current price movement
Custom Price Scenarios: Test "what-if" scenarios by entering a custom close price to see resulting pivot levels
Customizable Display: Adjust line styles, colors, opacity, and label positioning for both historical and future pivots
Historical Pivots: View up to 200 previous pivot periods for context
Future Pivot Options:
The unique future pivot feature calculates what the next period's support and resistance levels would be using the current period's High, Low, Open, and either the current price or a custom price you specify for the closing value. Future pivots are displayed with customizable line styles (solid, dashed, dotted) and opacity to distinguish them from historical levels.
Use Cases:
Plan entries and exits based on projected support/resistance
Scenario analysis with custom price targets
Identify key levels before the period closes
Multi-timeframe pivot analysis
Works on all timeframes and instruments.

Fib Golden RatioDynamic Fib High → Low (0.5 & 0.618)
This indicator automatically tracks the current day’s High and Low and plots the key Fibonacci retracement levels 0.5 (50%) and 0.618 (Golden Ratio) based on the live intraday price range.
The tool is designed for traders who want simple, clean, and dynamic intraday Fibonacci levels without clutter on the chart.
How It Works
Detects the start of a new trading day
Tracks the highest high and lowest low of the current day
Continuously recalculates:
Fibonacci 0.5 (Midpoint)
Fibonacci 0.618 (Golden Ratio)
Plots clean continuous lines across the chart
Fib is calculated from High → Low, matching how typical intraday fib tools are visually applied
Why This Indicator
No drawings to manually adjust
No user configuration required
Extremely lightweight and fast
Automatically adjusts as the day progresses
Perfect for identifying intraday mean reversion zones, pullback zones, and reaction levels
Ideal Use Cases
Intraday directional trading
Scalping pullbacks
Mean reversion setups
Identifying dynamic support/resistance zones
Option scalping (CE/PE)

SCOTTGO ORB V1SCOTTGO ORB (Opening Range Breakout) Indicator
The ORB Indicator is a powerful tool for day traders and scalpers, designed to automatically identify and project key price levels based on the market's initial trading activity—the Opening Range (OR).
It helps you quickly visualize the market structure, potential breakout zones, and price targets for the day.
🔑 Key Features & Customization
1. Dynamic Opening Range Calculation
Flexible Time Periods: Easily define your Opening Range using preset times of 5, 15, or 30 minutes. You can also use the International Overrides to set a custom start and end time with a specified timezone.
Visual Range: The indicator automatically calculates and shades the range between the ORB High and ORB Low prices. The Opacity of this shaded box is fully adjustable.
2. Comprehensive Price Targets
The indicator projects multiple levels of price targets (PTs) based on the size of the initial Opening Range, enabling you to set profit targets and manage risk. Targets are grouped for easy toggling:
Default Targets (50%): Visualize the immediate $50\%$ price extension above and below the ORB.
Extended Targets (75%, 100%): View the $75\%$ and full $100\%$ extension levels.
Further Targets (150%, 200%): Explore extended targets for volatile or trending days.
Mid Point: Optional line to display the $50\%$ retracement/midpoint of the ORB itself.
3. Fibonacci Extensions
Access highly relevant price projections using classic Fibonacci ratios:27.2% and 61.8% Extensions: These provide additional high-probability price targets for breakout scenarios.
4. Breakout & Retest Signaling
Entry Signals: Displays on-chart labels for potential ORB Breakouts and subsequent
Retests (BRB), helping you identify high-probability entry points.
Alert Options: Set alerts for simple ORB level crosses or restrict alerts only to confirmed breakout scenarios (Alert only on ORB breakouts).
🎨 Style Customization
All main ORB lines, target levels, and Fibonacci lines can be individually styled (color, thickness, line type) directly within the TradingView Style tab for a personalized chart experience. Dedicated inputs are available for setting colors for 50%, 75%, 100%, and Fibonacci 27.2% / 61.8% levels.
💡 How to Use
1. Set Your ORB Period: Choose the time frame that best suits your market (e.g., 15 minutes is common for US indices).
2. Monitor the Breakout: Once the ORB session ends, wait for the price to break above the ORB High or below the ORB Low.
3. Target and Risk: Use the projected Price Targets to define your potential profit zones, and place stop-losses just inside the ORB range.
SCOTTGO

fibonacci2Library "fibonacci2"
Useful methods to calculate and display fibonacci retracement
modelParamsNew(point_0, point_1)
Parameters:
point_0 (chart.point)
point_1 (chart.point)
modelParamsNew(this, point_0, point_1)
Parameters:
this (viewParams)
point_0 (chart.point)
point_1 (chart.point)
method toModelParams(this, point_0, point_1)
Namespace types: viewParams
Parameters:
this (viewParams)
point_0 (chart.point)
point_1 (chart.point)
method createModel(params)
Namespace types: modelParams
Parameters:
params (modelParams)
method createView(this, params)
Namespace types: model
Parameters:
this (model)
params (viewParams)
method delete(view)
Namespace types: view
Parameters:
view (view)
levelModelParams
Fields:
level (series float)
levelViewParams
Fields:
level (series float)
color (series color)
line_width (series int)
line_style (series lineStyleEnum enum from Hamster-Coder/drawing/1)
levelModel
Represents a Fibonacci retracement level
Fields:
level (series float) : The Fibonacci level ratio (e.g., 0.382, 0.5, 0.618)
value (series float) : The Y-coordinate on the chart corresponding to this level
modelParams
Represents the full parameter set for the Fibonacci retracement model
Fields:
point_1 (chart.point) : Coordinates of the anchor Point (1) of the model
point_0 (chart.point) : Coordinates of the anchor Point (0) of the model
levels (array) : List of levels to display for this model
model
Fields:
point_1 (chart.point)
point_0 (chart.point)
levels (array)
viewParams
Fields:
levels (array)
x1 (series int)
x2 (series int)
xloc (series string)
show_level_value (series bool)
value_format (series string)
force_overlay (series bool)
view
Fields:
model (model)
lines (array)
labels (array)

Dynamic Pivot Fibonacci v1.3Advanced Fibonacci Levels & Time Zones
This indicator provides a comprehensive suite for Fibonacci analysis, focusing on both price and time. It is designed for technical analysts who require a highly configurable tool to identify key levels of support, resistance, and temporal market rhythm.
📊 Core Price Level Features
The indicator's primary function is to draw Fibonacci price levels based on one of two user-defined calculation methods:
Pivot-Based Calculation: Automatically detects high/low pivot points using configurable Pivot Left and Pivot Right lookback periods.
Memory-Based Calculation: Identifies the highest high and lowest low over a specified Memory Length (lookback period).
🎨 Display & Customization
13 Configurable Levels: Users can enable, define, and color up to 13 distinct price levels.
Background Fill: Optional color filling between levels for enhanced visual clarity.
Line Extension: Full control over line drawing, including extending lines to the left, right, or both (either indefinitely or for a limited number of bars).
Historical Deletion: Option to automatically delete previous Fibonacci lines when a new range is detected.
⏳ Additional Analysis Tools
Fibonacci Time Zones: Renders vertical time markers based on the Fibonacci sequence, projected from the selected pivot points. This feature is designed to help identify potential turning points in time.
Trend Analysis (SMMA): Includes an optional module to display multiple Smoothed Moving Averages (SMMA) and an aggregate trend line, assisting in contextual market analysis.
🇮🇷 توضیحات فارسی
سطوح پیشرفته فیبوناچی و مناطق زمانی
این اندیکاتور مجموعهای جامع برای تحلیلهای فیبوناچی، با تمرکز همزمان بر قیمت و زمان، ارائه میدهد. این ابزار برای تحلیلگران فنی طراحی شده است که نیازمند ابزاری با قابلیت تنظیمات بالا جهت شناسایی سطوح کلیدی حمایت، مقاومت و ریتم زمانی بازار هستند.
📊 ویژگیهای اصلی سطوح قیمتی
عملکرد اصلی این اندیکاتور، ترسیم سطوح قیمتی فیبوناچی بر اساس یکی از دو متد محاسباتی قابل تعریف توسط کاربر است:
محاسبه مبتنی بر پیوت (Pivot-Based): به صورت خودکار نقاط پیوت سقف و کف را بر اساس دورههای بازبینی (Lookback) قابل تنظیم (Pivot Left و Pivot Right) شناسایی میکند.
محاسبه مبتنی بر حافظه (Memory-Based): بالاترین سقف و پایینترین کف را در یک طول حافظه (دوره بازبینی) مشخص، پیدا میکند.
🎨 نمایش و سفارشیسازی
۱۳ سطح قابل تنظیم: کاربران میتوانند تا ۱۳ سطح قیمتی مجزا را فعال، تعریف و رنگآمیزی کنند.
پُر کردن پسزمینه (Fill): قابلیت اختیاری پُر کردن فضای بین سطوح با رنگ، برای افزایش وضوح بصری.
امتداد خطوط: کنترل کامل بر ترسیم خطوط، شامل امتداد دادن به سمت چپ، راست یا هر دو طرف (به صورت نامحدود یا برای تعداد کندلهای معین).
حذف سطوح گذشته: گزینهای برای حذف خودکار خطوط فیبوناچی قبلی به هنگام شناسایی یک محدوده جدید.
⏳ ابزارهای تحلیلی جانبی
مناطق زمانی فیبوناچی (Fib Time Zones): نشانگرهای زمانی عمودی را بر اساس دنباله فیبوناچی ترسیم میکند که از نقاط پیوت منتخب، پروجکت (project) شدهاند. این ویژگی برای کمک به شناسایی نقاط عطف احتمالی در بستر زمان طراحی شده است.
تحلیل روند (SMMA): شامل یک ماژول اختیاری برای نمایش چندین میانگین متحرک هموارشده (SMMA) و یک خط روند کلی، جهت کمک به تحلیل زمینه بازار.

Period Range AnalyzerThis indicator analyzes a specific periodic range, which can start from a fixed date or a defined lookback period. It draws percentage levels and colored zones between the highest and lowest price. It also displays a detailed information table, which shows the price's position within the range in "Trend" mode, and the relative strength of currency pairs in "Forex" mode. The current price position is also indicated by a label with a percentage value and the name of the corresponding zone.
User Guide
Calculation Method
This setting determines how the indicator defines the range used for the calculation.
Lookback Period: In this mode, the indicator uses the last N candles (the number can be specified in the "Lookback Period (bars)" field). The range (the highest and lowest price) is "floating," meaning it is recalculated with each new candle based on the last N candles.
Date Based: In this mode, the calculation starts from a fixed date and time you select. The indicator finds the opening price of the start date and continuously tracks the highest and lowest price from that point on. This mode is ideal for measuring performance from a specific event (e.g., start of a week/month/year, news).
Data Handling Note: If you select a date in "Date Based" mode for which no data is available on the current timeframe (e.g., switching to a very low timeframe), the indicator will automatically use the earliest available candle as the starting point. All calculations (Open, Max, Min, Range, Percentage, Change, Trend) are based on this actual start date.
Start Date & Time
This setting is only active in "Date Based" mode.
Here you can specify the fixed starting point for the calculation.
The specified time is in the Exchange timezone.
Important limitation: Due to TradingView platform limits, visual elements (levels, zones) are only drawn for a maximum of 250 candles back. If the set date is older than this, the calculation still applies to the entire period (from the set date), but the drawing only covers the last 250 candles. The table always displays accurate data for the entire period.
When switching to a higher timeframe, the range may restart from a slightly later bar due to TradingView's bar alignment. For best accuracy, set your timeframe first, then select the start date.
Table Mode
This setting controls what data the information table displays.
Trend: This is the default mode, which works on any symbol (stock, index, crypto, etc.). It displays information related to the trend and the range.
Forex: This is a special mode used to measure the strength of currency and crypto pairs. It only works on symbols with exactly 6 characters (e.g., "EURUSD", "BTCUSD"). It treats the first 3 characters as the base currency (e.g., EUR) and the last 3 as the quote currency (e.g., USD). If the symbol does not have 6 characters, the table will automatically display in "Trend" mode.
Trend
This trend determination operates based on the formation order of the high and low within the analyzed range:
Its switch is located in the “Table Additional Rows” menu.
Bullish: Indicated if the low was formed before the high (on different candles). Or if they formed on the same candle, it was a bullish candle.
Bearish: Indicated if the high was formed before the low (on different candles). Or if they formed on the same candle, it was a bearish candle.
Neutral: Indicated if the high and low formed on the same candle, and it was a "doji" candle (close = open).
Upper & Lower Threshold
These settings (Upper Threshold (%) and Lower Threshold (%) in the "Label Coloring" section) primarily determine the state (Bullish/Bearish/Neutral) of the top row of the table.
The logic is not based on the percentage change of the price movement, but on the current price's position within the range, where the bottom of the range is 0% and the top is 100%.
Upper Threshold (%): The percentage level (e.g., 60.0) above which the indicator considers the price position "Bullish" (or "Strong").
Lower Threshold (%): The percentage level (e.g., 40.0) below which the indicator considers the price position "Bearish" (or "Weak").
If the price is between the two (e.g., between 40% and 60%), the signal is Neutral.
Secondary function: These thresholds also control the color of the label next to the price, provided the "Dynamic Label Coloring" option is enabled.

Fib OscillatorWhat is Fib Oscillator and How to Use it?
🔶 1. Conceptual Overview
The Fib Oscillator is a Fibonacci-based relative position oscillator.
Instead of measuring momentum (like RSI or MACD), it measures where price currently sits between the recent swing high and swing low, expressed as a percentage within the Fibonacci range.
In other words:
It answers: “Where is price right now within its most recent dynamic range?”
It visualizes retracement and extension zones numerically, providing continuous feedback between 0% and 100% (and beyond if extended).
🔶 2. What the Script Does
The indicator:
Automatically detects recent high and low levels using an adaptive lookback window, which depends on ATR volatility.
Calculates the current price’s position between those levels as a percentage (0–100).
Plots that percentage as an oscillator — showing visually whether price is near the top, middle, or bottom of its recent range.
Overlays Fibonacci retracement levels (23.6%, 38.2%, 50%, 61.8%, 78.6%) as reference zones.
Generates alerts when the oscillator crosses key Fib thresholds — which can signal retracement completion, breakout potential, or pullback exhaustion.
🔶 3. Technical Flow Breakdown
(a) Inputs
Input Description Default Notes
atrLength ATR period used for volatility estimation 14 Used to dynamically tune lookback sensitivity
minLookback Minimum lookback window (candles) 20 Ensures stability even in low volatility
maxLookback Maximum lookback window 100 Limits over-expansion during high volatility
isInverse Inverts chart orientation false Useful for inverse markets (e.g. shorts or inverse BTC view)
(b) Volatility-Adaptive Lookback
Instead of using a fixed lookback, it calculates:
lookback
=
SMA(ATR,10)
/
SMA(Close,10)
×
500
lookback=SMA(ATR,10)/SMA(Close,10)×500
Then it clamps this between minLookback and maxLookback.
This makes the oscillator:
More reactive during high volatility (shorter lookback)
More stable during calm markets (longer lookback)
Essentially, it self-adjusts to market rhythm — you don’t have to constantly tweak lookback manually.
(c) High-Low Reference Points
It takes the highest and lowest points within the dynamic lookback window.
If isInverse = true, it flips the candle logic (useful if viewing inverse instruments like stablecoin pairs or when analyzing bearish setups invertedly).
(d) Oscillator Core
The main oscillator line:
osc
=
(
close
−
low
)
(
high
−
low
)
×
100
osc=
(high−low)
(close−low)
×100
0% = Price is at the lookback low.
100% = Price is at the lookback high.
50% = Midpoint (balanced).
Between Fibonacci percentages (23.6%, 38.2%, 61.8%, etc.), the oscillator indicates retracement stages.
(e) Fibonacci Levels as Reference
It overlays horizontal reference lines at:
0%, 23.6%, 38.2%, 50%, 61.8%, 78.6%, 100%
These act as support/resistance bands in oscillator space.
You can read it similar to how traders use Fibonacci retracements on charts, but compressed into a single line oscillator.
(f) Alerts
The script includes built-in alert conditions for crossovers at each major Fibonacci level.
You can set TradingView alerts such as:
“Oscillator crossed above 61.8%” → possible bullish continuation or breakout.
“Oscillator crossed below 38.2%” → possible pullback or correction starting.
This allows automated monitoring of fib retracement completions without manually drawing fib levels.
🔶 4. How to Use It
🔸 Visual Interpretation
Oscillator Value Zone Market Context
0–23.6% Deep Retracement Potential exhaustion of a down-move / early reversal
23.6–38.2% Shallow retracement zone Possible continuation phase
38.2–50% Mid retracement Neutral or indecisive structure
50–61.8% Key pivot region Common trend resumption zone
61.8–78.6% Late retracement Often “last pullback” area
78.6–100% Near high range Possible overextension / profit-taking
>100% Range breakout New leg formation / expansion
🔸 Practical Application Steps
Load the indicator on your chart (set overlay = false, so it’s below the main price chart).
Observe oscillator position relative to fib bands:
Use it to determine retracement depth.
Combine with structure tools:
Trend lines, swing points, or HTF market structure.
Use crossovers for timing:
Crossing above 61.8% in an uptrend often confirms breakout continuation.
Crossing below 38.2% in a downtrend signals renewed downside momentum.
For range markets, oscillator swings between 23.6% and 78.6% can define accumulation/distribution boundaries.
🔶 5. When to Use It
During Retracements: To gauge how deep the pullback has gone.
During Range Markets: To identify relative overbought/oversold positions.
Before Breakouts: Crossovers of 61.8% or 78.6% often precede impulsive moves.
In Multi-Timeframe Contexts:
LTF (15M–1H): Detect intraday retracement exhaustion.
HTF (4H–1D): Confirm major range expansions or key reversal zones.
🔶 6. Ideal Companion Indicators
The Fib Oscillator works best when contextualized with structure, volatility, and trend bias indicators.
Below are optimal pairings:
Companion Indicator Purpose Integration Insight
Market Structure MTF Tool Identify active trend direction Use Fib Oscillator only in trend direction for cleaner signals
EMA Ribbon / Supertrend Trend confirmation Align oscillator crossovers with EMA bias
ATR Bands / Volatility Envelope Validate breakout strength If oscillator >78.6% & ATR rising → valid breakout
Volume Oscillator Confirm retracement strength Volume contraction + oscillator under 38.2% → potential reversal
HTF Fib Retracement Tool Combine LTF oscillator with HTF fib confluence Powerful multi-timeframe setups
RSI or Stochastic Measure momentum relative to position RSI divergence while oscillator near 78.6% → exhaustion clue
🔶 7. Understanding the Settings
Setting Function Practical Impact
ATR Period (14) Controls volatility sampling Higher = smoother lookback adaptation
Min Lookback (20) Smallest window allowed Lower = more reactive but noisier
Max Lookback (100) Largest window allowed Higher = smoother but slower to react
Inverse Candle Chart Flips oscillator vertically Useful when analyzing bearish or inverse scenarios (e.g. short-side fib mapping)
Recommended Configs:
For scalping/intraday: ATR 10–14, lookback 20–50
For swing/position trading: ATR 14–21, lookback 50–100
🔶 8. Example Trade Logic (Practical Use)
Scenario: Uptrend on 4H chart
Oscillator drops to below 38.2% → retracement zone
Price consolidates → oscillator stabilizes
Oscillator crosses above 50% → pullback ending
Entry: Long when oscillator crosses above 61.8%
Exit: Near 78.6–100% zone or upon divergence with RSI
For Short Bias (Inverse Setup):
Enable isInverse = true to visually flip the oscillator (so lows become highs).
Use the same thresholds inversely.
🔶 9. Strengths & Limitations
✅ Strengths
Dynamic, self-adapting to volatility
Quantifies Fib retracement as a continuous function
Compact oscillator view (no clutter on chart)
Works well across all timeframes
Compatible with both trending and ranging markets
⚠️ Limitations
Doesn’t define trend direction — must be used with structure filters
Can whipsaw during choppy consolidations
The “lookback auto-adjust” may lag in sudden volatility shifts
Shouldn’t be used standalone for entries without structural confluence
🔶 10. Summary
The “Fib Oscillator” is a dynamic Fibonacci-relative positioning tool that merges retracement theory with adaptive volatility logic.
It gives traders an intuitive, quantified view of where price sits within its recent fib range, allowing anticipation of pullbacks, reversals, or breakout momentum.
Think of it as a "Fibonacci RSI", but instead of momentum strength, it shows positional depth — the vibrational location of price within its natural swing cycle.

Fibo 68.2 / 32.1 (2 lignes)FIBO indicator that automatically plots two retracement lines (38.2 and 61.8).
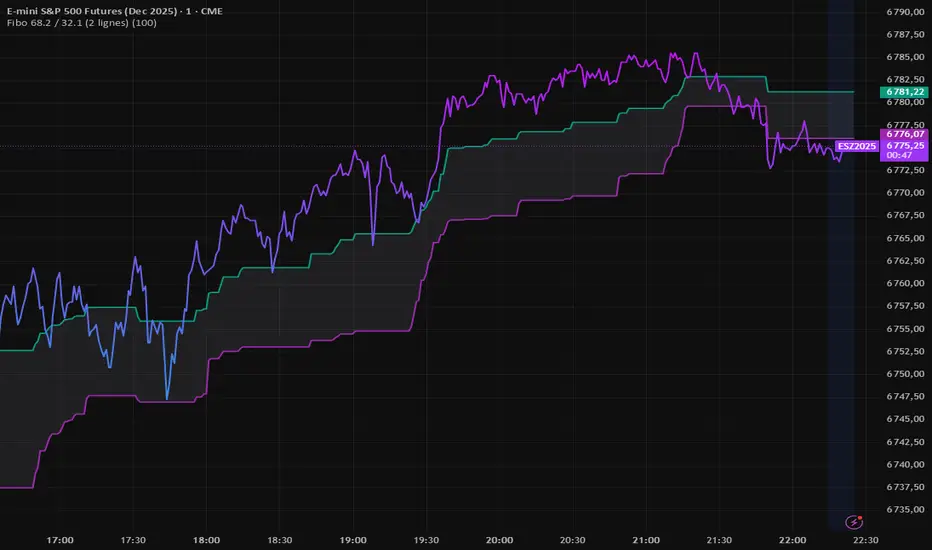
Metallic Retracement ToolI made a version of the Metallic Retracement script where instead of using automatic zig-zag detection, you get to place the points manually. When you add it to the chart, it prompts you to click on two points. These two points become your swing range, and the indicator calculates all the metallic retracement levels from there and plots them on your chart. You can drag the points around afterwards to adjust the range, or just add the indicator to the chart again to place a completely new set of points.
The mathematical foundation is identical to the original Metallic Retracement indicator. You're still working with metallic means, which are the sequence of constants that generalize the golden ratio through the equation x² = kx + 1. When k equals 1, you get the golden ratio. When k equals 2, you get silver. Bronze is 3, and so on forever. Each metallic number generates its own set of retracement ratios by raising alpha to various negative powers, where alpha equals (k + sqrt(k² + 4)) / 2. The script algorithmically calculates these levels instead of hardcoding them, which means you can pick any metallic number you want and instantly get its complete retracement sequence.
What's different here is the control. Automatic zig-zag detection is useful when you want the indicator to find swings for you, but sometimes you have a specific price range in mind that doesn't line up with what the zig-zag algorithm considers significant. Maybe you're analyzing a move that's still developing and hasn't triggered the zig-zag's reversal thresholds yet. Maybe you want to measure retracements from an arbitrary high to an arbitrary low that happened weeks apart with tons of noise in between. Manual placement lets you define exactly which two points matter for your analysis without fighting with sensitivity settings or waiting for confirmation.
The interactive placement system uses TradingView's built-in drawing tools, so clicking the two points feels natural and works the same way as drawing a trendline or fibonacci retracement. First click sets your starting point, second click sets your ending point, and the indicator immediately calculates the range and draws all the metallic levels extending from whichever point you chose as the origin. If you picked a swing low and then a swing high, you get retracement levels projecting upward. If you went from high to low, they project downward.
Moving the points after placement is as simple as grabbing one of them and dragging it to a new location. The retracement levels recalculate in real-time as you move the anchor points, which makes it easy to experiment with different range definitions and see how the levels shift. This is particularly useful when you're trying to figure out which swing points produce retracement levels that line up with other technical features like previous support or resistance zones. You can slide the points around until you find a configuration that makes sense for your analysis.
Adding the indicator to the chart multiple times lets you compare different metallic means on the same price range, or analyze multiple ranges simultaneously with different metallic numbers. You could have golden ratio retracements on one major swing and silver ratio retracements on a smaller correction within that swing. Since each instance of the indicator is independent, you can mix and match metallic numbers and ranges however you want without one interfering with the other.
The settings work the same way as the original script. You select which metallic number to use, control how many power ratios to display above and below the 1.0 level, and adjust how many complete retracement cycles you want drawn. The levels extend from your manually placed swing points just like they would from automatically detected pivots, showing you where price might react based on whichever metallic mean you've selected.
What this version emphasizes is that retracement analysis is subjective in terms of which swing points you consider significant. Automatic detection algorithms make assumptions about what constitutes a meaningful reversal, but those assumptions don't always match your interpretation of the price action. By giving you manual control over point placement, this tool lets you apply metallic retracement concepts to exactly the price ranges you care about, without requiring those ranges to fit someone else's definition of a valid swing. You define the context, the indicator provides the mathematical framework.