PROTECTED SOURCE SCRIPT
Güncellendi Ayman Entry Signal – With HTF + Pin Bar
A professional and versatile trading indicator combining classic technical analysis with Smart Money Concepts to detect high-probability entry points.
Designed especially for scalping gold and forex pairs on lower timeframes. Fully customizable to suit any trading style.
✅ Key Features:
EMA Trend Confirmation
Break of Structure (BoS) Detection
Order Block Zone Recognition
Fair Value Gap (FVG) Confirmation
Liquidity Sweep Detection
Pin Bar Candlestick Confirmation
Higher Timeframe Confirmation (HTF EMA + HTF BoS)
🎯 Smart Risk Management:
Automatically calculates Stop Loss (SL) and Take Profit (TP) based on the selected timeframe.
Dynamically adjusts lot size based on account capital and risk percentage.
📈 How It Works:
The indicator triggers a Buy or Sell signal only when a selected set of conditions are met, including:
Trend direction (EMA crossover)
Break of structure
Presence within strong supply/demand zones
Confirmation from higher timeframe
Reversal Pin Bar pattern
🛎 Alerts:
Built-in alert system notifies you instantly when a valid Buy or Sell signal is triggered.
⚙️ Customizable Settings:
Risk Percentage
Capital Size
HTF timeframe
Enable/Disable individual filters (EMA, BoS, OB, FVG, Liquidity, Pin Bar, HTF)
📌 Best Timeframes:
1-min, 5-min, and 15-min – especially during high-volume sessions like London or New York.
🔸 Note:
This is not financial advice. Always backtest and use manual confirmations before live trading.
Sürüm Notları
🧠 Indicator Name:"Ayman Entry Signal – With HTF + Pin Bar + Multi TP + BE + History (Modified)"
🔧 1. Capital & Risk Settings
These inputs define how the position size and targets are calculated:
Capital ($): The total account capital to base position sizing on.
Risk Percentage %: Percentage of capital to risk per trade.
TP to SL Ratio: Reward-to-risk ratio.
Value Per Point: Value of each price point per lot (e.g., $10 per point).
SL Buffer: Extra space in SL to avoid being wicked out.
🎯 2. Take Profit Settings
TP1 %: The portion of the full target where TP1 is set.
Break Even: If enabled, moves SL to entry after hitting TP1.
Partial Close: If enabled, closes part of the position at TP1.
📊 3. Indicator & Entry Condition Settings
These determine which filters are used:
ATR Period: Used to calculate dynamic stop loss buffer.
Use EMA: Filters trades by short/long EMA trend.
Use Break of Structure (BoS): Requires recent structure break for entry.
Use Order Block (OB): Requires price to be in OB zone.
Use FVG: Requires price to re-enter a Fair Value Gap.
Use Liquidity Sweep: Looks for stop-hunting wicks.
Liquidity Lookback: Number of bars to consider for sweep.
Use Pin Bar: Requires a Pin Bar confirmation.
Max Body-to-Wick Ratio: Controls what qualifies as a Pin Bar.
⏫ 4. Higher Timeframe (HTF) Confirmation
Use HTF EMA: Confirms trend direction from a higher timeframe.
Use HTF BoS: Confirms structure break on higher timeframe.
HTF Timeframe: The higher timeframe to use for confirmations.
🎨 5. Display Options
These settings control visual elements:
Show Previous Trades: Keep old trade lines/labels.
Show Trade Box: Display a colored box for open trade.
Colors: Customize TP1, TP2, SL, Entry lines and trade boxes for Buy/Sell.
📈 6. Trend Detection Using EMAs
Fast EMA (9) and Slow EMA (21) are used.
If Fast > Slow = Bullish Trend.
If Fast < Slow = Bearish Trend.
Same concept applies to HTF EMAs.
🔁 7. Break of Structure Logic (BoS)
Detects recent swing highs/lows and checks if the current price breaks them (adjusted by 0.5%).
Also applies similar logic to HTF BoS.
🟩 8. Order Block & FVG
OB Zones are set when a BoS happens.
FVG is checked using gaps between candle highs and lows.
Entry only happens if these gaps are revisited (filled).
💧 9. Liquidity Sweep
Detects if price wicks below recent lows (buy) or above highs (sell).
Uses liquidityLookback to define recent structure.
🔥 10. Pin Bar Detection
Identifies Pin Bars by:
Long wick in direction of trade.
Small body-to-wick ratio.
🚦 11. Entry Conditions
Combines all enabled filters (EMA, BoS, OB, FVG, Liquidity, Pin Bar, HTF) to define:
condBuy: Whether all bullish conditions are met.
condSell: Whether all bearish conditions are met.
💼 12. Trade Management Variables
Keeps track of:
inTrade: Active trade status.
entryFixed, tradeSL, tradeTP1, tradeTPFull: Trade levels.
lotSize: Calculated lot size based on risk.
Arrays to store lines and labels from old trades.
🧮 13. PnL Calculation
Calculates real dollar profit/loss using:
pine
Copy
Edit
(price difference) * lot size * value per point
✅ 14. Trade Execution Logic
Opens a Buy or Sell trade when the condition is true and there’s no open trade.
Entry = current candle close.
SL = dynamic + ATR.
TP1/TP2 = based on risk:reward.
Lot size = calculated using account risk %.
📦 15. Trade Box
Draws a visual box from entry to TP/SL:
Green box = Buy trade.
Red box = Sell trade.
It extends right as candles print.
💹 16. Exit & Partial Close Logic
If TP1 is hit → SL is moved to entry if enabled, and partial close is done if enabled.
If TP2 (full target) or SL is hit → trade closes.
If enabled, trade result is drawn with:
Dashed lines for TP1, TP2, SL, Entry.
Labels showing price level and profit/loss.
📊 17. Current Active Trade Display
Only one trade active at a time.
Deletes previous lines and labels each candle.
Draws live lines/labels for:
Entry
TP1
TP2
SL
Lot size
Real-time PnL
🔺 18. Pin Bar Signals
Plots a small triangle below/above candles when a valid Pin Bar is detected.
🔔 19. Alerts
Sends alert when a Buy or Sell signal appears:
"Buy Signal – Check chart for entry and lot size."
"Sell Signal – Check chart for entry and lot size."
✅ Summary:
This is a Smart Money Concepts-based entry system with:
Multiple confluence filters (trend, structure, OB, FVG, liquidity, HTF).
Advanced risk management (TP1, TP2, SL, BE, partial close).
Live visualization (boxes, lines, PnL labels).
One-trade-at-a-time enforcement.
Sürüm Notları
Ayman Entry Signal – Indicator DescriptionOverview
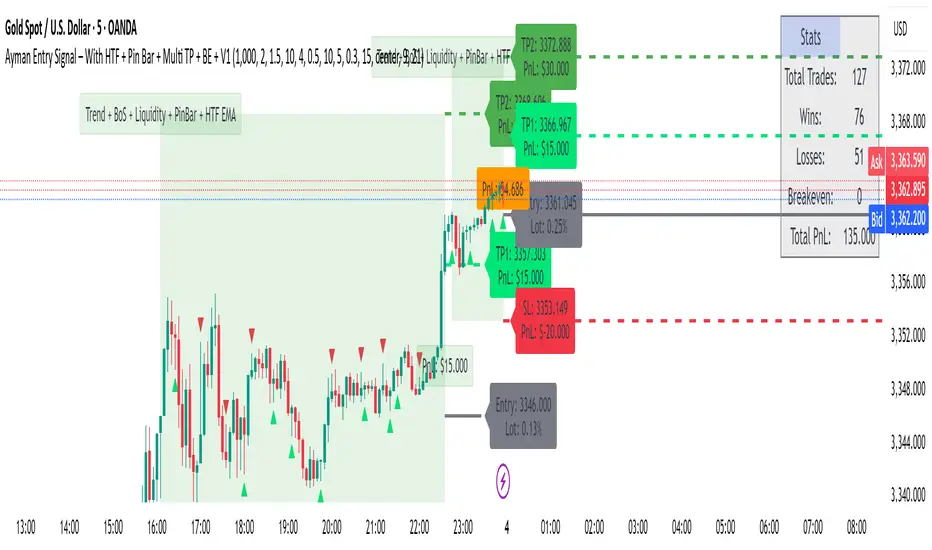
Ayman Entry Signal – With HTF + Pin Bar + Multi TP + BE + Stats Panel (V1)
This is a professional-grade Pine Script indicator designed for scalping and intraday trading, with full trade management, multi-confirmation logic, and advanced visualization. The tool is ideal for traders focused on XAUUSD (Gold), Forex, and other volatile instruments who seek both precision entries and structured exits with dynamic risk control.
Main Features
Advanced Entry Logic:
- EMA fast/slow crossovers (configurable)
- Optional conditions: Break of Structure (BoS), Order Block (OB), Fair Value Gap (FVG), Liquidity sweeps, Pin Bars
- HTF confirmation using EMA or BoS
- Real-time entry condition display
Trade Management:
- Dynamic calculation of Entry, SL (with ATR buffer), TP1, TP2
- Supports Partial Close and Break Even logic after TP1
- Visual PnL label (dynamic and color-coded)
Statistics Panel:
- Shows total trades, win/loss/breakeven count, cumulative PnL
- Filter by custom date or session
- Fully customizable panel appearance
Trade Visualization:
- Trade box includes all trade levels (Entry, SL, TP1, TP2)
- Visual display of trade conditions and PnL result
- Option to keep previous trades on chart
Alert System:
- Alerts for Buy and Sell entries
- Compatible with webhook automation systems like MT5/MT4
Customization & Inputs
- Capital & risk per trade
- Value per pip/point
- SL buffer (ATR-based)
- Manual EMA override
- Enable/disable: EMA, BoS, OB, FVG, Liquidity, Pin Bars
- HTF: timeframe + confirmation logic
- Trade box/labels visibility
- Full color customization
- PnL label position: top, center, or bottom
Recommended Use
- Ideal for Gold scalping (XAUUSD), also effective for Forex
- Best on 1m–15m charts; use HTF confirmation from 15m–4H
- Pairs well with semi-automated systems using alerts and webhooks
Disclaimer
Note: This is a non-executing indicator. It does not place trades but provides visual and statistical guidance for professional manual or semi-automated trading.
Korumalı komut dosyası
Bu komut dosyası kapalı kaynak olarak yayınlanmaktadır. Ancak, ücretsiz ve herhangi bir sınırlama olmaksızın kullanabilirsiniz – daha fazla bilgiyi buradan edinebilirsiniz.
Feragatname
Bilgiler ve yayınlar, TradingView tarafından sağlanan veya onaylanan finansal, yatırım, alım satım veya diğer türden tavsiye veya öneriler anlamına gelmez ve teşkil etmez. Kullanım Koşulları bölümünde daha fazlasını okuyun.