Customizable Non-Repainting HTF MACD MFI Scalper Bot Strategy v2Customizable Non-Repainting HTF MACD MFI Scalper Bot Strategy v2
This script was originally shared by Wunderbit as a free open source script for the community to work with. This is my second published iteration of this idea.
WHAT THIS SCRIPT DOES:
It is intended for use on an algorithmic bot trading platform but can be used for scalping and manual trading.
This strategy is based on the trend-following momentum indicator . It includes the Money Flow index as an additional point for entry.
This is a new and improved version geared for lower timeframes (15-5 minutes), but can be run on larger ones as well. I am testing it live as my high frequency trader.
HOW IT DOES IT:
It uses a combination of MACD and MFI indicators to create entry signals. Parameters for each indicator have been surfaced for user configurability.
Take profits are now trailing profits, and the stop loss is now fixed. Why? I found that the trailing stop loss with ATR in the previous version yields very good results for back tests but becomes very difficult to deploy live due to transaction fees. As you can see the average trade is a higher profit percentage than the previous version.
HOW IS MY VERSION ORIGINAL:
Now instead of using ATR stop loss, we have a fixed stop loss - counter intuitively to what some may believe this performs better in live trading scenarios since it gives the strategy room to move. I noticed that the ATR trailing stop was stopping out too fast and was eating away balance due to transaction fees.
The take profit on the other hand is now a trailing profit with a customizable deviation. This ensures that you can have a minimum profit you want to take in order to exit.
I have depracated the old ATR trailing stop as it became too confusing to have those as different options. I kept the old version for others that want to experiment with it. The source code still requires some cleanup, but its fully functional.
I added in a way to show RSI values and ATR values with a checkbox so that you can use the new an improved ATR Filter (and grab the right RSI values for the RSI filter). This will help to filter out times of very low volatility where we are unlikely to find a profitable trade. Use the "Show Data" checkbox to see what the values are on the indicator pane, then use those values to gauge what you want to filter out.
Both versions
Delayed Signals : The script has been refactored to use a time frame drop down. The higher time frame can be run on a faster chart (recommended on one minute chart for fastest signal confirmation and relay to algotrading platform.)
Repainting Issues : All indicators have been recoded to use the security function that checks to see if the current calculation is in realtime, if it is, then it uses the previous bar for calculation. If you are still experiencing repainting issues based on intended (or non intended use), please provide a report with screenshot and explanation so I can try to address.
Filtering : I have added to additional filters an ABOVE EMA Filter and a BELOW RSI Filter (both can be turned on and off)
Customizable Long and Close Messages : This allows someone to use the script for algorithmic trading without having to alter code. It also means you can use one indicator for all of your different alterts required for your bots.
HOW TO USE IT:
It is intended to be used in the 5-30 minute time frames, but you might be able to get a good configuration for higher time frames. I welcome feedback from other users on what they have found.
Find a pair with high volatility (example KUCOIN:ETH3LUSDT ) - I have found it works particularly well with 3L and 3S tokens for crypto. although it the limitation is that confrigurations I have found to work typically have low R/R ratio, but very high win rate and profit factor.
Ideally set one minute chart for bots, but you can use other charts for manual trading. The signal will be delayed by one bar but I have found configurations that still test well.
Select a time frame in configuration for your indicator calculations.
Select the strategy config for time frame (resolution). I like to use 5 and 15 minutes for scalping scenarios, but I am interested in hearing back from other community memebers.
Optimize your indicator without filters : customize your settings for MACD and MFI that are profitable with your chart and selected time frame calculation. Try different Take Profits (try about 2-5%) and stop loss (try about 5-8%). See if your back test is profitable and continue to optimize.
Use the Trend, RSI, ATR Filter to further refine your signals for entry. You will get less entries but you can increase your win ratio.
You can use the open and close messages for a platform integration, but I choose to set mine up on the destination platform and let the platform close it. With certain platforms you cannot be sure what your entry point actually was compared to Trading View due to slippage and timing, so I let the platform decide when it is actually profitable.
Limitations: this works rather well for short term, and does some good forward testing but back testing large data sets is a problem when switching from very small time frame to large time frame. For instance, finding a configuration that works on a one minute chart but then changing to a 1 hour chart means you lose some of your intra bar calclulations. There are some new features in pine script which might be able to address, this, but I have not had a chance to work on that issue.
"entry" için komut dosyalarını ara

QQE MOD + SSL Hybrid + Waddah Attar ExplosionTRADE CONDITIONS
Long entry:
QQE Mod changes to Blue (leading indicator)
SSL Hybrid is Blue and price is above MA Channel line
Waddah Attar Explosion is Green and above Explosion line
Short entry:
QQE Mod changes to Red (leading indicator)
SSL Hybrid is Red and price is below MA Channel line
Waddah Attar Explosion is Red and above Explosion line
Risk management:
Each trade risks 2% of account (configurable in settings)
SL size determined by swing low/high of previous X candles (configurable in settings)
TP is triggered on SSL Hybrid EXIT arrow signals
TIPS
Timeframe: Personally I've found best results running this on 1H timeframe.
Note: To help visual identification of trade entries and exits you may wish to add the SSL Hybrid and Waddah Attar Explosion to the chart separately. They are being used to determine trade entry/exit within the code of this strategy but it was not possible to display them in a clear way within a single panel. Make sure you set the settings of the auxiliary indicators to match what is in the settings of this indicator if you do decide to add them.
CREDITS
QQE MOD byMihkel00
SSL Hybrid by Mihkel00
Waddah Attar Explosion by shayankm

Smoothed Waddah ATR~~~All Credit to LAZY BEAR for posting the original Script which is an old MT4 indicator.~~~~
No this system does not repaint... if it does let me know. Either the code is wrong or you are using a repainting chart such as renko candles.
*PURPOSE*
This Is an "Enhanced or Smoothed" version of the script that captures the heiken-ashi closing price as its main calculation variable. While using normal bar or line charts. Enhancements integrate trade filters to reduce false signals.
*WHAT TYPE OF TRADING STRATEGY IS THIS?*
This is a Long Only, Trend Trading System. Is intended to be applied to Charts/Timeframes that produce sustainable trends for which ever asset you are trading.
*NOTE OF ADVICE REGARDING SETTINGS*
Settings can be tweaked but I have found that best results come with the given settings. If a chart is too choppy to trade this indicator successfully, it is advised not to change the settings but either find a different timeframe or different asset to apply this strategy to.
TLDR
Indicator measures the change of the MacD (difference between MAC D of given EMA's) and compares it to the difference between the Upper and Lower Bollinger bands. Green bar over trigger line= entry. Red bar over trigger line = close.
*SETTINGS AND INPUTS*
-MacD of HeikenAshi chart (will always be of the Heikenashi chart even when applied to different chart type)
sensitivity = input(150, title='Sensitivity') =range should be (125-175)multiplier so that MacD can be compared to BB
fastLength = input(20, title='MacD FastEMA Length')
slowLength = input(40, title='MacD SlowEMA Length')
-Bollinger Band of currently used price chart type
channelLength = input(20, title='BB Channel Length')
mult = input(1.5, title='BB Stdev Multiplier')
-14 Period RSI Trade Filter (set to 0 to Disable)
RSI14filter = input(40, title='RSI Value trade filter') =only gives entry when RSI is higher than given value
*ABSTRACT & CONCEPT*
TLDR - Indicator measures the change of the MacD (difference between MAC D of given EMA's) and compares it to the difference between the Upper and Lower Bollinger bands. Green bar over trigger line= entry. Red bar over trigger line = close.
Indicator plots -
Bars are the change in the MAC D and the indicator line is the difference in the BB.
When Bars are higher than the indicator line then it is considered a trend "Explosion"
Green Bars are Trend Explosion to the upside, Red Bars are Trend explosion to the downside.
GENERAL DETAIL-
the core calculation is measuring the change in MacD of current candle compared to the MacD of two previous candles.
This value is multiplied by the sensitivy so it can be compared to the change in Bollinger Band Width.
if the MACD change is positive then you get a green/lime bar for that value. If the MacDchange is negative you get a red/orange bar for that value.
and are determined by whether the actual change is increasing in that direction or decreasing. (bars getting taller or bars getting shorter)
Entry signal for long is A positive change in MACD difference (Green bar) that is greater than the change of the bollinger band (orange signal line) AND if the RSI value is above your filter.
Close signal or Trend Stop Warning Signal is given when a Negative MacD Difference (red bar) is greater than the change of the bollinger band (orange Line)
*CONSIDERATIONS AND THOUGHTS*
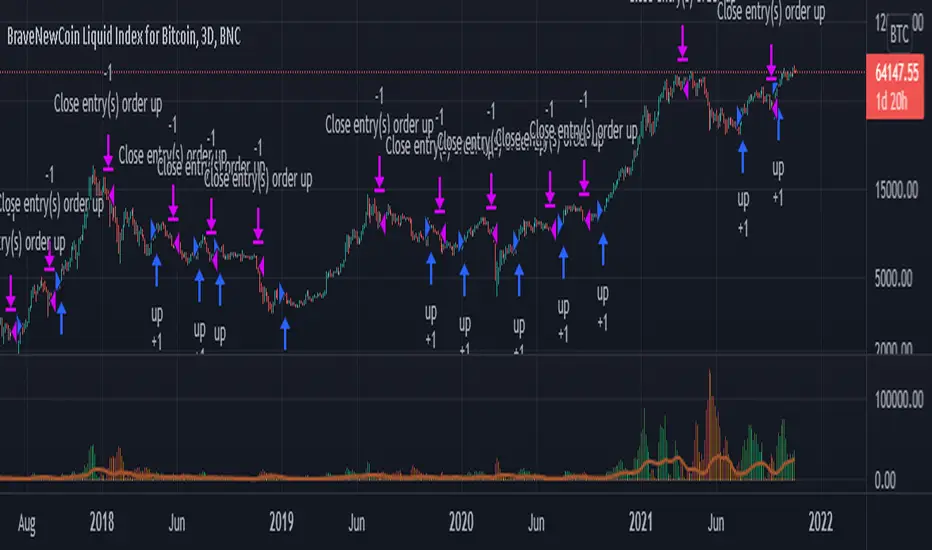
I have over 150 iterations of this indicator and this is the most consistent and best version of settings and filters I was able to generate. I built this indicator specifically for 3 charts. SPY monthly, QQQ monthly, BTC 3 Day. However this indicator works well on any long term bullish chart. (tech stocks are great) .
Trend trading systems are intended to be homerun hitting, plunge protecting indicators that allow for long legs and expanding volatility. This indicator does this as the trigger line is Dynamic with the expansion and contraction of the bollinger band.
I do not take every signal specifically not the close signals. Instead they more like warnings in ultra bullish environments.
If i had to pair this indicator with any other filter than the RSI, it would be a long term moving average i.e. the 50 week or equivalent for your chart. signals above rising moving averages means that you are trading with an upward trending market.
Hope this helps. Happy trades.
-SnarkyPuppy
Scalping EMA ADX RSI with Buy/Sell AlertsThis is a study indicator that shows the entries in the strategy seen in one of the youtube channel so it does not belong to me. I can't tell who it is because it's against the House Rules to advertise but you can find out if you look for it on youtube. Default values of oscilators and ema adjusted as suggested. He says he got the best results in 5 min timeframe but i tried to make things as modifiable as possible so you can mess around with the settings and create your own strategy for different timeframes if you'd like. Suggested to use with normal candlestick charts. The blue line below indicates the ADX is above the selected threshold set in the settings named "Trend Ready Limit". You can set alerts for Buy, Sell or Buy/Sell signal together.
The entry strategy itself is pretty straight forward.
The rules for entry are as follows, the script will check all of this on auto and will give you buy or sell signal :
Recommended time frame: 5 min
For Long Entry:
- Check if price above the set EMA (Can disable this rule if you'd like in the settings)
- RSI is in Oversold
- ADX is above set "Trend Ready" threshold (Meaning there is a trend going on)
- Price must approve the trend of previous candles. This is bullish for buy entries and bearish for sell entries.
- Enter with stop loss below last swing low with 1:1 or 1.5:1 take profit ratio.
For Short Entry:
- Check if price below the set EMA (Can disable this rule if you'd like in the settings)
- RSI is in Overbought
- ADX is above set "Trend Ready" threshold (Meaning there is a trend going on)
- Price must approve the trend of previous candles. This is bullish for buy entries and bearish for sell entries.
- Enter with stop loss above last swing high with 1:1 or 1.5:1 take profit ratio.
This is my first indicator. Let me know if you want any updates. I am not sure if i can add everything but i'll try nonetheless.
Changed: Signals will check up to 2 candles before if the RSI is below or above the set value to show signal. This is because sometimes the entry signal is right but the response might be a bit late.

RSI 30 CROSSScript will give the RSI 30 40 and 70 level for present price of the stock , when the price cross the green line RSI value will be 70 , blue line RSI value will be 40 and red line RSI value will be 30 . Helps to put entry and exit based on RSI strategy.
RED line give price for RSI 30
BLUE line give price for RSI 40
GREEN line give price for RSI 70
BLACK line give SMA 200
Strategy
Stock price should above 200 MA
price should touch RSI 30 RED line and bounce back.
Entry will be the high of candle lies on RSI 40 BLUE line.
Stop loss will be the RSI 30 price(RED line ) during entry.
Target will be the RSI 70 price ( GREEEN line) during entry.
You can take half profit at RSI 70 and trail stop loss on RSI 70 till it cross.
This will help you to find the Price for stock, when it cross RSI value 30 , 40 and 70 to place entry exit and target based on the trade strategy will follow RSI.
If you want to entry, when stock cross RSI 30 or 40 from below . You can place a stop loss limit buy order at price range .
If you want to exit, When stock cross RSI 70 . you place stock loss at green line price.

Webhook Starter Kit [HullBuster]
Introduction
This is an open source strategy which provides a framework for webhook enabled projects. It is designed to work out-of-the-box on any instrument triggering on an intraday bar interval. This is a full featured script with an emphasis on actual trading at a brokerage through the TradingView alert mechanism and without requiring browser plugins.
The source code is written in a self documenting style with clearly defined sections. The sections “communicate” with each other through state variables making it easy for the strategy to evolve and improve. This is an excellent place for Pine Language beginners to start their strategy building journey. The script exhibits many Pine Language features which will certainly ad power to your script building abilities.
This script employs a basic trend follow strategy utilizing a forward pyramiding technique. Trend detection is implemented through the use of two higher time frame series. The market entry setup is a Simple Moving Average crossover. Positions exit by passing through conditional take profit logic. The script creates ten indicators including a Zscore oscillator to measure support and resistance levels. The indicator parameters are exposed through 47 strategy inputs segregated into seven sections. All of the inputs are equipped with detailed tool tips to help you get started.
To improve the transition from simulation to execution, strategy.entry and strategy.exit calls show enhanced message text with embedded keywords that are combined with the TradingView placeholders at alert time. Thereby, enabling a single JSON message to generate multiple execution events. This is genius stuff from the Pine Language development team. Really excellent work!
This document provides a sample alert message that can be applied to this script with relatively little modification. Without altering the code, the strategy inputs can alter the behavior to generate thousands of orders or simply a few dozen. It can be applied to crypto, stocks or forex instruments. A good way to look at this script is as a webhook lab that can aid in the development of your own endpoint processor, impress your co-workers and have hours of fun.
By no means is a webhook required or even necessary to benefit from this script. The setups, exits, trend detection, pyramids and DCA algorithms can be easily replaced with more sophisticated versions. The modular design of the script logic allows you to incrementally learn and advance this script into a functional trading system that you can be proud of.
Design
This is a trend following strategy that enters long above the trend line and short below. There are five trend lines that are visible by default but can be turned off in Section 7. Identified, in frequency order, as follows:
1. - EMA in the chart time frame. Intended to track price pressure. Configured in Section 3.
2. - ALMA in the higher time frame specified in Section 2 Signal Line Period.
3. - Linear Regression in the higher time frame specified in Section 2 Signal Line Period.
4. - Linear Regression in the higher time frame specified in Section 2 Signal Line Period.
5. - DEMA in the higher time frame specified in Section 2 Trend Line Period.
The Blue, Green and Orange lines are signal lines are on the same time frame. The time frame selected should be at least five times greater than the chart time frame. The Purple line represents the trend line for which prices above the line suggest a rising market and prices below a falling market. The time frame selected for the trend should be at least five times greater than the signal lines.
Three oscillators are created as follows:
1. Stochastic - In the chart time frame. Used to enter forward pyramids.
2. Stochastic - In the Trend period. Used to detect exit conditions.
3. Zscore - In the Signal period. Used to detect exit conditions.
The Stochastics are configured identically other than the time frame. The period is set in Section 2.
Two Simple Moving Averages provide the trade entry conditions in the form of a crossover. Crossing up is a long entry and down is a short. This is in fact the same setup you get when you select a basic strategy from the Pine editor. The crossovers are configured in Section 3. You can see where the crosses are occurring by enabling Show Entry Regions in Section 7.
The script has the capacity for pyramids and DCA. Forward pyramids are enabled by setting the Pyramid properties tab with a non zero value. In this case add on trades will enter the market on dips above the position open price. This process will continue until the trade exits. Downward pyramids are available in Crypto and Range mode only. In this case add on trades are placed below the entry price in the drawdown space until the stop is hit. To enable downward pyramids set the Pyramid Minimum Span In Section 1 to a non zero value.
This implementation of Dollar Cost Averaging (DCA) triggers off consecutive losses. Each loss in a run increments a sequence number. The position size is increased as a multiple of this sequence. When the position eventually closes at a profit the sequence is reset. DCA is enabled by setting the Maximum DCA Increments In Section 1 to a non zero value.
It should be noted that the pyramid and DCA features are implemented using a rudimentary design and as such do not perform with the precision of my invite only scripts. They are intended as a feature to stress test your webhook endpoint. As is, you will need to buttress the logic for it to be part of an automated trading system. It is for this reason that I did not apply a Martingale algorithm to this pyramid implementation. But, hey, it’s an open source script so there is plenty of room for learning and your own experimentation.
How does it work
The overall behavior of the script is governed by the Trading Mode selection in Section 1. It is the very first input so you should think about what behavior you intend for this strategy at the onset of the configuration. As previously discussed, this script is designed to be a trend follower. The trend being defined as where the purple line is predominately heading. In BiDir mode, SMA crossovers above the purple line will open long positions and crosses below the line will open short. If pyramiding is enabled add on trades will accumulate on dips above the entry price. The value applied to the Minimum Profit input in Section 1 establishes the threshold for a profitable exit. This is not a hard number exit. The conditional exit logic must be satisfied in order to permit the trade to close. This is where the effort put into the indicator calibration is realized. There are four ways the trade can exit at a profit:
1. Natural exit. When the blue line crosses the green line the trade will close. For a long position the blue line must cross under the green line (downward). For a short the blue must cross over the green (upward).
2. Alma / Linear Regression event. The distance the blue line is from the green and the relative speed the cross is experiencing determines this event. The activation thresholds are set in Section 6 and relies on the period and length set in Section 2. A long position will exit on an upward thrust which exceeds the activation threshold. A short will exit on a downward thrust.
3. Exponential event. The distance the yellow line is from the blue and the relative speed the cross is experiencing determines this event. The activation thresholds are set in Section 3 and relies on the period and length set in the same section.
4. Stochastic event. The purple line stochastic is used to measure overbought and over sold levels with regard to position exits. Signal line positions combined with a reading over 80 signals a long profit exit. Similarly, readings below 20 signal a short profit exit.
Another, optional, way to exit a position is by Bale Out. You can enable this feature in Section 1. This is a handy way to reduce the risk when carrying a large pyramid stack. Instead of waiting for the entire position to recover we exit early (bale out) as soon as the profit value has doubled.
There are lots of ways to implement a bale out but the method I used here provides a succinct example. Feel free to improve on it if you like. To see where the Bale Outs occur, enable Show Bale Outs in Section 7. Red labels are rendered below each exit point on the chart.
There are seven selectable Trading Modes available from the drop down in Section 1:
1. Long - Uses the strategy.risk.allow_entry_in to execute long only trades. You will still see shorts on the chart.
2. Short - Uses the strategy.risk.allow_entry_in to execute short only trades. You will still see long trades on the chart.
3. BiDir - This mode is for margin trading with a stop. If a long position was initiated above the trend line and the price has now fallen below the trend, the position will be reversed after the stop is hit. Forward pyramiding is available in this mode if you set the Pyramiding value in the Properties tab. DCA can also be activated.
4. Flip Flop - This is a bidirectional trading mode that automatically reverses on a trend line crossover. This is distinctively different from BiDir since you will get a reversal even without a stop which is advantageous in non-margin trading.
5. Crypto - This mode is for crypto trading where you are buying the coins outright. In this case you likely want to accumulate coins on a crash. Especially, when all the news outlets are talking about the end of Bitcoin and you see nice deep valleys on the chart. Certainly, under these conditions, the market will be well below the purple line. No margin so you can’t go short. Downward pyramids are enabled for Crypto mode when two conditions are met. First the Pyramiding value in the Properties tab must be non zero. Second the Pyramid Minimum Span in Section 1 must be non zero.
6. Range - This is a counter trend trading mode. Longs are entered below the purple trend line and shorts above. Useful when you want to test your webhook in a market where the trend line is bisecting the signal line series. Remember that this strategy is a trend follower. It’s going to get chopped out in a range bound market. By turning on the Range mode you will at least see profitable trades while stuck in the range. However, when the market eventually picks a direction, this mode will sustain losses. This range trading mode is a rudimentary implementation that will need a lot of improvement if you want to create a reliable switch hitter (trend/range combo).
7. No Trade. Useful when setting up the trend lines and the entry and exit is not important.
Once in the trade, long or short, the script tests the exit condition on every bar. If not a profitable exit then it checks if a pyramid is required. As mentioned earlier, the entry setups are quite primitive. Although they can easily be replaced by more sophisticated algorithms, what I really wanted to show is the diminished role of the position entry in the overall life of the trade. Professional traders spend much more time on the management of the trade beyond the market entry. While your trade entry is important, you can get in almost anywhere and still land a profitable exit.
If DCA is enabled, the size of the position will increase in response to consecutive losses. The number of times the position can increase is limited by the number set in Maximum DCA Increments of Section 1. Once the position breaks the losing streak the trade size will return the default quantity set in the Properties tab. It should be noted that the Initial Capital amount set in the Properties tab does not affect the simulation in the same way as a real account. In reality, running out of money will certainly halt trading. In fact, your account would be frozen long before the last penny was committed to a trade. On the other hand, TradingView will keep running the simulation until the current bar even if your funds have been technically depleted.
Entry and exit use the strategy.entry and strategy.exit calls respectfully. The alert_message parameter has special keywords that the endpoint expects to properly calculate position size and message sequence. The alert message will embed these keywords in the JSON object through the {{strategy.order.alert_message}} placeholder. You should use whatever keywords are expected from the endpoint you intend to webhook in to.
Webhook Integration
The TradingView alerts dialog provides a way to connect your script to an external system which could actually execute your trade. This is a fantastic feature that enables you to separate the data feed and technical analysis from the execution and reporting systems. Using this feature it is possible to create a fully automated trading system entirely on the cloud. Of course, there is some work to get it all going in a reliable fashion. Being a strategy type script place holders such as {{strategy.position_size}} can be embedded in the alert message text. There are more than 10 variables which can write internal script values into the message for delivery to the specified endpoint.
Entry and exit use the strategy.entry and strategy.exit calls respectfully. The alert_message parameter has special keywords that my endpoint expects to properly calculate position size and message sequence. The alert message will embed these keywords in the JSON object through the {{strategy.order.alert_message}} placeholder. You should use whatever keywords are expected from the endpoint you intend to webhook in to.
Here is an excerpt of the fields I use in my webhook signal:
"broker_id": "kraken",
"account_id": "XXX XXXX XXXX XXXX",
"symbol_id": "XMRUSD",
"action": "{{strategy.order.action}}",
"strategy": "{{strategy.order.id}}",
"lots": "{{strategy.order.contracts}}",
"price": "{{strategy.order.price}}",
"comment": "{{strategy.order.alert_message}}",
"timestamp": "{{time}}"
Though TradingView does a great job in dispatching your alert this feature does come with a few idiosyncrasies. Namely, a single transaction call in your script may cause multiple transmissions to the endpoint. If you are using placeholders each message describes part of the transaction sequence. A good example is closing a pyramid stack. Although the script makes a single strategy.close() call, the endpoint actually receives a close message for each pyramid trade. The broker, on the other hand, only requires a single close. The incongruity of this situation is exacerbated by the possibility of messages being received out of sequence. Depending on the type of order designated in the message, a close or a reversal. This could have a disastrous effect on your live account. This broker simulator has no idea what is actually going on at your real account. Its just doing the job of running the simulation and sending out the computed results. If your TradingView simulation falls out of alignment with the actual trading account lots of really bad things could happen. Like your script thinks your are currently long but the account is actually short. Reversals from this point forward will always be wrong with no one the wiser. Human intervention will be required to restore congruence. But how does anyone find out this is occurring? In closed systems engineering this is known as entropy. In practice your webhook logic should be robust enough to detect these conditions. Be generous with the placeholder usage and give the webhook code plenty of information to compare states. Both issuer and receiver. Don’t blindly commit incoming signals without verifying system integrity.
Setup
The following steps provide a very brief set of instructions that will get you started on your first configuration. After you’ve gone through the process a couple of times, you won’t need these anymore. It’s really a simple script after all. I have several example configurations that I used to create the performance charts shown. I can share them with you if you like. Of course, if you’ve modified the code then these steps are probably obsolete.
There are 47 inputs divided into seven sections. For the most part, the configuration process is designed to flow from top to bottom. Handy, tool tips are available on every field to help get you through the initial setup.
Step 1. Input the Base Currency and Order Size in the Properties tab. Set the Pyramiding value to zero.
Step 2. Select the Trading Mode you intend to test with from the drop down in Section 1. I usually select No Trade until I’ve setup all of the trend lines, profit and stop levels.
Step 3. Put in your Minimum Profit and Stop Loss in the first section. This is in pips or currency basis points (chart right side scale). Remember that the profit is taken as a conditional exit not a fixed limit. The actual profit taken will almost always be greater than the amount specified. The stop loss, on the other hand, is indeed a hard number which is executed by the TradingView broker simulator when the threshold is breached.
Step 4. Apply the appropriate value to the Tick Scalar field in Section 1. This value is used to remove the pipette from the price. You can enable the Summary Report in Section 7 to see the TradingView minimum tick size of the current chart.
Step 5. Apply the appropriate Price Normalizer value in Section 1. This value is used to normalize the instrument price for differential calculations. Basically, we want to increase the magnitude to significant digits to make the numbers more meaningful in comparisons. Though I have used many normalization techniques, I have always found this method to provide a simple and lightweight solution for less demanding applications. Most of the time the default value will be sufficient. The Tick Scalar and Price Normalizer value work together within a single calculation so changing either will affect all delta result values.
Step 6. Turn on the trend line plots in Section 7. Then configure Section 2. Try to get the plots to show you what’s really happening not what you want to happen. The most important is the purple trend line. Select an interval and length that seem to identify where prices tend to go during non-consolidation periods. Remember that a natural exit is when the blue crosses the green line.
Step 7. Enable Show Event Regions in Section 7. Then adjust Section 6. Blue background fills are spikes and red fills are plunging prices. These measurements should be hard to come by so you should see relatively few fills on the chart if you’ve set this up as intended. Section 6 includes the Zscore oscillator the state of which combines with the signal lines to detect statistically significant price movement. The Zscore is a zero based calculation with positive and negative magnitude readings. You want to input a reasonably large number slightly below the maximum amplitude seen on the chart. Both rise and fall inputs are entered as a positive real number. You can easily use my code to create a separate indicator if you want to see it in action. The default value is sufficient for most configurations.
Step 8. Turn off Show Event Regions and enable Show Entry Regions in Section 7. Then adjust Section 3. This section contains two parts. The entry setup crossovers and EMA events. Adjust the crossovers first. That is the Fast Cross Length and Slow Cross Length. The frequency of your trades will be shown as blue and red fills. There should be a lot. Then turn off Show Event Regions and enable Display EMA Peaks. Adjust all the fields that have the word EMA. This is actually the yellow line on the chart. The blue and red fills should show much less than the crossovers but more than event fills shown in Step 7.
Step 9. Change the Trading Mode to BiDir if you selected No Trades previously. Look on the chart and see where the trades are occurring. Make adjustments to the Minimum Profit and Stop Offset in Section 1 if necessary. Wider profits and stops reduce the trade frequency.
Step 10. Go to Section 4 and 5 and make fine tuning adjustments to the long and short side.
Example Settings
To reproduce the performance shown on the chart please use the following configuration: (Bitcoin on the Kraken exchange)
1. Select XBTUSD Kraken as the chart symbol.
2. On the properties tab set the Order Size to: 0.01 Bitcoin
3. On the properties tab set the Pyramiding to: 12
4. In Section 1: Select “Crypto” for the Trading Model
5. In Section 1: Input 2000 for the Minimum Profit
6. In Section 1: Input 0 for the Stop Offset (No Stop)
7. In Section 1: Input 10 for the Tick Scalar
8. In Section 1: Input 1000 for the Price Normalizer
9. In Section 1: Input 2000 for the Pyramid Minimum Span
10. In Section 1: Check mark the Position Bale Out
11. In Section 2: Input 60 for the Signal Line Period
12. In Section 2: Input 1440 for the Trend Line Period
13. In Section 2: Input 5 for the Fast Alma Length
14. In Section 2: Input 22 for the Fast LinReg Length
15. In Section 2: Input 100 for the Slow LinReg Length
16. In Section 2: Input 90 for the Trend Line Length
17. In Section 2: Input 14 Stochastic Length
18. In Section 3: Input 9 Fast Cross Length
19. In Section 3: Input 24 Slow Cross Length
20. In Section 3: Input 8 Fast EMA Length
21. In Section 3: Input 10 Fast EMA Rise NetChg
22. In Section 3: Input 1 Fast EMA Rise ROC
23. In Section 3: Input 10 Fast EMA Fall NetChg
24. In Section 3: Input 1 Fast EMA Fall ROC
25. In Section 4: Check mark the Long Natural Exit
26. In Section 4: Check mark the Long Signal Exit
27. In Section 4: Check mark the Long Price Event Exit
28. In Section 4: Check mark the Long Stochastic Exit
29. In Section 5: Check mark the Short Natural Exit
30. In Section 5: Check mark the Short Signal Exit
31. In Section 5: Check mark the Short Price Event Exit
32. In Section 5: Check mark the Short Stochastic Exit
33. In Section 6: Input 120 Rise Event NetChg
34. In Section 6: Input 1 Rise Event ROC
35. In Section 6: Input 5 Min Above Zero ZScore
36. In Section 6: Input 120 Fall Event NetChg
37. In Section 6: Input 1 Fall Event ROC
38. In Section 6: Input 5 Min Below Zero ZScore
In this configuration we are trading in long only mode and have enabled downward pyramiding. The purple trend line is based on the day (1440) period. The length is set at 90 days so it’s going to take a while for the trend line to alter course should this symbol decide to node dive for a prolonged amount of time. Your trades will still go long under those circumstances. Since downward accumulation is enabled, your position size will grow on the way down.
The performance example is Bitcoin so we assume the trader is buying coins outright. That being the case we don’t need a stop since we will never receive a margin call. New buy signals will be generated when the price exceeds the magnitude and speed defined by the Event Net Change and Rate of Change.
Feel free to PM me with any questions related to this script. Thank you and happy trading!
CFTC RULE 4.41
These results are based on simulated or hypothetical performance results that have certain inherent limitations. Unlike the results shown in an actual performance record, these results do not represent actual trading. Also, because these trades have not actually been executed, these results may have under-or over-compensated for the impact, if any, of certain market factors, such as lack of liquidity. Simulated or hypothetical trading programs in general are also subject to the fact that they are designed with the benefit of hindsight. No representation is being made that any account will or is likely to achieve profits or losses similar to these being shown.

Bollinger Band with RSI
Using combination bollinger band and RSI indicator as guide to predict price volatility and the best entry point. The strategy logic is pretty straightforward where we're interested with close price that touches the lower bollinger band ; there are only two scenarios that will happened after the price reaches the lower band; the price might rebound from the lower bollinger band or drop lower and continue downtrend. To confirm the price movement, we use a second indicator which is the RSI to further investigate the price trend. For example, if the price reaches the lower bollinger band but the RSI value is not in the oversold region, we can conclude that the price will go lower and continue downtrend. If the RSI value is in the oversold region, we can use this price area as our entry point.
Stop loss is necessary to avoid losing too much capital if the RSI value lingers too long in the oversold region.
Best take profit area is when the price rebound above the middle bollinger band area/upper bollinger band or when the RSI reaches overbought region; whichever comes first.
Long entry:
RSI < 30 & close price < lower bollinger band
Exit entry:
RSI > 70
Default stop loss: -25%
Swing/Daytrading strategy with reversal option
Hello, today I bring a swing reversal strategy that work on all financial markets.
It uses timeframes starting from 1h, the bigger the better.
Its very dangerous because it has no stop loss, neither a take profit. Our exit condition is based on the reversal on the entry .
For entry we have 2 types : normal and reversal
Lets say we want to go long , for that we check the last CLOSE of a candle with the previos HIGH. If its higher than that, and at the same time CLOSE is bigger than the moving average, we have a long entry.
For short we have CLOSE with the previous LOW. If its lower than that and at the same time is lower than moving average, we have a short entry.
For moving average we use T3 MA
For reversal what I do, is , I take the short condition and I apply it to long, and for long I apply the short condition.
On many cases I found out it work amazingly.
I forgot to add: it also has a time entry system, so we use the best hours/sessions for entries .
Exit a trade: lets say we enter short, when we find a long condition, we close short and enter into long. Viceversa for long.
If you have any questions, let me know.
Enjoy it :)

Two Take Profit StrategyThis script is for research purposes only. I am not a financial advisor.
Entry Condition
This strategy is based on two take profit targets and scaling out strategy. The entry rule is very simple. Whenever the EMA crossover WMA, the long trade is taken and vice versa.
Take Profit and Stop Loss
The first take profit is set at 20 pips above the long entry and the second take profit is set at 40 pips above the long entry. Meanwhile, the stop loss is set at 20 pips below the long entry.
Money Management
When the first take profit is achieved, half of the position is closed. The rest of the position is open to achieve either second take profit or stop loss.
There are three outcomes when using this strategy. Let's say you enter the trade with 200 lot size and you are risking 2% of your equity.
1. The first outcome is when the price hits stop loss, you lose the entire 2%.
2. The second outcome is when the price hits the first take profit and you close half of your position. Meaning that you have gained 1%. Then you let the trade running and eventually it hits stop loss. The total loss is 0% because the remaining lot size which is 200/2=100 times by 20pips is 1%. You have gained the earlier 1% and then loss 1%. At this point, you are at break even.
3. The third outcome is similar to the second out but instead of hiring stop loss, the trade is running to your favor and hits the second take profit.
Therefore, you gained 1% from the first take profit and you gained another 2% for the second take profit. Your total gained is 3%
Summary
The reason behind this strategy is to minimize risk. with normal strategy, you only have two outcomes which are either win or loss. With this strategy, you have three outcomes which are win, loss or break even.
Scalping V5 - Strongest S/R & Predictive PanelScalping V5: Predictive Momentum & Institutional S/R by Herman Sangivera ( Papua )
Overview
Scalping V5 is a high-precision momentum indicator designed for lower timeframe traders (1m, 5m, 15m) who require a blend of trend-following logic and real-time structural analysis. Unlike standard indicators that only look at price action, this script utilizes a Dual-EMA Ribbon for momentum, a 200-period Filter for institutional bias, and a Predictive Probability Panel to gauge the strength of a potential move.
Key Features
1. Smart Momentum Ribbon (EMA 12/36)
The core of the strategy uses a dynamic ribbon.
Blue Ribbon: Indicates aggressive bullish momentum.
Red Ribbon: Indicates aggressive bearish momentum.
Traders should look for "Value Area" entries when the price retraces into the ribbon before continuing the trend.
2. Institutional Trend Guard (EMA 200)
To avoid "choppy" markets and counter-trend traps, the script plots a thick white baseline.
Above 200 EMA: Only Long setups are prioritized.
Below 200 EMA: Only Short setups are prioritized.
3. Dynamic Support & Resistance (S/R)
The script automatically calculates the Strongest Resistance (Highest High) and Strongest Support (Lowest Low) based on a 50-period lookback. This helps scalpers identify immediate "walls" in the market to set realistic Take Profit (TP) and Stop Loss (SL) levels.
4. Predictive Analytics Dashboard
The real-time panel in the top right provides:
Strategy State: Detects if the market is breaking out or consolidating.
Probability Score: A weighted calculation (smoothed by SMA) that determines the likelihood of the next move based on trend alignment.
Actionable Recommendation: Flashes "STRONG BUY" or "STRONG SELL" only when momentum and distance-to-target are optimal.
How to Trade with Scalping V5
Long Entry: Price must be above the EMA 200. Wait for the Ribbon to turn Blue and the Dashboard to display a Probability Up > 65%. Ensure there is enough "room" to the Red Resistance line.
Short Entry: Price must be below the EMA 200. Wait for the Ribbon to turn Red and the Dashboard to display a Probability Down > 65%. Ensure there is room to the Green Support line.
Exit Strategy: Take profits at the S/R levels or when the price closes back inside the EMA Ribbon.
Settings & Optimization
EMA 12/36: Optimized for Scalping. Increase to 20/50 for Day Trading.
Lookback S/R: Set to 50 for intraday levels; increase to 100 for more "significant" swing levels.
Overlay: This indicator is designed to be used directly on the price chart.
Disclaimer: Scalping involves significant risk. This tool is designed to assist your analysis and should be used in conjunction with proper risk management and price action confirmation.

Multi-Indicator Scoring System# Multi-Indicator Scoring System
## Overview
This indicator combines five technical analysis tools (RSI, MACD, EMA trends, and Volume) into a single unified scoring system that generates clear BUY and SELL signals. Instead of analyzing multiple indicators separately and dealing with conflicting signals, this script calculates one comprehensive 0-100% score that shows current market strength at a glance.
## Purpose and Originality
**Problem it solves:**
Traders using multiple indicators individually often face contradictory signals. For example, RSI might show oversold conditions while MACD indicates bearish momentum, or price is above EMA but volume is weak. This creates confusion and leads to poor trading decisions or missed opportunities.
**Solution:**
This script uses a weighted scoring algorithm that only generates signals when multiple technical components mathematically agree. Each indicator contributes weighted points based on its reliability in crypto markets, and the combined score filters out noise by requiring multi-indicator confirmation before triggering a signal.
**What makes it original:**
Unlike simple indicator overlays that just display multiple tools side-by-side, this script:
- Uses a mathematically weighted scoring system where each component has justified importance
- Requires conditional alignment—signals only appear when components agree, not just individual crossovers
- Normalizes complex multi-indicator data into one intuitive percentage
- Includes built-in volume confirmation to filter low-conviction setups
This approach mirrors professional algorithmic trading systems that use multi-factor quantitative models.
## How Components Work Together
The script analyzes five technical components and assigns weighted points to each:
### 1. RSI (Relative Strength Index) - Weight: 25 points
- **Period:** 14
- **Function:** Identifies overbought and oversold conditions
- **Scoring logic:**
- RSI < 30 (oversold) → +25 points (bullish reversal signal)
- RSI > 70 (overbought) → -25 points (bearish reversal signal)
- RSI between 30-70 → 0 points (neutral)
- **Why 25 points:** RSI is highly reliable for detecting potential reversal zones in cryptocurrency markets
### 2. MACD (Moving Average Convergence Divergence) - Weight: 25 points
- **Parameters:** Fast=12, Slow=26, Signal=9
- **Function:** Detects momentum shifts and trend changes
- **Scoring logic:**
- MACD line > Signal line → +25 points (bullish momentum)
- MACD line < Signal line → -25 points (bearish momentum)
- **Why 25 points:** MACD is the gold standard for momentum confirmation across timeframes
### 3. EMA Short-Term Trend (21 vs 50) - Weight: 25 points
- **Function:** Confirms immediate trend direction
- **Calculation:** Compares EMA 21 to EMA 50, plus price position relative to EMA 21
- **Scoring logic:**
- EMA 21 > EMA 50 AND Price > EMA 21 → +25 points (strong uptrend)
- EMA 21 < EMA 50 AND Price < EMA 21 → -25 points (strong downtrend)
- Mixed conditions → 0 points (no clear trend)
- **Why 25 points:** Short-term trend alignment is critical for accurate entry timing
### 4. EMA Long-Term Context (200) - Weight: 15 points
- **Function:** Validates overall market structure
- **Calculation:** Price position relative to 200-period EMA
- **Scoring logic:**
- Price > EMA 200 → +15 points (bull market context)
- Price < EMA 200 → -15 points (bear market context)
- **Why 15 points:** Lower weight because long-term trend changes more slowly
### 5. Volume Confirmation - Weight: 10 points (Bonus)
- **Function:** Confirms genuine market interest versus noise
- **Calculation:** Current volume compared to 20-period SMA
- **Scoring logic:**
- Volume > 1.5× average → +10 bonus points
- Volume ≤ 1.5× average → 0 bonus points
- **Why 10 points:** Volume adds conviction but shouldn't override technical setup
### Score Aggregation Formula
**Why these thresholds?**
Backtesting on BTC/ETH showed optimal risk/reward at 65/35 levels. Lower thresholds (50%) produce too many false signals, while higher thresholds (80%) miss opportunities. The 65/35 balance provides good sensitivity with acceptable accuracy.
## How to Use This Indicator
### Visual Components
**On Chart:**
- **Green triangle (▲) below candle** = BUY signal (score crossed above 65%)
- **Red triangle (▼) above candle** = SELL signal (score crossed below 35%)
- Clean display with no background colors or extra lines
**Dashboard Table (top-right corner):**
- **Header:** "CRYPTO SIGNAL"
- **SCORE:** Current percentage (0-100%)
- Green color = Bullish zone (65%+)
- Red color = Bearish zone (35%-)
- Orange color = Neutral zone (36-64%)
- **SIGNAL:** Current status (BUY/SELL/WAIT)
### Interpreting the Score
- **70-100% (Strong Bullish):** All or most indicators agree market is going up. Consider long positions.
- **65-69% (BUY Signal Zone):** Enough confirmation for entry. BUY signals trigger here.
- **36-64% (Neutral Zone):** No clear direction. Wait for clearer setup or maintain existing positions.
- **31-35% (SELL Signal Zone):** Enough confirmation for exit. SELL signals trigger here.
- **0-30% (Strong Bearish):** All or most indicators agree market is going down. Avoid longs or consider shorts.
### Step-by-Step Usage
1. **Add to chart:** Click "Add to favorites" then add from your indicators list
2. **Check the score:** Look at the dashboard table in the top-right corner
3. **Wait for signals:**
- Green triangle appears = Consider buying
- Red triangle appears = Consider selling
- No triangle = Wait patiently for clearer setup
4. **Confirm with price action:** Best results when signals appear at support/resistance levels
5. **Use risk management:** Always set stop losses (3-5% below entry for longs)
6. **Set alerts (optional):** Right-click indicator → "Add alert" → Choose "BUY Signal" or "SELL Signal"
### Best Practices
**Recommended Timeframes:**
- **4-Hour (4H):** Best for swing trading, optimal signal frequency (3-7 per month), lowest false signal rate
- **Daily (1D):** Best for position trading, very high reliability, ideal for patient traders
- **1-Hour (1H):** More signals but noisier, only for experienced traders
- **Below 15 minutes:** Not recommended, too many false signals
**Recommended Markets:**
- Bitcoin (BTCUSDT, BTCUSD) - Most reliable
- Ethereum (ETHUSDT, ETHUSD) - Excellent results
- Major altcoins (SOL, XRP, ADA, etc.) - Works well on top 20 by market cap
**Risk Management:**
- Position size: Risk only 1-2% of account per trade
- Stop loss: Place 3-5% below entry (BUY) or above entry (SELL)
- Take profit: Target 2-3× your risk distance
- Trail stops: Move to breakeven after 1:1 profit achieved
**Advanced Tips:**
- Combine signals with support/resistance levels for higher probability setups
- Check multiple timeframes: if 4H and 1D both show BUY, signal is stronger
- Wait for candle close before acting on signals
- Ignore signals against the higher timeframe trend direction
- Only trade signals accompanied by volume spikes (check dashboard)
## Default Settings
The indicator uses pre-optimized parameters based on backtesting:
- RSI Period: 14
- MACD: 12, 26, 9
- EMA Short-term: 21, 50
- EMA Long-term: 200
- Volume threshold: 1.5× average
- Signal thresholds: BUY ≥65%, SELL ≤35%
These settings are designed for cryptocurrency markets on 4H and 1D timeframes and do not require adjustment for most users.
## Limitations and Disclaimers
**What this indicator CANNOT do:**
- Predict black swan events (exchange hacks, major regulations, etc.)
- Work effectively during extreme market manipulation
- Replace proper risk management and stop losses
- Guarantee profits (no indicator can)
- Account for fundamental news (Fed decisions, major announcements)
**When signals may be less reliable:**
- Low volume periods (weekends, holidays)
- High-impact news events
- Extreme volatility (>10% daily price moves)
- Prolonged sideways/ranging markets
**Important warnings:**
- This is a technical analysis tool, not financial advice
- Past performance does not guarantee future results
- Always use stop losses to protect capital
- Test the indicator with small positions first
- Do your own research before trading
## Technical Specifications
- **Pine Script Version:** v5
- **Type:** Overlay indicator
- **Signals:** Non-repainting (confirmed at candle close only)
- **Calculation frequency:** Every bar recalculates based on current values
- **Alerts:** Available for BUY and SELL threshold crossings
- **Resource usage:** Optimized for efficient runtime performance
## Additional Notes
- Signals appear only once when threshold is crossed (no repeated signals during same trend)
- Volume filter helps eliminate low-conviction signals
- Works on any cryptocurrency pair with sufficient liquidity
- Can be combined with other indicators for additional confirmation
- Suitable for both beginners (simple visual signals) and experienced traders (customizable for deeper analysis)
---
**This indicator provides educational value by demonstrating how multi-indicator confirmation systems work and how weighted scoring can reduce false signals compared to using individual indicators alone.**

ICT Liquidity & OTE Engine - Real TimeICT Liquidity & OTE Engine - Real Time
This indicator is a comprehensive toolkit designed for traders utilizing Inner Circle Trader (ICT) concepts. It automates the identification of key structural liquidity pools (Buy Side & Sell Side Liquidity) and calculates real-time Optimal Trade Entry (OTE) levels, allowing you to react instantly to market structure shifts and liquidity sweeps.
Core Features
1. Dynamic Liquidity Pools (BSL / SSL) The script uses pivot high and low logic to identify significant swing points where stop losses and breakout orders typically reside.
BSL (Buy Side Liquidity): Green lines extending from Pivot Highs. These represent areas where short sellers have stops (buy stops).
SSL (Sell Side Liquidity): Red lines extending from Pivot Lows. These represent areas where long traders have stops (sell stops).
2. Real-Time "Sweep" Detection Unlike static support/resistance indicators, this script reacts to live price action.
Visual Feedback: When price "sweeps" or purges a liquidity level (breaks a BSL or SSL line), the line style automatically changes from solid to dotted and becomes semi-transparent.
Why this matters: This provides immediate visual confirmation that a "Stop Hunt" has occurred, often a precursor to a Smart Money reversal.
3. Optimal Trade Entry (OTE) 70.5% The indicator continuously tracks the highest high and lowest low over a definable lookback period (default 40 bars) to establish the current dealing range.
It plots the 70.5% Fibonacci retracement level, which is the classic ICT "Sweet Spot" for entries during a retracement.
This removes the need to manually draw and redraw Fib tools every time the range expands.
4. Bullish Fair Value Gap (FVG) Markers The script highlights specific bars that exhibit bullish displacement gaps, aiding in the identification of strong buying pressure or potential entries after a liquidity sweep.
How It Works
Pivots: It calculates pivots based on your user-defined Lookback input (default 20). A higher number finds longer-term swings; a lower number finds short-term scalping levels.
Liquidity Logic: Once a pivot is confirmed, a line is projected forward. If the current live High or Low breaches this line, the script detects the liquidity run and alters the line's appearance.
OTE Logic: (Highest High - Lowest Low) * 0.705. This dynamic calculation ensures the OTE level moves with the market structure in real-time.
How to Use
Identify the Sweep: Wait for price to run a SSL (Red Line) or BSL (Green Line). Watch for the line to turn dotted, indicating the liquidity has been taken.
Wait for Displacement: Look for a reaction away from the sweep (e.g., a sharp move up after taking SSL).
Find the Entry: Look for price to retrace to the plotted OTE 70.5% Line, ideally aligning with a marked FVG square, to position yourself in alignment with Smart Money.
Settings
Pivot Lookback: Adjusts the sensitivity of the liquidity lines (Default: 20).
Show BSL/SSL Lines: Toggles the liquidity pools on/off.
Show OTE Levels: Toggles the real-time Fibonacci level.
OTE Line Color: Customize the visual style of your entry level.

Risk & Lot Calculator PanelFXMANS Risk & Lot Panel
Smart Risk Management Tool for TradingView
- Overview
FXMANS Risk & Lot Panel is a lightweight and professional risk management tool designed to help traders calculate position size (lot) and take-profit levels directly on the chart, without cluttering the screen.
The panel is displayed as a minimal table in the top-right corner of the chart and automatically adapts to the currently opened symbol.
This tool focuses on clarity, precision, and usability, making it suitable for scalpers, day traders, and swing traders.
- Key Features
Automatic Direction Detection
The script can automatically determine BUY or SELL direction based on:
Entry Price
Stop Loss Price
Logic:
Stop Loss below Entry → BUY
Stop Loss above Entry → SELL
Manual override is available if auto direction is disabled.
Risk-Based Lot Size Calculation
Calculates position size based on:
User-defined risk amount in USD
Distance between Entry and Stop Loss
Symbol-specific tick size and point value
Ensures consistent risk management across all markets.
Automatic Take Profit (RR Based)
Take Profit is calculated automatically using a predefined Risk / Reward (RR) ratio.
Supports both BUY and SELL scenarios.
- Symbol-Aware Calculation
Uses TradingView’s built-in symbol properties:
syminfo.mintick
syminfo.pointvalue
Works correctly on:
Forex
Indices
Metals
Crypto
- Minimal & Non-Intrusive UI
Small, fixed panel located at the top-right corner
Designed to avoid covering price action
Clean FXMANS-style color palette
- Safe Panel Size Control
Panel size can be adjusted from settings:
Small
Medium
Large
Size changes are handled without modifying layout geometry, preventing UI bugs.
- How It Works
Enter your Entry Price and Stop Loss Price
Define your Risk Amount ($)
Set your desired Risk / Reward ratio
The script automatically calculates:
Trade Direction (BUY / SELL)
Lot Size
Take Profit Level
All results are displayed instantly in the panel
- Example Use Case
Risk: $100
Entry: 1.0850
Stop Loss: 1.0800
RR: 2.0
- The panel will automatically display:
Direction: BUY
Lot Size adjusted to risk exactly $100
Take Profit at 2R
- Important Notes
Entry and Stop Loss prices must be valid (greater than zero).
The tool does not place trades automatically.
Calculations are for position sizing only and may vary slightly depending on broker specifications.
- Disclaimer
This script is intended for educational and analytical purposes only.
Trading involves risk, and users are responsible for their own trading decisions.
- Ideal For
Traders who follow strict risk management rules
Forex, crypto, and index traders
Scalpers and intraday traders
Anyone who wants clean and fast position sizing on TradingView

Institutional Top-Bottom by Herman Sangivera (Papua)Institutional Top-Bottom + Volume Profile by Herman Sangivera ( Papua )
📈 Component Description
Orange Line (POC - Point of Control): This represents the "Fair Value." Institutions view prices far above this line as "Expensive" (Premium) and prices below as "Cheap" (Discount).
Green/Red Boxes (Order Blocks): These are footprints left by big banks. A Green Box is a demand zone where institutional buying occurred, and a Red Box is a supply zone where institutional selling happened.
Institutional Labels: These appear when the RSI Divergence confirms that price momentum is fading, signaling a high-probability reversal (Top or Bottom).
🚀 Trading Strategy Guide
1. The High-Probability Buy Setup (Bottom)
Look for a "Confluence" of these three factors:
Location: Price is trading below the Orange POC line (Discount zone).
The Zone: Price enters or touches a Green Order Block.
The Signal: The "INSTITUTIONAL BUY" label appears.
Entry: Enter Buy at the close of the candle with the label.
Stop Loss: Place it just below the Green Order Block.
Take Profit: Target the Orange POC line or the nearest Red Order Block.
2. The High-Probability Sell Setup (Top)
Look for a "Confluence" of these three factors:
Location: Price is trading above the Orange POC line (Premium zone).
The Zone: Price enters or touches a Red Order Block.
The Signal: The "INSTITUTIONAL SELL" label appears.
Entry: Enter Sell at the close of the candle with the label.
Stop Loss: Place it just above the Red Order Block.
Take Profit: Target the Orange POC line or the nearest Green Order Block.
💡 Pro Tips for Accuracy
Timeframes: For the best results, use 15m for Scalping, and 1H or 4H for Day/Swing Trading.
Wait for the Candle Close: Labels are based on Pivot points. Always wait for the current candle to close to ensure the signal is locked and won't "repaint."
Avoid Flat Markets: This indicator works best when there is volatility. Avoid using it during "choppy" or sideways markets with very low volume.

Mean Reversion Mirror📌 Mean Reversion Mirror — Multi‑Level Mean Reversion Strategy
Mean Reversion Mirror is an advanced modular mean‑reversion strategy built around dynamic and static deviation levels from a moving average.
The strategy automatically scales into positions across six levels (LONG and SHORT), using both dynamic MA‑based deviation levels and static levels that lock in after entry.
🔍 Core Concept
Price tends to revert toward its mean.
This strategy exploits that behavior by opening an initial base entry at the first deviation and adding positions as the imbalance grows.
Each additional level improves the average entry price and increases the probability of exiting profitably.
⚙️ Key Features
📈 Six Dynamic Deviation Levels
Levels are calculated as percentage deviations from a selected MA (WMA, SMA, EMA, RMA, HMA).
This makes the strategy adaptive to volatility and market structure.
📉 Six Static Levels
Once triggered, each level becomes fixed and no longer changes.
This creates a stable averaging grid independent of future MA movement.
🎯 Flexible Take‑Profit System
fixed take‑profit
or trailing take‑profit with dynamic offset
🖐 Manual Entry Support
You can manually set a price for LONG or SHORT, and the strategy will execute the base entry automatically.
📊 Rich Visualization
dynamic deviation levels
static levels
dotted “last chance” levels
average position price
take‑profit line
compact mini‑table with key position metrics
📦 Two Operating Modes
STK Mode — fixed unit size
Classic Mode — quantity calculated from USD value
🧠 Entry Logic
The strategy uses sequences B1–B6 (LONG) and S1–S6 (SHORT):
B1/S1 — base entry
B2–B6 / S2–S6 — averaging entries as deviation increases
L6/S6 — “last chance” level with its own size
Each level activates only after the previous one.
📌 Who This Strategy Is For
mean‑reversion traders
grid/averaging system users
pullback‑based investors
traders who want clear visual levels
users who prefer manual control over entry points
⚠️ Disclaimer
This strategy is not financial advice.
Always backtest and adjust parameters according to your risk tolerance before using it in live markets.

ORB - BO-RT-ENThis script is designed for the Opening Range Breakout (ORB) trader who seeks high-probability entries through price action confirmation. Unlike standard breakout tools that trigger on the first touch, this indicator requires a three-step validation process: Breakout, Retest, and Momentum Confirmation.
High-Level Summary
The script identifies the high and low of the first 5 minutes of the trading session (adjustable via inputs). It then monitors price action to find a confirmed breakout outside this range. To filter out "fakeouts," the script requires the price to return and touch the broken level (the retest) before signaling an entry. If at any point the price closes back inside the opening range before the setup is complete, the trade is invalidated and the sequence resets.
Core Features
Sequential Signal Logic: Tracks the BO → RT → ENTRY process across distinct candles to prevent early entries.
Momentum Confirmation: Entry arrows only trigger after a user-defined candle delay and a close in the trend direction.
Visual Clarity: Plots high-visibility 5-minute range lines that persist until the market close.
Advanced Invalidation: Automatically cancels setups if a "stop-run" or fakeout closes price back within the range.
Scanner Ready: Includes specific alertcondition calls for Breakouts, Retests, and Entries, making it compatible with the TradingView Stock Screener.
How to Use the Script (Steps to Play)
1. Setup the Timeframe
Apply the indicator to a 1-minute chart. While the opening range is calculated based on the first 5 minutes, the entry logic requires the granularity of the 1-minute timeframe to detect precise retests.
2. Define the Range
By default, the script calculates the range from 09:30 to 09:35 EST. If you trade a different market (e.g., London Open or Crypto), adjust the "Opening Range Period" in the settings.
3. Monitor for the Breakout (BO)
Wait for a 1-minute candle to close above the High or below the Low. A label marked "BO" will appear on your chart.
4. The Retest (RT)
After the breakout, look for the price to "wick" or touch the breakout line. A triangle marked "RT" will appear.
Note: If the price closes back inside the range during this phase, the labels will disappear, signaling an invalid setup.
5. Execution (ENTRY)
Once the retest is complete, wait for the "ENTRY" arrow. This triggers when:
The user-defined candle delay (default: 1 bar) has passed since the retest.
The candle closes in the direction of the breakout (Green for Long / Red for Short).
6. Exit Strategy
Following the original strategy parameters, place your Stop Loss at the opposite end of the 5-minute opening range and set your Take Profit at a 2.0 Risk-to-Reward (2R) ratio from your entry price.

Larry Williams Qualified Trend Break Signals [tradeviZion]Larry Williams Qualified Trend Break Signals - Description
📖 Introduction
Welcome to the Larry Williams Qualified Trend Break Signals indicator. This description explains how the indicator works, its settings, and how to use it.
This indicator demonstrates Larry Williams' Qualified Trend Line Break technique - his preferred method for timing precise entries on daily charts when you already have a confirmed market setup.
---
🎯 About This Script
This indicator implements the Qualified Trend Line Break system - an entry technique that qualifies trend line breaks for better timing.
Important: This is NOT a signal generator. It's an entry timing tool for traders who already have a market setup and confirmation. Use it only after establishing weekly bias and daily confirmation.
Why We Made This Indicator:
This indicator demonstrates Larry Williams' favorite entry technique for daily timeframe trading. It's designed to be used as part of his complete methodology:
How To Use It Properly:
First, establish your setup: Check weekly chart for overall market bias (bullish/bearish)
Then confirm on daily: Look for confirmation signals on daily timeframe
Finally, use trend breaks: Enter trades only when trend breaks align with your setup direction
Important Warning: This is NOT a standalone buy/sell signal indicator. Using trend breaks without proper setup and confirmation will likely produce poor results. It's a timing tool for entries, not a signal generator.
---
About The Qualification Rules
The system improves on qualification methodology with these key changes:
For BUY signals (breaking above downtrend lines):
Break is usually bad if previous bar closed higher
But can still be good if:
Previous bar was inside the prior bar AND that prior bar closed lower
Price gaps above trend line and moves up at least one tick
Previous bar closed below its own opening price
For SELL signals (breaking below uptrend lines):
Break is usually bad if previous bar closed lower
But can still be good if:
Previous bar was inside the prior bar AND that prior bar closed higher
Price gaps below trend line and moves down at least one tick
Previous bar closed above its own opening price
---
📐 How The Qualification System Works
The trend break system is based on qualification methodology as developed by Larry Williams . It solves the problem where trend line breaks often fail and price goes back.
Trend Line Setup:
For BUY signals: Connect the two most recent declining swing highs to make a downtrend line
For SELL signals: Connect the two most recent rising swing lows to make an uptrend line
Inside Bar Rule:
A key principle: Trend breaks that occur on inside bars are completely ignored. The system only evaluates breaks that occur on regular bars, making signals more reliable.
How It Works In The Code
The indicator follows these steps:
Finds swing points: Identifies highs and lows in the price action
Draws trend lines: Connects 2 recent swing points to make trend lines
Checks inside bars: Ignores breaks that happen on inside bars
Qualifies signals: Uses the rules to check if breaks are good or bad
Shows signals: Only displays qualified BUY/SELL signals
Optional feature: Can show disqualified signals
⚙️ Settings
The indicator has 3 groups of settings to customize how it works.
---
📊 Signal Settings
Show Signals
Default: ON
ON: Displays green/red labels when trend breaks qualify for entry
OFF: Hides entry labels (trend lines still show for analysis)
Remember: These are entry TIMING signals, not standalone buy/sell signals
Signal Selection
Default: Both | Options: Buy Only, Sell Only, Both
Buy Only: Shows only BUY signals
Sell Only: Shows only SELL signals
Both: Shows both BUY and SELL signals
Break Validation
Default: Close | Options: Break Level, Close
Break Level: Signal when price touches the trend line (more signals)
Close: Signal when bar closes beyond trend line (fewer signals)
Tip: Try "Close" first for better signals
Show Disqualified
Default: OFF | Options: ON/OFF
What it does: Shows bad breaks
ON: Shows gray ❌ labels with explanations
OFF: Hides bad signals
👁️ Display Settings
Show Trend Lines
Default: ON
What it does: Shows trend lines on the chart
Looks like: Dashed blue lines connecting swing points
Goes to: Extends into future bars
Why: Shows where breakouts are expected
Show Swing Points
Default: ON
What it does: Marks highs/lows used for trend lines
Looks like: Shape markers at swing locations
Shows: How trend lines are constructed
Marker Style
Default: Circle | Options: Circle, Triangle, Square, Diamond, Cross
What it does: Choose shape for swing markers
Options: Circle, Triangle, Square, Diamond, Cross
Best choice: Circle is clear without being busy
Marker Size
Default: 3 | Range: 1-10
What it does: Controls marker size
Range: 1 (tiny) to 10 (large)
Show Inside Bars
Default: ON
What it does: Highlights inside bars
Looks like: Light orange background on inside bars
Note: These bars are ignored for break qualification
Important: Inside bars are ignored for break qualification
🎨 Colors
Signal Colors
Buy Signal (Default: Green) - Color for good BUY signals
Sell Signal (Default: Red) - Color for good SELL signals
Disqualified (Default: Gray) - Color for bad signals
Display Colors
Trend Line (Default: Blue) - Color for trend lines and markers
Inside Bar (Default: Light Orange) - Background for inside bars
💡 How To Use It In Larry Williams Methodology
Step 1 - Weekly Setup: Identify market bias on weekly chart (clear bullish/bearish trend)
Step 2 - Daily Confirmation: Find confirmation signals on daily timeframe
Step 3 - Trend Break Entry: Use qualified trend breaks only in setup direction
Important: Never enter based on trend breaks alone - always require setup + confirmation first
⚠️ Important Notice
This indicator implements Larry Williams' trend break entry technique. It should NOT be used as standalone buy/sell signals. Only use trend breaks for entry timing after you have established a proper market setup and confirmation. Poor results will occur if using signals without the complete Larry Williams methodology.
Credits: Based on Larry Williams' trading approach and qualification methodology. Swing detection logic adapted from "Larry Williams: Market Structure" by Smollet.

Trinity Tactical: BTC Liquidity Snatch//@version=6
indicator("Trinity Tactical: BTC Liquidity Snatch", overlay=true)
// --- INPUTS ---
liq_level = input.float(87156.0, "Liquidity Low to Sweep", step=10)
fvg_threshold = input.float(0.5, "FVG Min Size (%)", step=0.1)
// --- LIQUIDITY SWEEP LOGIC ---
is_swept = low < liq_level and close > liq_level
plotshape(is_swept, title="Liquidity Sweep", style=shape.triangleup, location=location.belowbar, color=color.green, size=size.small, text="SWEEP")
// --- FVG DETECTION (FOR ENTRY) ---
// Bullish FVG: Low of bar > High of bar
is_bullish_fvg = low > high and (low - high ) > (close * fvg_threshold / 100)
// Visualizing the Entry FVG Zone
var box fvg_box = na
if is_bullish_fvg and barstate.isconfirmed
fvg_box := box.new(bar_index , low , bar_index, high , bgcolor=color.new(color.green, 80), border_color=color.green)
// --- LEVELS ---
hline(87156, "8H Liquidity Low", color=color.red, linestyle=hline.style_dashed)
hline(92500, "TP1: Supply", color=color.orange, linestyle=hline.style_dotted)
hline(97000, "TP2: Range High", color=color.green, linestyle=hline.style_dotted)
// --- ALERTS ---
alertcondition(is_swept, title="BTC Sweep Alert", message="Liquidity Swept! Look for FVG Entry.")
alertcondition(is_bullish_fvg, title="BTC FVG Entry", message="Bullish Displacement Detected. Check 15m Structure.")

Gamma of Gamma - AnticipationGamma of Gamma — Anticipation Engine
What if you could detect market inflections before they become obvious? Not react to momentum — anticipate the momentum itself.
"Gamma here refers to mathematical acceleration (2nd derivative), NOT options Gamma"
Gamma of Gamma (GoG) operates one abstraction layer above conventional indicators. While RSI tells you what momentum did , GoG tells you what momentum is about to do . This is the difference between chasing price and positioning ahead of it.
Core Innovation: Traditional indicators measure first-order effects (price change) or second-order effects (momentum/acceleration). This system measures the third derivative — the rate of change of acceleration itself. When Gamma-of-Gamma reaches extremes, it signals that pressure dynamics are about to flip — often 2-5 bars before price visibly reacts.
Target Users: Discretionary traders, scalpers, and swing traders who want early positioning signals with statistical rigor. Effective on stocks, crypto, forex, and futures with meaningful volume data.
━━━━━━━━━━━━━━━━━━━━━━━━━━━━━━━━━━━━━━━━━━━
WHY THIRD-DERIVATIVE ANALYSIS?
━━━━━━━━━━━━━━━━━━━━━━━━━━━━━━━━━━━━━━━━━━━
The Hierarchy of Market Information
Most traders operate at the wrong level of abstraction:
• Price → What happened (lagging)
• Momentum → How fast it happened (still lagging)
• Gamma (2nd Derivative) → How momentum is changing (coincident)
• Gamma of Gamma (3rd Derivative) → How FAST that change is changing ( leading )
The third derivative captures inflection acceleration — the mathematical signature of regime transition. When GoG reaches extreme values, the market is telegraphing that current pressure dynamics are unsustainable.
Why This Beats RSI
RSI measures momentum magnitude. GoG measures momentum trajectory .
Consider this scenario: RSI reads 70 (overbought). Is the move exhausted or just getting started? RSI cannot tell you. GoG can — because it measures whether buying pressure is accelerating into the high RSI reading (continuation likely) or decelerating despite high RSI (reversal imminent).
RSI answers: "How strong was the move?"
GoG answers: "Is the move strengthening or weakening right now ?"
The first is historical. The second is predictive.
━━━━━━━━━━━━━━━━━━━━━━━━━━━━━━━━━━━━━━━━━━━
MATHEMATICAL FOUNDATION
━━━━━━━━━━━━━━━━━━━━━━━━━━━━━━━━━━━━━━━━━━━
Layer 1: Cumulative Volume Delta (CVD)
The foundation is order flow approximation:
• Up bar (close > prior close): Volume classified as buying pressure
• Down bar (close < prior close): Volume classified as selling pressure
• CVD = Running sum of signed volume
Interpretation: Rising CVD indicates net aggressive buying. Falling CVD indicates net aggressive selling. CVD divergence from price often precedes reversals.
Layer 2: Gamma (Second Derivative)
Gamma measures acceleration of order flow:
Formula: Gamma = CVD - 2×CVD + CVD
This is the discrete second derivative — the rate of change of the rate of change. When Gamma spikes positive, buying pressure is accelerating . When Gamma spikes negative, selling pressure is accelerating.
Layer 3: Gamma of Gamma (Third Derivative)
GoG measures jerk — the acceleration of acceleration:
Formula: GoG = Gamma - 2×Gamma + Gamma
Critical insight: Extreme GoG readings indicate that current pressure dynamics are reaching an inflection point. The system is "overextended" in its current trajectory and will likely revert or reverse.
Layer 4: Z-Score Normalization
Raw GoG values are normalized against their 50-period distribution:
Formula: GoG_Z = (GoG - Mean_50) / StdDev_50
Benefit: Z-scores are regime-adaptive. A "2.0" reading always means "2 standard deviations from normal" regardless of whether you're trading a penny stock or ES futures. This makes thresholds consistent across instruments and timeframes.
━━━━━━━━━━━━━━━━━━━━━━━━━━━━━━━━━━━━━━━━━━━
SIGNAL GENERATION LOGIC
━━━━━━━━━━━━━━━━━━━━━━━━━━━━━━━━━━━━━━━━━━━
Long Signal (Bullish Anticipation)
Triggers when:
• GoG Z-score < -Threshold (default -2.0)
• Volume > Average Volume × Minimum Multiple (default 1.2×)
Interpretation: Selling pressure acceleration has reached an extreme negative reading. The selling is "exhausting itself" — acceleration is peaking and will soon decelerate. Buyers are likely to step in.
Short Signal (Bearish Anticipation)
Triggers when:
• GoG Z-score > +Threshold (default +2.0)
• Volume > Average Volume × Minimum Multiple (default 1.2×)
Interpretation: Buying pressure acceleration has reached an extreme positive reading. The buying is "exhausting itself" — often occurs at blow-off tops, failed breakouts, or momentum climaxes.
Why Volume Confirmation?
Gamma acceleration in thin liquidity is meaningless noise. The volume filter ensures signals occur only when meaningful participation backs the pressure dynamics. This dramatically reduces false signals during low-activity periods.
━━━━━━━━━━━━━━━━━━━━━━━━━━━━━━━━━━━━━━━━━━━
CONFIDENCE ENGINE
━━━━━━━━━━━━━━━━━━━━━━━━━━━━━━━━━━━━━━━━━━━
Not all signals are equal. The Confidence Engine quantifies signal strength:
Confidence Calculation:
Confidence = 50 + ((|Z-Score| - Threshold) / Threshold) × 100
Capped at 100%
Visual Representation:
• Small orb = Low confidence (50-65%)
• Normal orb = Medium confidence (65-80%)
• Large orb = High confidence (80-100%)
Orb transparency also adjusts — high-confidence signals appear brighter and more prominent. This creates intuitive visual hierarchy where stronger signals demand more attention.
Practical Use:
• High confidence (>80%): Consider larger position size, tighter stops
• Medium confidence (50-80%): Standard position size
• Low confidence (<50%): Reduced size or wait for confirmation
━━━━━━━━━━━━━━━━━━━━━━━━━━━━━━━━━━━━━━━━━━━
INTEGRATED BACKTESTER
━━━━━━━━━━━━━━━━━━━━━━━━━━━━━━━━━━━━━━━━━━━
Every signal system needs accountability. The onboard backtester provides real-time performance tracking:
Core Metrics:
• Total Trades
• Win Rate
• Profit Factor
• Expectancy (average P&L per trade)
• Net P&L
• Max Drawdown
• Average Win / Average Loss
Methodology:
• Positions held for configurable bar count (default 10 bars)
• Forces objective evaluation independent of discretionary exits
• Updates in real-time as new trades complete
Optimizer Mode:
Enable for parameter tuning research:
• Stability Score (0-100 points): Composite evaluation of parameter robustness
• Trade Density : Signals per 1000 bars — monitors over/under-trading
• Parameter Display : Current settings for documentation
• Robustness Rating : ROBUST / STABLE / FRAGILE / OVERFIT
Stability Scoring Breakdown:
• Win Rate ≥55%: +25 points | ≥50%: +15 points | ≥45%: +5 points
• Expectancy >0.5%: +25 points | >0.1%: +15 points | >0%: +5 points
• Total Trades ≥30: +25 points | ≥20: +15 points | ≥10: +5 points
• Profit Factor ≥1.5: +25 points | ≥1.2: +15 points | ≥1.0: +5 points
Target: 60+ points indicates stable parameters. Below 40 suggests overfitting risk.
━━━━━━━━━━━━━━━━━━━━━━━━━━━━━━━━━━━━━━━━━━━
CHART EXECUTION SIGNALS
━━━━━━━━━━━━━━━━━━━━━━━━━━━━━━━━━━━━━━━━━━━
Unique feature: Entry and exit markers display directly on the price chart via force_overlay, even though the indicator runs in a separate pane.
Visual Markers:
• ▲ Green Triangle (below bar): Long entry at exact price level
• ▼ Red Triangle (above bar): Short entry at exact price level
• ✕ Gold X-Cross : Position exit after hold period
Benefit: Immediate visual correlation between GoG signals and price action. Review historical trades without switching between panes.
━━━━━━━━━━━━━━━━━━━━━━━━━━━━━━━━━━━━━━━━━━━
DUAL DASHBOARD SYSTEM
━━━━━━━━━━━━━━━━━━━━━━━━━━━━━━━━━━━━━━━━━━━
Main Dashboard — Real-Time State
Displays:
• Current GoG regime (EXTREME HIGH / EXTREME LOW / NEUTRAL)
• GoG Z-Score (numerical)
• Raw GoG value
• Gamma value
• CVD (Cumulative Volume Delta)
• Volume status (Active/Low with ratio)
• Signal state (Scanning / Long Signal / Short Signal / In Position)
• Confidence meter with visual bar
• Entry price when in position
Backtest Dashboard — Performance Metrics
Displays all backtester metrics in compact format. Switches to Optimizer view when Optimizer Mode enabled.
Both dashboards feature:
• Configurable position (6 locations including Middle Left/Right)
• Adjustable text size (Tiny/Small/Normal/Large)
• Transparency control for visual integration
━━━━━━━━━━━━━━━━━━━━━━━━━━━━━━━━━━━━━━━━━━━
PARAMETER GUIDE
━━━━━━━━━━━━━━━━━━━━━━━━━━━━━━━━━━━━━━━━━━━
Calculation Settings
• GoG Extreme Threshold (default 2.0): Z-score level for signal generation. Higher = fewer but stronger signals. Range: 0.5-5.0
• Gamma Smoothing (default 3): SMA period for Gamma. Lower = more responsive, more noise. Higher = smoother, more lag. Range: 1-20
• GoG Smoothing (default 5): SMA period for GoG. Filters micro-spikes while preserving structural inflections. Range: 1-20
• Min Volume Multiple (default 1.2): Volume must exceed this multiple of 20-period average. Ensures signals have participation backing. Range: 0.5-3.0
Backtester Settings
• Backtest Hold Bars (default 10): Forced holding period for backtester evaluation. Adjust based on timeframe and trading style.
• Parameter Optimizer Mode : Enables extended metrics for tuning research.
Tuning by Timeframe
Scalping (1-5 min):
Threshold: 1.5-2.0 | Gamma Smooth: 2-3 | GoG Smooth: 3-4 | Hold: 5-8 bars
Day Trading (15-60 min):
Threshold: 2.0-2.5 | Gamma Smooth: 3-5 | GoG Smooth: 5-7 | Hold: 8-12 bars
Swing Trading (4H-Daily):
Threshold: 2.5-3.0 | Gamma Smooth: 5-7 | GoG Smooth: 7-10 | Hold: 10-15 bars
━━━━━━━━━━━━━━━━━━━━━━━━━━━━━━━━━━━━━━━━━━━
HOW TO USE: PRACTICAL WORKFLOW
━━━━━━━━━━━━━━━━━━━━━━━━━━━━━━━━━━━━━━━━━━━
Step 1: Identify Regime
Watch the GoG Z-score line. Most of the time it oscillates within the neutral zone (between thresholds). This is "scanning" mode — no actionable signal.
Step 2: Wait for Extreme
When Z-score crosses threshold AND volume confirms, a signal fires. The orb appears in the indicator pane; the triangle appears on price chart.
Step 3: Assess Confidence
Check orb size and dashboard confidence reading:
• Large bright orb + 80%+ confidence = High conviction setup
• Small faint orb + <60% confidence = Requires additional confirmation
Step 4: Execute with Context
GoG signals anticipate — they don't confirm. Use price structure (support/resistance), higher timeframe trend, or other confirmation before entry.
Step 5: Manage Position
Exit markers show backtester exits. For live trading, consider:
• Time-based exit (signal's hold period)
• Opposite signal exit
• Fixed R:R targets
Step 6: Review Performance
Check Backtest Dashboard regularly. If Win Rate drops below 45% or Expectancy goes negative, reassess parameters or market conditions.
━━━━━━━━━━━━━━━━━━━━━━━━━━━━━━━━━━━━━━━━━━━
WHAT THIS INDICATOR IS — AND ISN'T
━━━━━━━━━━━━━━━━━━━━━━━━━━━━━━━━━━━━━━━━━━━
This Indicator IS:
✅ State-transition detector (balance → imbalance)
✅ Early warning system for momentum shifts
✅ Anticipation tool for pre-positioning
✅ Statistical framework with built-in accountability
This Indicator IS NOT:
❌ Mechanical buy/sell system (requires discretion)
❌ Trend-following indicator
❌ Reversal-only indicator
❌ Replacement for risk management
Best Use Cases:
• Detecting early reversals before obvious confirmation
• Anticipating breakouts during volatility compression
• Timing pullback entries in established trends
• Identifying exhaustion at momentum climaxes
Challenging Conditions:
• Extremely low volume environments
• News-driven gaps (no order flow to measure)
• Instruments with unreliable volume data
━━━━━━━━━━━━━━━━━━━━━━━━━━━━━━━━━━━━━━━━━━━
ORIGINALITY STATEMENT
━━━━━━━━━━━━━━━━━━━━━━━━━━━━━━━━━━━━━━━━━━━
Innovation 1: Third-Derivative Order Flow Analysis
While first and second derivatives are common, applying third-derivative (jerk) analysis to cumulative volume delta is novel. This captures inflection points that lower-order analysis misses entirely.
Innovation 2: Z-Score Adaptive Thresholds
Rather than fixed thresholds that require per-instrument tuning, z-score normalization creates self-adapting signal levels that work consistently across any liquid instrument.
Innovation 3: Confidence-Weighted Visual System
Dynamic orb sizing and transparency based on signal strength provides intuitive visual hierarchy. Stronger signals literally appear larger and brighter.
Innovation 4: Integrated Accountability
Built-in backtester with optimizer mode enables parameter validation directly on chart. No external tools or spreadsheets required.
Innovation 5: Dual-Pane Execution Visualization
Force-overlay chart signals bridge the gap between indicator pane and price action, enabling immediate visual trade review.
━━━━━━━━━━━━━━━━━━━━━━━━━━━━━━━━━━━━━━━━━━━
LIMITATIONS & DISCLAIMERS
━━━━━━━━━━━━━━━━━━━━━━━━━━━━━━━━━━━━━━━━━━━
Technical Limitations
• Volume classification uses bar direction (close vs prior close), not tick-level aggressor data. Precision loss estimated 10-15% vs institutional-grade data.
• CVD approximation assumes volume follows price direction. Works well in trending conditions; less precise in choppy markets.
• Backtester uses fixed hold period, not optimal exit logic. Real performance may vary with proper trade management.
Market Limitations
• Requires meaningful volume data. Avoid instruments with reported volume issues.
• Signals may cluster during high-volatility events. Not every signal should be traded.
• Anticipation signals appear early by design. Patience required — price may continue against signal briefly before reversing.
Risk Disclosure
• Trading involves risk of loss. Past performance does not guarantee future results.
• This indicator provides analysis tools, not financial advice.
• Always use proper position sizing and risk management.
• Backtest results are hypothetical and do not include slippage, commissions, or fees.
━━━━━━━━━━━━━━━━━━━━━━━━━━━━━━━━━━━━━━━━━━━
RECOMMENDED SETTINGS BY MARKET
━━━━━━━━━━━━━━━━━━━━━━━━━━━━━━━━━━━━━━━━━━━
Crypto (BTC, ETH, SOL)
Threshold: 1.8-2.2 | Gamma: 3 | GoG: 5 | Volume: 1.3x | TF: 15min-4H
Notes: Higher volatility produces more signals. Consider higher threshold to filter.
Forex Majors (EURUSD, GBPUSD)
Threshold: 2.0-2.5 | Gamma: 4 | GoG: 6 | Volume: 1.2x | TF: 5min-1H
Notes: Lower volatility requires patience. Volume proxy via tick volume works adequately.
Stocks (Large Cap)
Threshold: 2.0-2.5 | Gamma: 3-4 | GoG: 5-6 | Volume: 1.2x | TF: 15min-Daily
Notes: Real volume data provides cleanest signals. Watch for opening/closing auction distortions.
Futures (ES, NQ, CL)
Threshold: 2.0-2.3 | Gamma: 3 | GoG: 5 | Volume: 1.2x | TF: 5min-1H
Notes: Excellent volume data. Session boundaries may produce false signals — consider RTH only.
━━━━━━━━━━━━━━━━━━━━━━━━━━━━━━━━━━━━━━━━━━━
CONCLUSION
━━━━━━━━━━━━━━━━━━━━━━━━━━━━━━━━━━━━━━━━━━━
Gamma of Gamma represents a fundamental shift in signal philosophy: from reacting to momentum to anticipating momentum.
By operating at the third derivative of order flow, this system detects the mathematical signatures of regime transition — the moments when current pressure dynamics become unsustainable and reversal becomes probable.
This is not another oscillator telling you what already happened. This is an anticipation engine positioning you for what's about to happen.
Stop chasing. Start anticipating.
RSI tells you where momentum was. GoG tells you where it's going.
Taking you to school. - Dskyz , Trade with probability. Trade with anticipation. Trade with GoG

Gold Profit Target SystemGOLD PROFIT TARGET SYSTEM
Track Real Profits, Exit With Confidence
Best on Daily or Weekly - copy and mod as you see fit. Have fun!
WHAT THIS INDICATOR DOES:
This indicator tracks your gold position from entry and shows color-coded profit targets as the price rises. Instead of guessing when to exit, you see exact profit levels in real-time: 1%, 2%, 3%, 4%, 5%, 10%, 15%, 20%, 25%, and 25%+.
Simple concept: BUY on the signal, SELL at YOUR chosen profit level.
HOW IT WORKS - 3 SIMPLE STEPS:
STEP 1: Wait for BUY Signal
• Green triangle (▲) appears below the composite line
• Triggered when inverse assets (DXY, rates, etc.) show strong correlation and are falling
• Entry price is automatically recorded
• Position tracking begins
STEP 2: Watch Profit Targets Appear
• As gold rises, color-coded symbols appear above the composite line
• Each symbol represents a profit milestone
• The info table shows your current profit
• You decide when to exit based on YOUR target
STEP 3: Exit at Your Chosen Level
• Conservative? Exit at 5-10%
• Moderate? Exit at 10-15%
• Aggressive? Hold for 20%+
• The indicator just shows the levels - YOU make the call
THE COMPOSITE LINE - WHAT IT MEANS:
The main line is a weighted composite of inverse-correlated assets:
• DXY (US Dollar Index)
• Real Interest Rates (10Y TIPS)
• US 10-Year Treasury Yield
• US 2-Year Treasury Yield
• Bitcoin (optional)
• Copper (optional)
Line Position:
• Below -30 (Bright Green): Very strong inverse correlation - excellent BUY conditions
• Below 0 (Green): Inverse correlation present - moderate BUY conditions
• Above 0 (Red): Inverse assets rising - neutral to bearish
• Above 30 (Bright Red): Strong inverse rally - bearish for gold
What Causes BUY Signals:
When the composite line is negative (inverse assets falling) AND shows strong correlation (>0.3), this suggests gold is likely to rise. The indicator records your entry and begins tracking profits.
COLOR-CODED PROFIT TARGETS:
EARLY PROFITS (Green Circles):
• 1% - Very Light Green (#c8e6c9) - First confirmation
• 2% - Light Green (#a5d6a7) - Building profit
• 3% - Green (#81c784) - Good profit
• 4% - Medium Green (#66bb6a) - Strong profit
• 5% - Dark Green (#4caf50) - Solid profit!
EXCELLENT PROFIT (Yellow Diamond):
• 10% - Yellow (#ffd54f) - Double digits, excellent trade!
OUTSTANDING PROFIT (Orange Diamonds):
• 15% - Orange (#ffb74d) - Exceptional profit, consider partial exit
EXCEPTIONAL PROFIT (Red Diamonds):
• 20% - Light Red (#ff8a65) - Rare territory, strong exit consideration
• 25% - Red (#f44336) - Extraordinary profit, very rare!
PEAK PROFIT (Purple Star):
• 25%+ - Purple (#9c27b0) - Once in a blue moon! The home run trade!
STOP LOSS (Red X):
• Default -5% - Protection against losses
• Position auto-resets if stop is hit
THE PROFIT BAR (Histogram):
Below the composite line, you'll see a colored histogram when in position:
Bar Color = Your Current Profit Tier
• Light green bar = 1-2% profit
• Green bar = 3-5% profit
• Yellow bar = 10% profit
• Orange bar = 15% profit
• Red bar = 20-25% profit
• Purple bar = 25%+ profit
• Red negative bar = Currently at a loss
Bar Height = Current Profit %
The taller the bar, the larger your profit. Negative bars extend downward when you're at a loss.
THE INFORMATION TABLE:
The table (top-right by default) shows everything at a glance:
Position: ✓ IN (green) or ✗ OUT (gray)
Shows whether you're currently holding a position
Entry Price: Your recorded buy price
Example: 2,100.50
Current Price: Gold's current price
Example: 2,142.75
Current P/L: YOUR PROFIT %
This is the most important metric - shows exactly how much you're up (or down)
Color matches your current profit tier
Example: +2.01% in light green
Profit Tier: Current milestone reached
Shows which profit level you've hit: "1%", "2%", "5%", "10%", etc.
Next Target: The next profit level to watch
Tells you what milestone is coming up next
Bars Held: How long you've been in the trade
Helps track holding time
Composite: Current correlation strength
Shows the underlying composite correlation value
REFERENCE LINES:
Zero Line (Gray):
The center line. Above = bearish for gold, Below = bullish for gold
Strong Bull Line (Green dashed at -30):
When composite crosses below -30, very strong BUY conditions
Strong Bear Line (Red dashed at +30):
When composite crosses above +30, strong bearish conditions
BACKGROUND SHADING:
Very Light Green Background:
You're in profit (position open and above entry price)
Very Light Red Background:
You're at a loss (position open and below entry price)
No Background:
No position currently open
SYMBOLS ON CHART:
▲ Green Triangle Below Line: BUY SIGNAL
Enter long position here. Entry price recorded.
● Small Green Circles Above Line: 1-5% Profits
Early profit targets. Light green to dark green progression.
◆ Diamonds Above Line: 10-25% Profits
Major profit milestones. Yellow → Orange → Red progression.
★ Purple Star Above Line: 25%+ Profit
The holy grail! Peak profit achieved.
✖ Red X Below Line: STOP LOSS HIT
Trade went against you. Position resets (if auto-reset enabled).
PROFIT-TAKING STRATEGIES:
Strategy 1: Fixed Target (Simple)
Pick one target (e.g., 10%) and always exit there.
Best for: Beginners, disciplined traders
Strategy 2: Scaled Exit (Advanced)
Exit in portions:
• 5% profit → Sell 25%
• 10% profit → Sell 25% (50% total out)
• 15% profit → Sell 25% (75% total out)
• 20%+ profit → Let final 25% ride
Best for: Risk management, maximizing upside
Strategy 3: Trailing Stop
• Hit 10%? Set stop at 5%
• Hit 15%? Set stop at 10%
• Lock in profits while letting winners run
Best for: Trend followers, bull markets
Strategy 4: Adaptive
• Strong uptrend → wait for 15-20%
• Choppy market → exit at 5-10%
• Weakening trend → exit at any profit
Best for: Experienced traders
SETTINGS YOU CAN CUSTOMIZE:
Profit Target Levels:
Change any profit % to match your strategy
• Conservative: Lower targets (0.5%, 1%, 2%, 3%, 5%)
• Aggressive: Higher targets (2%, 5%, 10%, 20%, 30%)
Assets to Include:
• Enable/disable Bitcoin
• Enable/disable Copper
• Toggle which inverse assets to track
Display Options:
• Show all targets or just current tier
• Show/hide profit bar
• Show/hide composite line
• Move table position
Stop Loss:
• Set your risk tolerance (default 5%)
• Enable/disable auto-reset on stop loss
Correlation Periods:
• Adjust for your timeframe
• Hourly: 14/30/60
• Daily: 20/50/100
• Weekly: 10/20/50
ALERTS AVAILABLE:
Set alerts for any profit milestone:
Critical Alerts:
• "BUY Signal" - Entry notification
• "5% Profit Target" - First major milestone
• "10% Profit Target" - Decision point
• "Stop Loss Hit" - Risk protection
Optional Alerts:
• 1%, 2%, 3%, 4% - Early confirmations
• 15%, 20%, 25% - Major milestones
• Individual levels for your strategy
BEST TIMEFRAMES:
Daily Chart (Recommended):
Best for swing traders holding 3-10 days
Use default settings (20/50/100 periods)
Target 5-15% profits
4-Hour Chart:
Good for active swing traders
Adjust periods to 14/30/60
Target 3-10% profits
Hourly Chart:
For day traders and scalpers
Use shorter periods (14/30/60)
Target 1-5% profits
Adjust profit levels lower (0.5%, 1%, 2%, 3%)
WHY THIS INDICATOR IS DIFFERENT:
Most indicators tell you WHEN to enter.
This one tells you WHEN TO EXIT with profit.
Most indicators use vague signals.
This one shows EXACT profit percentages.
Most indicators leave exit decisions to you.
This one gives CLEAR, COLOR-CODED milestones.
Most indicators don't track your P/L.
This one shows your profit in text you can't miss.
QUICK START GUIDE:
1. Add indicator to gold chart (XAUUSD, GLD, GC1!)
2. Wait for green triangle (▲) BUY signal
3. Watch your profit grow in the table
4. Exit when you hit YOUR target (5%, 10%, 15%, etc.)
5. Repeat
That's it. Simple. Effective. Profitable.
IMPORTANT NOTES:
• This is for LONG positions only - not for shorting gold
• Position tracking begins only after a BUY signal
• The indicator shows levels - YOU decide when to exit
• Always use stop losses (default 5% is reasonable)
• Past performance doesn't guarantee future results
• Not financial advice - use for educational purposes
PRO TIPS:
Tip 1: Don't get greedy - 10-15% is an excellent profit for most trades
Tip 2: Purple stars (25%+) are RARE - don't wait for them on every trade
Tip 3: The profit bar color change is your visual cue - green→yellow→orange→red
Tip 4: Combine with resistance levels - "10% profit + resistance = exit"
Tip 5: Set alerts for YOUR target level so you never miss it
Tip 6: The giant P/L number in the table removes emotion from decisions
EXAMPLE TRADE:
Day 1: ▲ BUY signal at $2,100
Table shows: Position ✓ IN | Entry: 2,100
Day 2: Current P/L: +1.8%
First green circle appears (1% target hit)
Table tier: "1%"
Day 4: Current P/L: +5.2%
Dark green circle appears (5% target hit)
Profit bar is dark green
Decision point: Exit 50% here?
Day 7: Current P/L: +10.5%
Yellow diamond appears (10% target hit!)
Table shows: +10.5% in yellow text
Decision point: Exit remaining 50%?
Result: Average exit ~7.5% over 7 days. Excellent swing trade!
WORKS ON:
• Gold Spot (XAUUSD)
• Gold Futures (GC1!)
• Gold ETFs (GLD, IAU)
• Any gold instrument
Inverse Assets Tracked:
• DXY (US Dollar Index)
• Real Interest Rates (TIPS)
• US Treasury Yields (2Y, 10Y)
• Bitcoin (optional)
• Copper (optional)
THE BOTTOM LINE:
Stop guessing when to take profits.
Start SEEING your profit levels in real-time.
The indicator shows you the targets.
YOU choose when to cash out.
That's YOUR edge.
Developed for traders who want clear, actionable profit targets instead of vague signals.

Big Trend Catcher: Quad-Gate & VCP & ATR trailing Swing TradeThe Strategy Philosophy
This is designed for Daily Charts to capture the large chunks if not all of a primary trend. It focuses on the "VCP" (Volatility Contraction Pattern), combined with high-grade momentum filtering.
1. How VCP (The Quiet Zone) is Calculated
The script identifies "Volatility Contraction" by measuring the Bollinger Band Width (BBW).
* The Math: It calculates the standard BBW: $(Upper Band - Lower Band) / Mid Band$.
* The "Quiet" Threshold: It compares the current width to its own 50-period Simple Moving Average.
* The Signal: When the current width is narrower than the 50-period average, the stock is in a "Quiet Zone" (represented by the blue background). This indicates energy is coiling for a potential breakout.
2. How Rate of Change (ROC) is Calculated
Unlike a standard ROC, this "Wizard" version uses a smoothed momentum filter to reduce whipsaws:
* Raw ROC: First, it calculates the raw percentage change over 15 bars: $100 x (Close / Close(15) - 1).
* Smoothing: This raw value is then smoothed using a 10-period EMA.
* The Gate: The ROC Gate only turns green when this smoothed value is greater or equal to 0, ensuring the stock has genuine upward velocity before you enter.
3. What the Indicators on the Chart Show
* Yellow Line (20 EMA): Your "Tactical Line." It tracks short-term momentum and acts as a trigger for Phoenix re-entries.
* Blue/Gray Line (100 EMA): Your "Regime Filter." It turns Blue when the trend slope is positive and Gray when negative.
* Thin Gray Outer Bands: These are Bollinger Bands set at 3 Standard Deviations from the 100 EMA. They mark extreme "Climax Zones" where price is statistically overextended.
* Stepped Red/Green Line (ATR Stop): The "Iron Floor." It uses a 20-period ATR with a 3.0 multiplier and an HHV (Highest High Value) lookback to ensure the stop only moves up, never down.
* Yellow Crosses (Gate Wait): These small icons appear above the bars when a signal has been detected but one or more "Wizard Gates" (such as the ROC or 100 EMA Slope) are not yet satisfied, signifying the strategy is waiting for full confirmation.
4. How to Trade This Strategy
* Step 1: The Setup: Look for the Blue Background on the daily chart, signifying a Volatility Contraction.
* Step 2: The Entry: An Initial Entry (Lime Triangle) fires when the price breaks out of the Quiet Zone with a volume spike. This volume must be greater than 1.3 times the 20-period Simple Moving Average of volume to confirm significant buying interest. An entry only occurs when all Quad-Gates (ROC, EMA Slope, Price > ATR) are satisfied.
* Step 3: Pyramiding: If the trend gains "Velocity" (price > 10% from entry), the script will signal a second unit to maximize gains during runaway moves.
* Step 4: The Exit: Sell the entire position if the price closes below the ATR Trailing Stop (Trend Death) or if the 100 EMA trend turns down.
5. The Phoenix Re-entry
If you are stopped out but the stock immediately recovers above the 20 EMA within 10 bars, a Phoenix Entry (Orange Triangle) will fire. This allows you to catch "Power Resumptions" where the initial shakeout was a bear trap.

A Humbled Trader Strategy + ChecklistHumbled Trader Swing Strategy + Checklist
This indicator is a complete swing trading system based on the high-probability strategies popularized by Humbled Trader. It is designed to help traders identify trend breakouts and low-risk momentum pullbacks on the Daily Timeframe.
The script combines trend filtering, automated resistance lines, and specific entry triggers into a single chart overlay, complete with a real-time Strategy Checklist Dashboard to confirm your setups instantly.
🎯 Core Components
Trend Filter (Purple Line): The 200 Simple Moving Average (SMA). This acts as your long-term trend filter. We only look for long trades when the price is above this line.
Momentum Guide (Orange Line): The 8 Exponential Moving Average (EMA). This tracks short-term momentum. In a strong trend, price will "ride" this line. We look to enter when price pulls back to touch this area.
Multi-Month Resistance (Orange Horizontal Line): Automatically plots the highest price over the last X Months (adjustable). This helps you instantly visualize the key level the stock needs to break out from.
Checklist Dashboard: A real-time table that evaluates Trend, Resistance, and Momentum conditions to give you a clear "✅ ENTER", "🚀 GAP UP", or "⏳ WAIT" signal.
🛠 How It Works
This indicator scans for two specific setups:
1. The Daily Gap Up ("GAP" Label) This signal appears when a stock shows strong momentum by gapping up overnight.
Condition: The stock opens at least 3% higher (adjustable) than the previous day's Close AND opens above the previous day's High.
Trend: Must be above the 200 SMA.
Visual: Marked with a green "GAP" label on the chart.
2. The Trend Pullback ("ENTER" Signal) This is a trend-following entry that lets you join an existing move with lower risk.
Condition: The stock is in an uptrend but dips down to touch or test the 8 EMA.
Validation: The candle must show a "dip" (red candle or lower close) to ensure we are buying a pullback, not chasing a top.
Visual: The Dashboard "Action Signal" will turn orange and display "✅ ENTER".
📋 The Checklist Dashboard
Located in the corner of your chart, this table provides a live status report for the current bar:
Trend (> 200 SMA):
🟢 Bullish: Price is in an uptrend. Safe to look for entries.
🔴 Bearish: Price is below the 200 SMA. Stay away.
Above Resistance?:
🟢 Breakout: Price has cleared the multi-month resistance line.
⚪ ---: Price is currently below the key breakout level.
Near 8 EMA?:
🟢 Yes: Price is near the "value zone" (8 EMA) for a potential pullback entry.
Action Signal:
🚀 GAP UP: Strong momentum gap detected.
✅ ENTER: Valid pullback entry detected.
⏳ WAIT: No clear setup found.
⚙️ Settings
Momentum EMA Length: Default is 8. Controls the sensitivity of the pullback line.
Trend SMA Length: Default is 200. The standard for long-term trend filtering.
Gap Up % Threshold: Default is 3.0%. Minimum overnight gap size required to trigger a signal.
Resistance Lookback (Months): Default is 3. The script will look back this many months to find and draw the key resistance line.
Table Position: Move the checklist to any corner of your screen.
⚠️ Disclaimer
This tool is for educational purposes only and does not constitute financial advice. Always manage your risk and use a stop loss.

ORB (x2) by jaXn# ORB (x2) Professional Suite
## 🚀 Unleash the Power of Precision Range Trading
**ORB (x2)** isn't just another breakout indicator—it is a complete **Opening Range Breakout workspace** designed for professional traders who demand flexibility, precision, and chart cleanliness.
Whether you are trading Indices, Forex, or Commodities, the Opening Range is often the most critical level of the day. This suite allows you to master these levels by tracking **two independent ranges** simultaneously, giving you a distinctive edge.
## 🔥 Why choose ORB (x2)?
Most indicators force you to choose one specific time. **ORB (x2)** breaks these limits.
### 🌎 1. Multi-Session Mastery (London & New York)
Trade the world's biggest liquidity pools. Set **ORB 1** for the **London Open** (e.g., 03:00–03:05 EST) and **ORB 2** for the **New York Open** (09:30–09:35 EST). Watch how price reacts to London levels later in the New York session.
### ⏱️ 2. Multi-Strategy Stacking (The "Fractal" Approach)
This is a game-changer for intraday setups. Instead of two different times, track **two different durations** for the *same* open.
* **Setup:** Configure **ORB 1** as the classic **5-minute range** (09:30–09:35).
* **Setup:** Configure **ORB 2** as the statistically significant **15-minute or 30-minute range** (09:30–10:00).
* **Result:** You now see immediate scalping levels *and* major trend reversals levels on the same chart, automatically.
### 🎯 3. "Plot Until" Tech: Keep Your Chart Clean
Sick of lines extending infinitely into the void?
Our exclusive **"Plot Until"** feature separates the signal from the noise. You define exactly when the trade idea invalidates.
* *Example:* Plot the 09:30 levels only until 12:00 (Lunch).
* The script intelligently cuts the lines off at your exact minute, ensuring your chart is ready for the afternoon session without morning clutter.
### ⚡ Precision Engine
We use a dedicated "Precision Timeframe" input. Even if you are viewing a 1-hour or 4-hour chart to see the big picture, ORB (x2) can fetch data from the **1-minute** timeframe to calculate the *exact* high and low of the opening range. No more "repainting" or guessing where the wick was.
## 🛠 Feature Breakdown
* **Dual Independent Engines:** Fully separate Color, Style, Time, and Cutoff settings for both ORB 1 and ORB 2.
* **Absolute Time Cutoff:** Lines obey day boundaries perfectly. A cutoff at 16:00 means 16:00, not "whenever the next bar closes".
* **Style Control:** Visually distinguish between your "Scalp" ORB (e.g., Dotted Lines) and your "Trend" ORB (e.g., Solid Thick Lines).
* **Performance Mode:** Adjustable "Lookback Days" limits history to keep your chart lightning fast.
## 💡 Configuration Examples
**The "Double Barrel" (Standard Stock + Futures)**
* *ORB 1:* `0930-0935` (5 min) - The immediate reaction.
* *ORB 2:* `0930-1000` (30 min) - The institutional trend setter.
**The "Transatlantic" (Forex/Indices)**
* *ORB 1:* `0800-0805` (London Open) - European liquidity.
* *ORB 2:* `1330-1335` (NY Open) - US liquidity injection.
## ⚠️ Disclaimer
Trading involves substantial risk. This tool helps visualize critical price levels but does not guarantee profits. Always combine with proper risk management and your own analysis.
