Adaptive Momentum Deviation Oscillator | QuantMAC
Overview 🎯
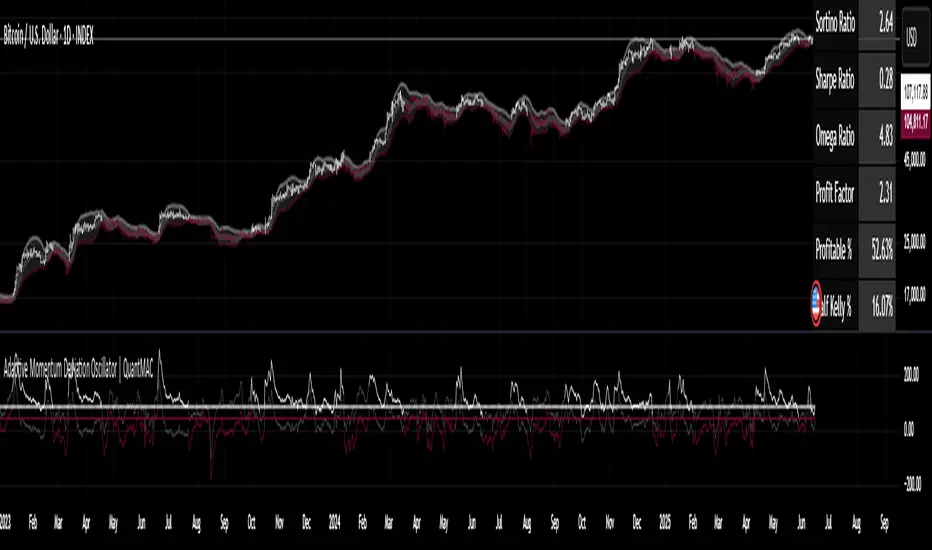
The Adaptive Momentum Deviation Oscillator (AMDO) is an advanced technical analysis indicator that combines the power of Bollinger Bands with adaptive momentum calculations to identify optimal entry and exit points in financial markets. This sophisticated oscillator creates dynamic bands that adapt to market volatility while providing clear visual signals for both trending and ranging market conditions.
How It Works 🔧
Core Methodology
The AMDO employs a sophisticated multi-layered approach to market analysis through four distinct phases:
- Bollinger Band Foundation: The indicator begins by establishing a volatility baseline using traditional Bollinger Bands. These bands are calculated using a simple moving average as the center line, with upper and lower bands positioned at a specific number of standard deviations away from this centerline. The distance between these bands expands and contracts based on market volatility, creating a dynamic envelope around price action.
- BB% Normalization Process: The raw price data is then transformed into a normalized percentage format that represents where the current price sits within the Bollinger Band envelope. When price is at the lower band, this percentage reads 0%; at the upper band, it reads 100%. This normalization allows for consistent comparison across different timeframes and price levels, creating a standardized oscillator that oscillates between extreme values.
- Adaptive Momentum Band Construction: The normalized BB% values undergo a secondary volatility analysis where their own standard deviation is calculated over a specified period. This creates "bands around the bands" - upper and lower boundaries that adapt to the volatility of the normalized price position itself. These adaptive bands expand during periods of high momentum volatility and contract during consolidation phases.
- Intelligent Signal Synthesis: The final layer combines the adaptive momentum bands with user-defined threshold levels to create a sophisticated trigger system. The indicator monitors when the dynamic bands cross above or below these thresholds, filtering out noise while capturing significant momentum shifts. This creates a dual-confirmation system where both volatility adaptation and threshold breaches must align for signal generation.
Key Components 🛠️
Adaptive Momentum Bands 📈
- Dynamic Volatility Response: These bands automatically widen during periods of high momentum volatility and narrow during consolidation phases. Unlike fixed oscillator boundaries, they continuously recalibrate based on recent price behavior within the Bollinger Band framework.
- Dual-Layer Calculation: The bands are derived from the volatility of the normalized price position itself, creating a "volatility of volatility" measurement. This provides early warning signals when momentum characteristics are changing, even before price breakouts occur.
- State-Aware Visualization: The bands employ intelligent color coding that transitions between active and neutral states based on their interaction with threshold levels. Active states indicate high-probability momentum conditions, while neutral states suggest consolidation or indecision.
- Momentum Persistence Tracking: The bands maintain memory of recent momentum characteristics, allowing them to distinguish between genuine momentum shifts and temporary price spikes or dips.
Threshold Levels 🎚️
- Statistical Significance Boundaries: The threshold levels (default 83 for long, 40 for short) are positioned to capture statistically significant momentum events while filtering out market noise. These levels represent points where momentum probability shifts meaningfully in favor of directional moves.
- Asymmetric Design Philosophy: The intentional asymmetry between long and short thresholds (83 vs 40) reflects the natural upward bias of many financial markets and the different risk/reward profiles of long versus short positions.
- Contextual Sensitivity: The thresholds work in conjunction with the adaptive bands to create context-sensitive triggers. A threshold breach is only meaningful when it occurs in the proper sequence with band interactions.
- Risk-Adjusted Positioning: The threshold levels are calibrated to provide favorable risk-adjusted entry points, considering both the probability of success and the potential magnitude of subsequent moves.
Bollinger Bands Overlay 📊
- Multi-Timeframe Context: The price chart overlay provides essential context by showing traditional Bollinger Bands alongside the oscillator. This dual perspective allows traders to see both the absolute price position and the momentum characteristics simultaneously.
- Support/Resistance Identification: The filled band area creates a visual representation of dynamic support and resistance levels. Price interaction with these bands provides additional confirmation for oscillator signals.
- Volatility Environment Assessment: The width and slope of the bands offer immediate visual feedback about the current volatility environment, helping traders adjust their expectations and risk management accordingly.
- Confluence Analysis: The overlay enables traders to identify confluence between price action at Bollinger Band levels and oscillator signals, creating higher-probability trade setups.
Signal Generation ⚡
The AMDO generates signals through precise mathematical crossover events:
Long Signals 🟢
- Momentum Accumulation Detection: Long signals are generated when the lower adaptive momentum band crosses above the 83 threshold, indicating that downside momentum has exhausted and bullish momentum is beginning to accumulate. This represents a shift from defensive to offensive market posture.
- Statistical Edge Confirmation: The crossing event occurs only when momentum characteristics have shifted sufficiently to provide a statistical edge for long positions. The adaptive nature ensures the signal quality remains consistent across different market volatility regimes.
- Visual State Synchronization: Upon signal generation, the entire indicator ecosystem shifts to a bullish state - bar colors change, band states update, and the visual hierarchy emphasizes the long bias until conditions change.
- Momentum Persistence Validation: The signal incorporates momentum persistence analysis to distinguish between genuine trend starts and false breakouts, reducing whipsaw trades in choppy market conditions.
Short Signals 🔴
- Momentum Exhaustion Recognition: Short signals trigger when the upper adaptive momentum band crosses below the 40 threshold, signaling that bullish momentum has peaked and bearish momentum is emerging. This asymmetric threshold reflects the different dynamics of bullish versus bearish market phases.
- Volatility-Adjusted Timing: The adaptive band system ensures that short signals are generated with appropriate timing regardless of the underlying volatility environment, maintaining signal quality in both high and low volatility conditions.
- Regime-Aware Activation: Short signals are only active in Long/Short trading mode, recognizing that not all trading strategies benefit from short positions. The indicator adapts its behavior based on the selected trading approach.
- Risk-Calibrated Thresholds: The 40 threshold is specifically calibrated to capture meaningful bearish momentum shifts while accounting for the higher risk typically associated with short positions.
Cash Signals 💰
- Defensive Positioning Logic: In Long/Cash mode, cash signals are generated when short conditions are met, allowing traders to move to a defensive cash position rather than taking on short exposure. This preserves capital during unfavorable market conditions.
- Risk Mitigation Strategy: Cash signals represent a risk-off approach that removes market exposure when momentum conditions favor the short side, protecting long-biased portfolios from adverse market movements.
- Opportunity Cost Optimization: The cash position allows traders to avoid negative returns while maintaining flexibility to re-enter long positions when momentum conditions improve, optimizing the risk-adjusted return profile.
Features & Customization ⚙️
Color Schemes 🎨
- 9 pre-built color schemes (Classic through Classic9)
- Custom color override option
- Dynamic color changes based on signal states
Trading Modes 📈
- Long/Short: Full bidirectional trading capability
- Long/Cash: Long-only strategy with cash positions
Performance Metrics 📊
The indicator includes a comprehensive suite of advanced performance analytics that provide deep insights into strategy effectiveness:
Risk-Adjusted Return Metrics
- Sortino Ratio: Measures returns relative to downside deviation only, providing a more accurate assessment of risk-adjusted performance by focusing on harmful volatility rather than total volatility. This metric is particularly valuable for asymmetric return distributions.
- Sharpe Ratio: Calculates excess return per unit of total risk, offering a standardized measure of risk-adjusted performance that allows for comparison across different strategies and timeframes.
- Omega Ratio: Employs probability-weighted analysis to compare the likelihood and magnitude of gains versus losses, providing insights into the overall shape of the return distribution and tail risk characteristics.
Drawdown and Risk Analysis
- Maximum Drawdown: Tracks the largest peak-to-trough equity decline, providing crucial information about the worst-case scenario and helping traders understand the emotional and financial stress they might encounter.
- Dynamic Drawdown Monitoring: Continuously updates drawdown calculations in real-time, allowing traders to monitor current drawdown levels relative to historical maximums.
Trade Statistics and Profitability
- Profit Factor Analysis: Compares gross profits to gross losses, revealing the efficiency of the trading approach and the relationship between winning and losing trades.
- Win Rate Calculation: Provides the percentage of profitable trades, which must be interpreted in conjunction with profit factor and average trade size for meaningful analysis.
- Trade Frequency Tracking: Monitors total trade count to assess strategy turnover and transaction cost implications.
Position Sizing Guidance
- Half Kelly Percentage: Calculates optimal position sizing based on Kelly Criterion methodology, then applies a conservative 50% reduction to account for parameter uncertainty and reduce volatility. This provides mathematically-based position sizing guidance that balances growth with risk management.
Parameters & Settings 🔧
BMD Settings
- Base Length: Period for Bollinger Band calculation (default: 10)
- Source: Price data source (default: close)
- Standard Deviation Length: Period for volatility calculation (default: 35)
- SD Multiplier: Bollinger Band width multiplier (default: 1.0)
- BB% Multiplier: Scaling factor for BB% calculation (default: 100)
Signal Thresholds 🎯
- Long Threshold: Trigger level for long signals (default: 83)
- Short Threshold: Trigger level for short signals (default: 40)
Display Options 🖥️
- Toggleable metrics table with 6 position options
- Customizable date range limiter
- Multiple visual elements for comprehensive analysis
Use Cases & Applications 💡
Trend Following
- Identifies momentum shifts in trending markets
- Provides early entry signals during trend continuations
- Adaptive bands adjust to changing volatility conditions
Mean Reversion
- Detects oversold/overbought conditions
- Signals potential reversal points
- Works effectively in ranging markets
Risk Management
- Built-in performance metrics for strategy evaluation
- Half Kelly percentage for position sizing guidance
- Maximum drawdown monitoring
Advantages ✅
- Adaptive Nature: Automatically adjusts to market volatility
- Dual Display: Oscillator and price chart components work together
- Comprehensive Metrics: Built-in performance analysis
- Flexible Trading Modes: Supports different trading strategies
- Visual Clarity: Color-coded signals and states
- Customizable: Extensive parameter adjustment options
Important Considerations ⚠️
- This indicator is designed for educational and analysis purposes
- Should be used in conjunction with other technical analysis tools
- Proper risk management is essential when trading
- Backtest thoroughly before implementing in live trading
- Market conditions can change rapidly, affecting indicator performance
Disclaimer ⚠️
Past performance is not indicative of future results. Trading involves substantial risk of loss and is not suitable for all investors. The information provided by this indicator should not be considered as financial advice. Always conduct your own research.
Yalnızca davetli komut dosyası
Bu komut dosyasına yalnızca yazar tarafından onaylanan kullanıcılar erişebilir. Kullanmak için izin istemeniz ve almanız gerekir. Bu genellikle ödeme yapıldıktan sonra verilir. Daha fazla ayrıntı için aşağıdaki yazarın talimatlarını izleyin veya doğrudan Quant_MAC ile iletişime geçin.
TradingView, yazarına tamamen güvenmediğiniz ve nasıl çalıştığını anlamadığınız sürece bir komut dosyası için ödeme yapmanızı veya kullanmanızı TAVSİYE ETMEZ. Ayrıca topluluk komut dosyalarımızda ücretsiz, açık kaynaklı alternatifler bulabilirsiniz.
Yazarın talimatları
Feragatname
Yalnızca davetli komut dosyası
Bu komut dosyasına yalnızca yazar tarafından onaylanan kullanıcılar erişebilir. Kullanmak için izin istemeniz ve almanız gerekir. Bu genellikle ödeme yapıldıktan sonra verilir. Daha fazla ayrıntı için aşağıdaki yazarın talimatlarını izleyin veya doğrudan Quant_MAC ile iletişime geçin.
TradingView, yazarına tamamen güvenmediğiniz ve nasıl çalıştığını anlamadığınız sürece bir komut dosyası için ödeme yapmanızı veya kullanmanızı TAVSİYE ETMEZ. Ayrıca topluluk komut dosyalarımızda ücretsiz, açık kaynaklı alternatifler bulabilirsiniz.